Not logged inAmerican Welding Society Forum
Forum AWS Website Help Search Login
Up Topic Welding Industry / Technical Discussions / B31.3 para 323.3.4
- - By SFIENG (**) Date 11-04-2008 16:28
Hi all,

Can I get an interpretation on a sentence from para 323.3.4(a) and (b) of B31.3-2006?

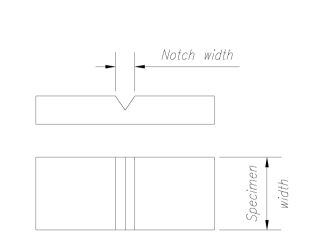
What is meant by "Where the largest attainable Charpy V-notch specimen has a width along the the notch of at least....."  Is the measured width the notch width or is it the specimen width?

Any help would be appreciated!
Parent - - By MBSims (****) Date 11-04-2008 17:09
Specimen width.
Parent - - By SFIENG (**) Date 11-04-2008 17:23 Edited 11-04-2008 17:32
Thanks MBSims,

Then my questions are....

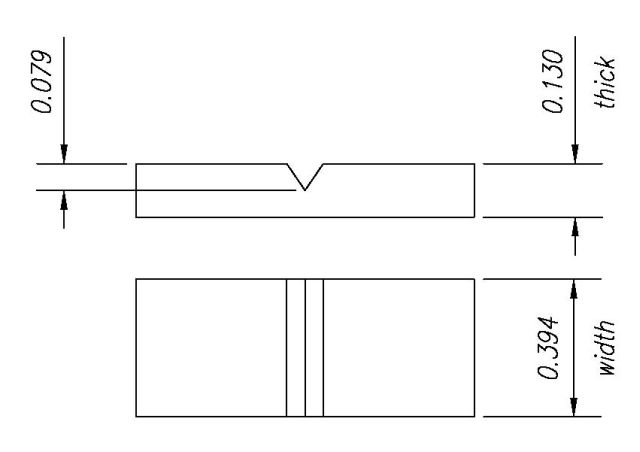
1)   Then per 323.3.4(a), If my specimen is full size standard bar (10mm / 0.394") wide x 0.394" thick then temperature reduction during testing is not required to qualify the design temperature. 

2)   Then per 323.3.4(b), If my specimen is full size standard bar (10mm / 0.394") wide x 0.130" thick then temperature reduction during testing is not required to qualify the design temperature.  (0.394" is greater then 80% of 0.130")
Parent - - By js55 (*****) Date 11-04-2008 18:30
If you've reduced your specimen to .130" thick you need to compensate with temp reduction. However, if you add 1/1000 of an inch to your specimen you only need to reduce your test temp 35deg F instead of 40degF.
Parent - - By SFIENG (**) Date 11-04-2008 18:38
js55,

Thanks for your response.  How did you arrive at this?  Para 323.3.4(b) states that "Where the largest attainable Charpy V-notch specimen has a width of along the notch of at least 80% of the material thickness, the charpy test of such a specimen shall be conducted at a temperature not higher than the design minimum design temperature".  Where are the words that state otherwise?
Parent - - By js55 (*****) Date 11-04-2008 19:27
I didn't see your material thickness posted.
And if I understand your question correctly, if the width along the notch of your specimen is 80% or more of the material thickness (for materials < 10mm T) then you do not have to use temp reduction.
Parent - - By SFIENG (**) Date 11-04-2008 19:33 Edited 11-04-2008 20:32
I have two specimen sizes that were tested

1)   From a 1/2" plate coupon a full size standard bar 0.394" wide x 0.394" thick specimen was tested

2)   From a 1/4" plate coupon a full size standard bar 0.394" wide x 0.130" thick specimen was tested.

So, I am interpreting 323.3.4(a)/(b) to not require a temperature reduction in these instances...... correct?
Parent - - By js55 (*****) Date 11-04-2008 21:09
.130 / .250 = .52 or 52%
I'd say you have to use temp reduction.
Parent - - By SFIENG (**) Date 11-04-2008 21:54
What is the bases of the last equation of .130 / .250 = .52 or 52%  Can you tie that to a code reference please....

So let me regroup a little.....

Specimen in question is from a ¼" plate and was tested at the size of 0.394" wide x 0.130" thick. 

Per 323.3.4(b) (For materials with thickness less that 0.394") the first sentence states, "Where the largest attainable Charpy V-notch specimen has a width of along the notch of at least 80% of the material thickness, the charpy test of such a specimen shall be conducted at a temperature not higher than the design minimum temperature."   The specimen is 0.394" wide along the notch which is greater than 80% of the material thickness of either 0.130 as tested or ¼" nominal so therefore no reduction is required?

Per Table 323.3.4 states "Actual Material Thickness or Charpy Impact Specimen Width Along the Notch" which in this case is 0.394" wide, so therefore no reduction is required?
Parent - - By js55 (*****) Date 11-04-2008 22:16
The equation is used just to figure the percentage of specimen width to base metal width.
The dimension in question is the "width along the notch", I was assuming the .130 dimension was the width along the notch dimension. If your testing on 1/4" plate and your "width along the notch" is .394" you put your notch in the wrong orientation.
The other dimension has to be maintained at 10mm (3/8") unless material shape does not allow(323.3.3). If you're testing with pipe or plate the other dimension has to remain 10mm because these shapes will allow it.
The notch has to be normal to the plate surface which means the "width along the notch" cannot possibly be > than 1/4" with 1/4" plate in order to comply.
Parent - - By SFIENG (**) Date 11-04-2008 23:15
I am getting clarification from our lab on the orientation of the specimen tested.  I will follow-up when I get the information

I appreciate the time you are spending on this!
Parent - - By js55 (*****) Date 11-05-2008 13:19
I am almost certain your orientation is going to be proper. The notch depth is .079" so with your .130" dimension you would have very little material left over. My meaning was that instead of considering it from the full thickness dimension I think you need to consider that you haven't acheived the necessary 80%.
Parent - - By SFIENG (**) Date 11-05-2008 14:03
I understand what you are saying but I don't see where I can match the words of the code to your interpretation.  Can you point it out?

Do you interpret the width across the notch to be the 0.394" dimension and the thickness being the 0.130" dimension on the specimen?  If so, why wouldn't the formula be 0.130" (thickness of specimen) x 0.8 (80%) = 0.104", where 0.394" (specimen width) is greater than 0.104", so therefore meets 323.3.4 with out temperature reduction required.   
Parent - - By js55 (*****) Date 11-05-2008 14:36
Because the notch has to be oriented normal to the material surface, the width across the notch essentially IS the thickness.
In your case the width across the notch is not the thickness and therefore is invalid per 31.3.
The reduction of thickness takes place on the surface perpendicular to the notched surface. In this way no matter how much you reduce the thickness of the specimen the thickness resisting the hammer on the charpy machine is the same.
On other words, you cannot have 1/4" thick material with a full width (3/8") notch and still comply with 31.3, unles you can somehow invoke the idea that the material does not allow such dimensions. If your testing on plate or pipe this will not be the case. Even on small diameter pipe the problem will not be the dimension of the surface perpendicluar to the notch, it will be the length of the specimen.
The diagram you have posted is, in my opinion, non compliant
Parent - - By SFIENG (**) Date 11-05-2008 16:44
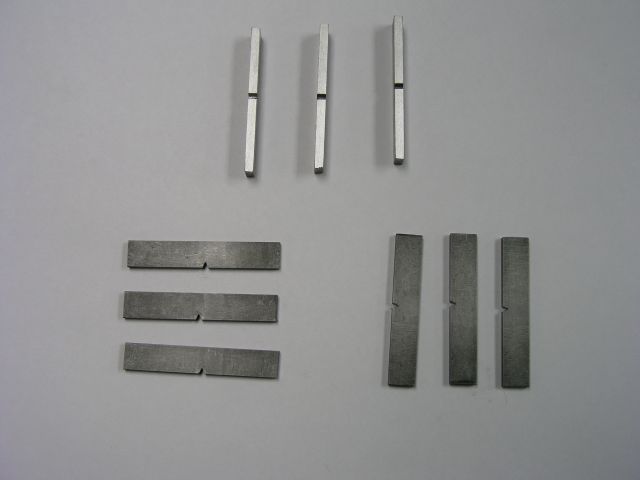
I have received the photo of the specimens from the test lab.  As you can see the photos don't match the previous sketch that I posted.  So........the width along the notch is 0.130" and the thickness is 0.394"?  Which paragraph (423.3.4 (a) or (b)) does this fall into then?
Parent - By js55 (*****) Date 11-05-2008 18:50
From the appearance it looks like the lab did them right. You have a width along the notch of .130" which is 52% of the material thickness. Your problem is the largest obtainable specimen is actually 1/4" since its flat plate material. Not .130". Why did you reduce the size?
You could have avoided the problems of 323.3.4(b) by making your specimen 1/4" In which case your notch width would be 100% of the material thickness.
Up Topic Welding Industry / Technical Discussions / B31.3 para 323.3.4

Powered by mwForum 2.29.2 © 1999-2013 Markus Wichitill