Not logged inAmerican Welding Society Forum
Forum AWS Website Help Search Login
Up Topic Welding Industry / Inspection & Qualification / Aluminum, Side Bends VS Root and Face
- - By pipewelder_1999 (****) Date 11-12-2009 15:55
Thought I posted this already but couldn't find it.

Recently performed bend tests on a 3/8" thick 5086 plate of unknown temper. 5356 Filler Metal. 4 Side bends went fine. Also did face and root bends as I had extra material and one code needed face/roots for that thickness.

Both Bend thicknesses were 3/8", bent around the same radius on the same bender. The only difference was the speed . The root and face were bent slower.

I Used a Harbor Freight Benchtop Bender that worked great but required a little more effort on the 1 1/2" x 3/8" strips.

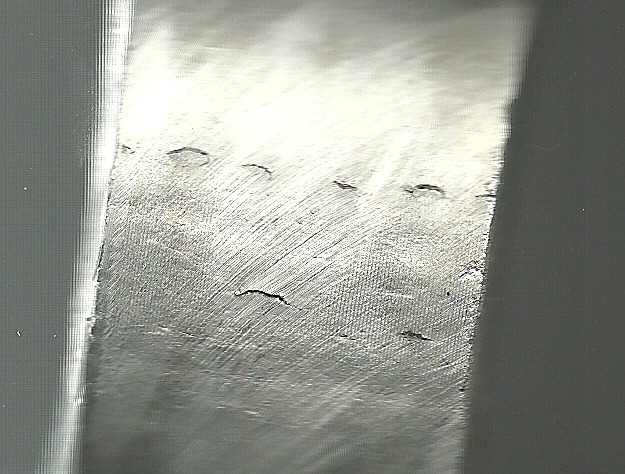
The issue is, the side bends were all fine. The two root and face bends failed along the weld metal base metal interface.

Any ideas why there would be such a difference. On the root bend, the overall length of open discontinuities totalled 3/4" with two of those being 1/16" and all other 1/8th or longer. The face was similar.

The side bend did not exhibit ANY open discontinuities.

Any ideas or comments are welcome.
Parent - - By 803056 (*****) Date 11-13-2009 20:29
My guess would be that you were very lucky with the side bends.

The cracks appear to be due to some incomplete fusion between the base metal and the weld bead and between weld beads. Aluminum oxides melts at a higher temperture than the aluminum and it has nearly the same density, so it doesn't float out of the weld puddle. In sufficient cleaning between weld beads can cause the type of problem seen in the photograph.

Best regards - Al
Parent - - By pipewelder_1999 (****) Date 11-13-2009 20:53
Very lucky. I did 4 side bends. All good. Just the root and face bend failed. This was done with a pulse on pulse option and wonder if that was a factor.
Parent - - By ssbn727 (*****) Date 11-14-2009 08:02
Hi Gerald!

What was the position for this test?

Respectfully,
Henry
Parent - By pipewelder_1999 (****) Date 11-14-2009 18:39
It was vertical.
Parent - By Lawrence (*****) Date 11-16-2009 05:22 Edited 11-16-2009 05:25
Gerald,

I can't really see a reason for pulse on pulse for a multi-pass weld..  The whole idea behind pulse on pulse is to make current reductions in such a way as ripples will appear on the bead face without operator manipulation... Same travel speed... ripples..  Lower modulation makes fewer ripples for a given spped..  -10 to +10.  The regular pulsation proggie would provide a better (more consistant) heat input for multi-pass welds.  In my *opinion*.  I like pulse on pulse for thin (>1/8") fillets for cosmetic reasons only.

I think you would find the stock pulse program in your Lincoln to provide equal or superior vertical operator control when compared to the pulse on pulse. Again I just can't see the reason to run pulse on pulse if you are burrying or stacking the beads.

The defects do look to be rather ... um... patterned.. Like an issue on either a high or low pulse.   I'm assuming stringers but if those scalloped defects might be the sign of a wide weave.. That could be a problem too.

Interpass brushing like Al mentioned... And better polish on the area to be convex before bending.. Don't like the tool marks even though they are not in a terribly bad direction.
Parent - - By Mikeqc1 (****) Date 11-13-2009 23:50
was it ground or sumthin after the bend?
Parent - - By pipewelder_1999 (****) Date 11-14-2009 18:45
They were ground before bending.
Parent - By 803056 (*****) Date 11-16-2009 22:55
There is no need to run pulse on anything but aluminum that is less than 1/8 inch thick regardless of the position. The thermal conductivity of aluminum requires heat, the more the better (to a point). I've qualified welding procedures and welders on 1/8 inch thick 6061-T6 with standard spray mode transfer without backing. I wouldn't want to weld anything less than 1/8 inch without backing with spray mode, perhaps that is where the pulse spray transfer would show some advantage.

Looking back at the photograph, I am still of the mind that it is related to oxides. If not oxides, then perhaps liquation cracking. Without access to my references to see what the liquidus-solidus temperature spread is for the filler metal, it hard to say the words liquation cracking. The wider the range of L-S the more likely LC is the culprit. Then there is the issue of dilution and groove details; narrow groove, more dilution, possibly wider L-S, higher potential for LC. Sometimes the remaining liquid will back fill the LC, but they serve as crack initiators when you perform the bend test, similar to oxide inclusions.

Best regards - Al
Up Topic Welding Industry / Inspection & Qualification / Aluminum, Side Bends VS Root and Face

Powered by mwForum 2.29.2 © 1999-2013 Markus Wichitill