Not logged inAmerican Welding Society Forum
Forum AWS Website Help Search Login
Up Topic Welding Industry / Inspection & Qualification / UT to D1.1 Question
- - By eekpod (****) Date 08-26-2010 17:30
Question, I have a third party inspector who says he can't UT shearwave this connection from one side, that he is required to UT it from both sides.
COuld someone familier with UT shearwave to D1.1 tell me your thoughts?
Material is 3/4" thick, and 5" wide, or to say it another way from the toe of the cover pass to the edge of the material is 5", the weld is about 3' long.  It's a full pen weld w/ backgouge. 
snail wedge w/ 45 degree transducer.
Thanks
Parent - - By jwright650 (*****) Date 08-26-2010 17:57
You would have the best chance with that 45°, but 70° is more common on that thickness material...however, you don't have enough room to back up into the 2nd and 3rd leg with the 70° due to the plate being so short. With the 45° you can get all 3 legs within 2.25" plus a little for wiggle room.

What type of joint is it? Butt, T, Corner?
Parent - - By eekpod (****) Date 08-26-2010 18:15
it would be a T joint.  It's a split WT full pen welded to the top flange of another W shape.
Parent - - By jwright650 (*****) Date 08-26-2010 18:37
"says he can't UT shearwave this connection from one side, that he is required to UT it from both sides."-quote

Does he mean from one side of the joint(weld axis) or one side of the material?

You can't always get to both side of the weld axis either and if you look at Fig. 6.21 Note 2, it says to test from both sides of the weld axis where ever mechanically possible, so it is giving you an out if you can't get to both sides of the weld axis.
Parent - - By eekpod (****) Date 08-26-2010 19:52
he doesn't have complete access to both sides of the weld.  We put stiffiners on one side, they are not welded in, they are just tacked in, and he says we have to remove them.  When I said "can't you UT from the other side", (the root side, casue the stiffiners are on the cover side) he says no, he needs to do both sides (cover and backgouge root side).
Now I need to confirm the 45 degree angle.  You got me wondering, and I can't remember if I get the 45 degree bevel mixed up with the wedge degree.  Maybe he is using 70, I know he has both.  Tomorrow.
Parent - - By 803056 (*****) Date 08-26-2010 20:22 Edited 08-26-2010 20:30
He should be using a 70 degree wedge if D1.1 is the applicable code. Tables 6.2 and 6.3 for static and cyclic nontubular conditions specifies a 70 degree wedge. A quick review of Table 6.7 depicts the surfaces from which the testing is to be performed and what wedge is required. Once again, only a 70 degree wedge is required for 3/4 inch thick material. Per the table, the examination is to be performed in the first leg.

Acceptance or rejection is based on the ratings obtained using the wedge specified in the tables listed above for the thickness of the joint being tested. Ratings obtained using wedges other than the ones specified are not to be used for accept/reject per an interpretation by the D1.1 committee if my memory serves me correctly.

Best regards -Al
Parent - - By eekpod (****) Date 08-27-2010 10:25
So if he can only use the first leg, then he needs acces to both sides of the part, which he doesn't have complete access now cause we put some stiffiners in the way (tacked not welded) on the first side.
Parent - - By 803056 (*****) Date 08-27-2010 14:04 Edited 08-27-2010 14:14
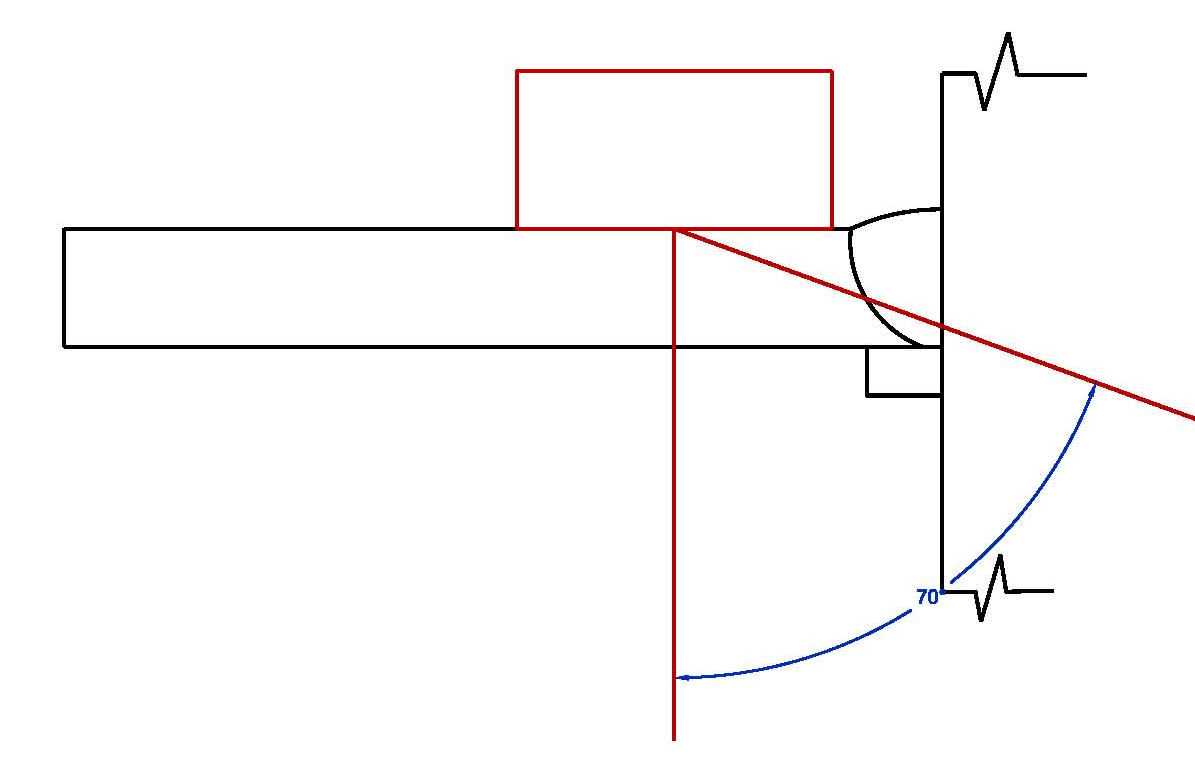
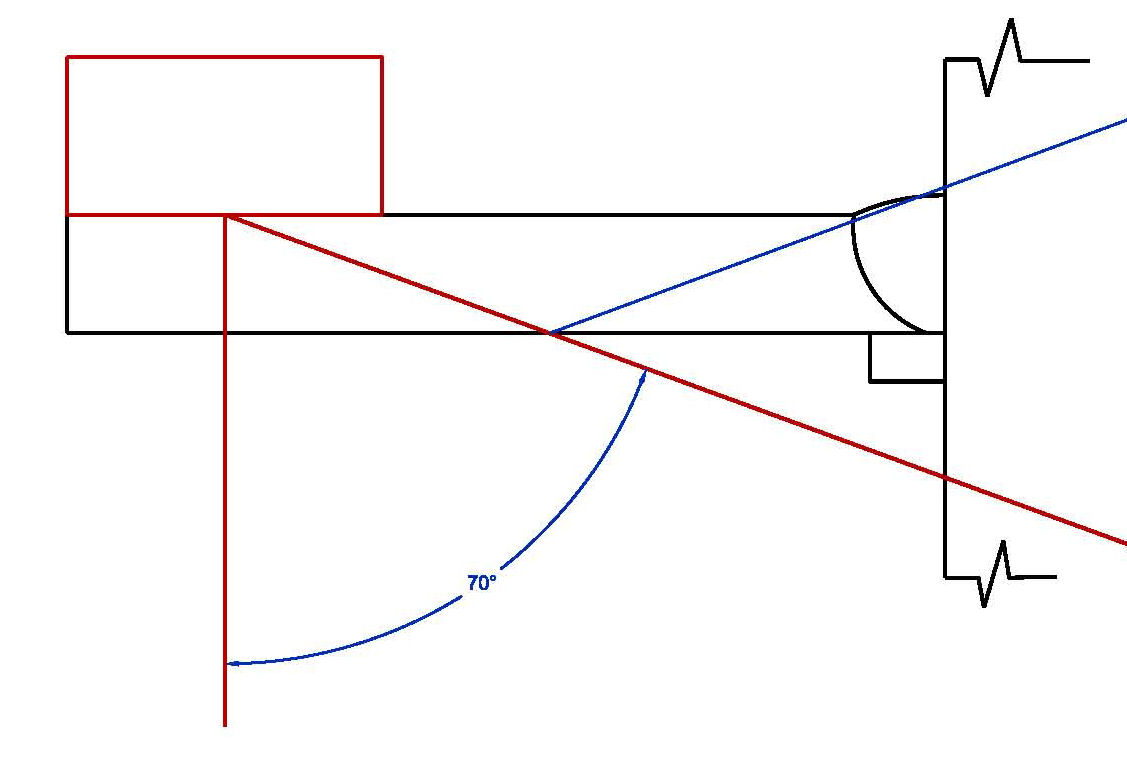
Here is a graphically solution to your problem. The sketch is drawn to scale. The transducer is assumed to be two inches in length and the sound beam emanates from the center point along the bottom of the wedge.

As you can see, the transducer is too long to scan the full thickness in the first leg. The leading edge of the transducer bumps into the toe of the weld, so only the lower 1/3 of the weld volume is interrogated. Moving the transducer to the far end of the member (five inches from the weld toe according to your earlier post) will allow the inspector to interrogate the full thickness of the weld using the second leg. That should be sufficient to meet the code requirements.

The TPI is being cautious in his attempt to interrogate the weld from two surfaces to insure complete coverage and to eliminate any misinterpretations that may be caused by the backing bar. Oops, I see the groove was back gouged and no backing bar was used. Still, there appears to be sufficient length to permit the inspector to examine the entire weld from the one surface if the dimensions are as you listed them and the assumed length of the transducer is reasonable.

If the embedded sketches do not represent the actual conditions, a new sketch using more accurate or a better description of the actual conditions may help you visualize what the UT inspector is attempting to do.

Best regards - Al
Parent - - By eekpod (****) Date 08-27-2010 17:27
Wow, thank you for that sketch and the time it took to draw it up.  So in otherwords it could be done from one side, but he's covering his ass, and making me do extra work to get this done.
Parent - - By 803056 (*****) Date 08-27-2010 17:33
In so many words, yes.

Al
Parent - - By mraschis (*) Date 08-31-2010 21:19
Where possible, all examinations shall be made from Face A and in Leg 1, Unless otherwise specified in Table 6.7. Typ. welded moment connections beam to column flange (TC-U4a) are UT from face A only.
Parent - - By trapdoor (**) Date 09-01-2010 17:07 Edited 09-01-2010 17:10
You also have to subtract the length that the cable sticks out in the back since there will be a WT flange at the rear of the scanning surface. For those situations I use a 90 degree adapter to help you get the transducer as far away from the weld as I can. Of course you have to calibrate your sensativity with the adapter on. If the WT flange does not allow you to scan the whole weld then you would have to scan from both sides, grind the weld flat (probably not practical), or request relief from the engineer.
Parent - By mroach (**) Date 09-06-2010 05:45
Looks like he can get full coverage from one face with a 70 degree shoe and still meet code requirements. I calculated the full skip distance at 4.121". At 2.061" he is at the bottom of the first leg which is in the bottom corner of Al's illustration. If you didn't have enough surface area to get the skip distance on the second leg to examine the top quarter I would tend to agree with the TPI but that doesn't appear to be the case. With this particular joint it's more or less the UT inspectors choice as to which face is "A" or "B"  so simply call the opposite face with the stiffener face "B".
Parent - By DAYANARA (**) Date 03-10-2014 21:33
Dear Al.

Please I like your comment.
I have the UT shear wave accordance with AWS D1.1, the owner inspector said me "accordace con table 6.7 note 5 cyclically loaded shall be UT it from both sides!!!!!!
Material base is 1in and 1-1/2in, Butt joint double V groove weld and 70 degree transducer.

Thank you for help me.
Up Topic Welding Industry / Inspection & Qualification / UT to D1.1 Question

Powered by mwForum 2.29.2 © 1999-2013 Markus Wichitill