Not logged inAmerican Welding Society Forum
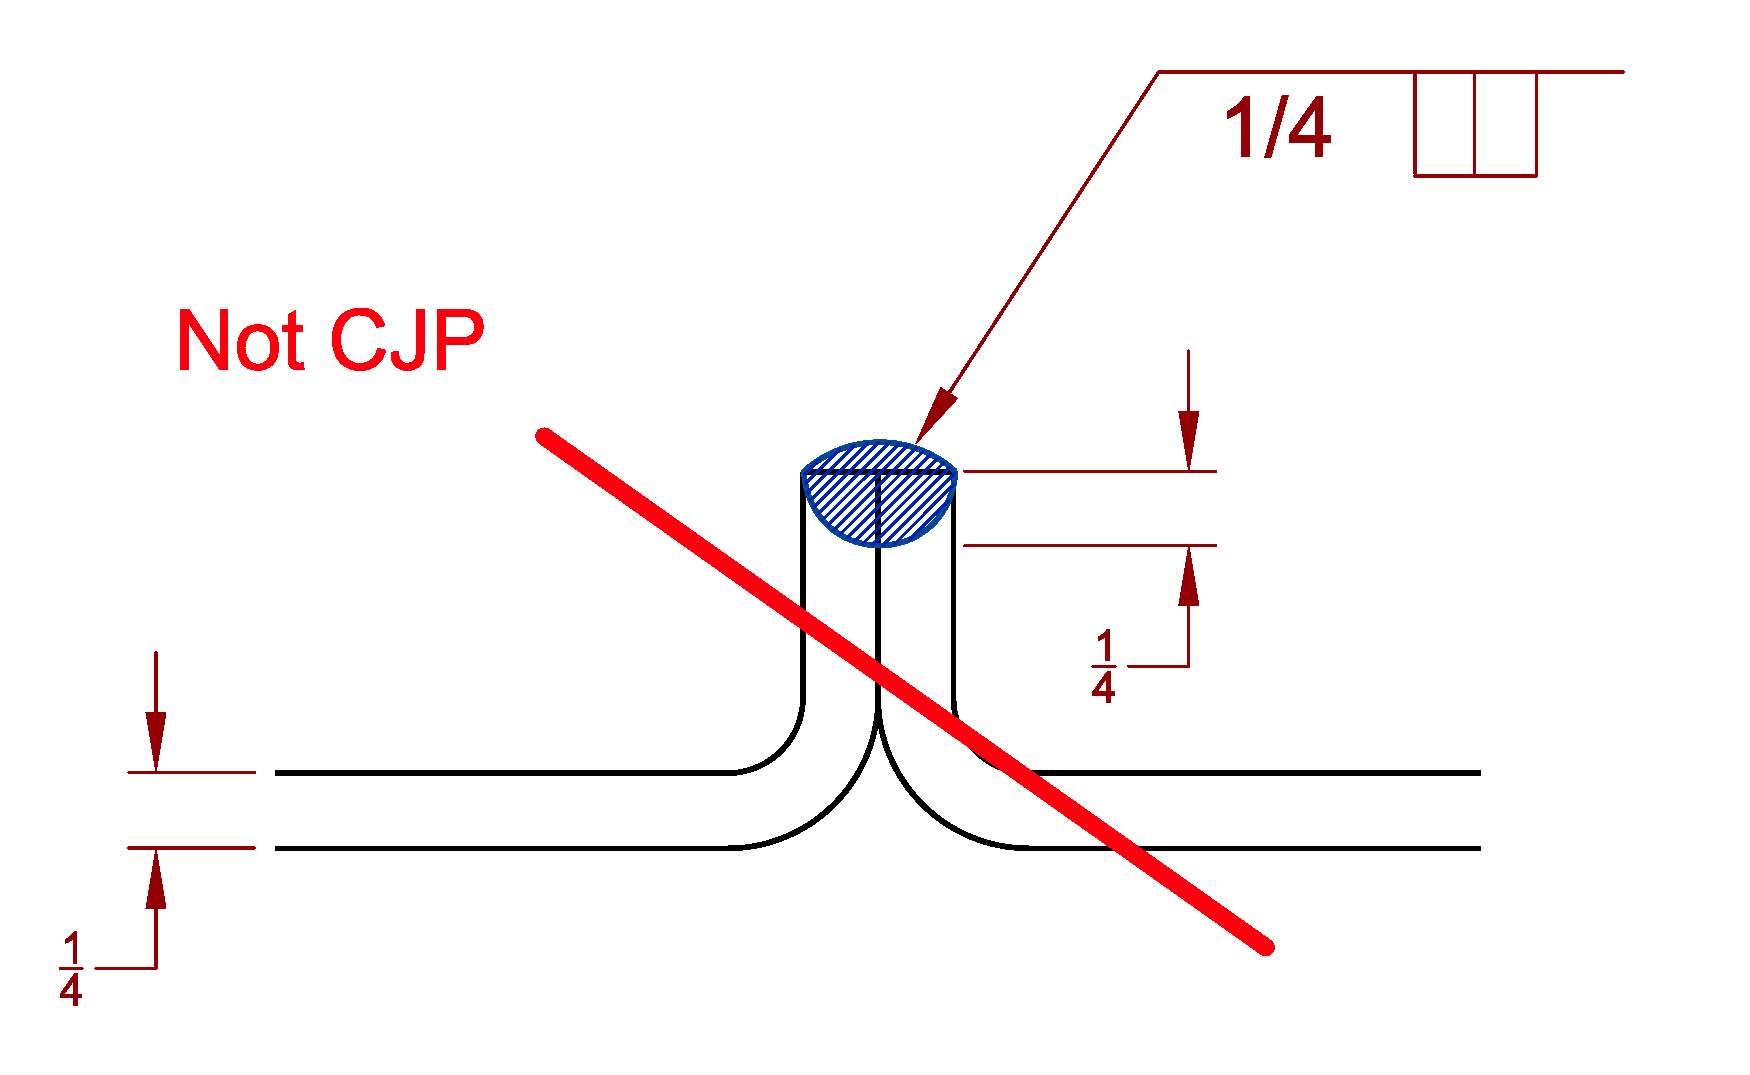
Hello all I have a question that has stirred some debate this person says this and another says that. If Weld symbol shows a (1/4) on quarter inch thick wall tube does that mean it is Complete joint penatration or Partial Joint Penatration?? I think it should be complete penatration but thats just my opinion. Thanks for all your input.
This is a very perplexing situation.
There are a couple ways to figure that out.
Check the contract drawings that referance that part and see if the weld symbol says "CJP" or PJP in the tail of the symbol.
Or have the/ an engineer determine what is required.
I have had this a few times and that's always my the first thing I say to myself , which is it. Depending on the joint configuration that will automatically lead you in one direction, but we're just talking in general for this discussion.
I'd rather see the symbol before commenting :)
Can you post a sketch of the symbol?
Good call Lawrence. It could be a fillet weld symbol for all we know.
That being said, if the welding symbol calls for a groove weld; is the 1/4 in brackets like this: (1/4), or is it all alone, standing by itself like this: 1/4?
The latter indicated the depth of the groove preparation is 1/4 inch deep as measured from the surface from which the weld is deposited. If it is the former, it is the required joint penetration from the respective side of the weld joint.
Depending on the groove angle and the welding standard used, the 1/4 by itself indicates the depth of the groove preparation and can indicate the welded joint is complete joint penetration (per AWS D1.1 as an example). If you are interpreting the symbol in accordance with AWS A2.4 the weld size is required to be equal to the depth of preparation.
If the welding symbols lists the 1/4 in brackets like so: (1/4), the 1/4 indicates the minimum joint penetration, i.e., weld size if it is a single sided weld. Since you said the material is only 1/4 inch thick, I would interpret the groove weld as being CJP if you are welding in accordance with D1.1 since the weld size is equal to the material thickness. Even if you are not welding to D1.1, if the weld size is equal to the material thickness you have a complete joint penetration groove weld regardless of the depth or type of joint preparation.
Like Lawrence said, "I would like to see the actual welding symbol." One never knows whether the welding symbol is specifying a fillet weld or if the welding symbol is pointing to the edge of a flanged joint or an edge joint in which case, due to the orientation of the joint, the 1/4 joint penetration would still not qualify the weld as a CJP.
Best regards – Al


 By jwright650
  Date
Date 04-09-2012 12:28
Edited 04-09-2012 18:48

I'd use some scrap 1/4" material to mock up the joint and run a few tests, cut and etch to verify that you are meeting the 1/4" min nugget and if not, tweek your welding parameters until you can.
I messed up, I saw Al's sketch and didn't realize that you had added one to your original post. I would still verify with a cut and etch. Sorry about my mis-read.
Hello all I posted the sketch of the weld symbol in my original post. Thanks.
P/P.
The (1/4) in paraenthisis is the weld size.
This is clearly where the radius of the tube meets the intersection of the joining tube.
When I have this I make sure that the joint will allow for the minimum 1/4" weld size or whatever size is called for.
I would say that the corner radius is going to play a big part in whether the weld is a CJP or PJP. If you have a 1/2" radius on the outside of the corner, I dont think a 1/4" flare bevel weld will be considered CJP. See D7.2.2 and 7.2.10 in A2.4 2012 for some good commentary. In particular, the definition of CJP is:"...a groove weld condition in which weld metal extends through the joint thickness." I would say that for CJP, you would need to specify the radius as the joint prep, and have a weld size at least as large as the corner radius.
I think that ASTM A500 calls for no more than 3 x wall for the corner radius. I don't think there is an ASTM minimum. This would indicate that you may have a 1/2" "automatic" joint prep, perhaps as much as 3/4". I would plan for 3/4", but go ahead and measure your actual tubing and see what you get. For a true CJP, I think you will need a weld ad big as the actual corner radius. Finally, I am pretty sure tubing of this wall thickness will have a radius significantly large than the wall.
I neglected to mention this only applies at the ends of the box tube where the walls drop down away from the weld
Hello Bubba;
You didn't reference a welding code or standard, so I'll use AWS D1.1 as the basis of my comments. I will also assume the joint details are prequalified:
A) The radius for design and computations is taken assumed to be 1.5 T where T is the thickness of the HSS. (Refer to figure 3.5 for a joint detail for a flare bevel groove detail)
B) The maximum weld size (joint penetration) is 5/16 times the radius.
C) 1/4 wall results in a radius of 3/8 inch
d) The maximum weld size is assumed to be 0.375 x 0.313 = 0.117 inch
e) The drawing indicates the required joint penetration, i.e., weld size, is 1/4 inch. This doesn't meet the limitations for prequalification, thus you would have to qualify the joint detail per clause 4 to demonstrate you can produce a weld size of 1/4 inch.
f) Since 1/4 inch is the wall thickness of the HSS, it is a complete joint penetration groove weld made without backing. Thus the procedure and welders would have to be qualified for an open root complete joint penetration T, Y, or K joint. Ouch!
Best regards and good luck - Al
Al,
I'm not saying your wrong, and I'm not saying your right.
But look at all the calculations you had to go through to come up with your answer.
In real life who's job is it to do all that?
The detailer? the EOR? the CWI (assuming they even have one)?
I have run into this type of situation before and clearly it's not always cut and dry.
Open to comments and discussions (FIY I may be away from the computer for a day so I'm, not ignoring anyone, just on the road.)
thanks
Please note that I prefaced my comments on using AWS D1.1 as the applicable welding standard. This may or may not be the case.
To answer your question; it is the Engineer's responsibility to verify the proposed connection meets the requirements of the applicable welding standard. The detailer most likely determines the appropriate joint detail (which has to be approved by the Engineer if D1.1 is applicable), but the CWI should verify those up the food chain have met their obligations. If not, the CWI should be asking, via an RFI, for clarification.
Is this real life? It becomes real life if I'm the inspector. I don't care how many P.E. stamps are on the drawings, if I have a question, I submit an RFI or include the noncompliance in my report. The item is not closed until I get a written response from the Engineer.
'But, you know what I want." isn't an acceptable response.
Best regards - Al
Just based strictly on the weld symbol and the material thickness would it be a CJP. YES or No. Or is that over simplfying it. Thanks for your input
Thanks Al I appreciate you input.

 By 803056
  Date
Date 04-09-2012 22:23
Edited 04-10-2012 03:20
No problem. Just remember one tidbit; this is simply my opinion.
I look at the problem as follows: The base metal is 1/4 inch thick. The fraction within brackets means that is the minimum weld size required. Since the minimum weld size cannot be greater than the thickness of the base metal and because the weld is equal to the base metal thickness, complete joint penetration is required.
If I had to make a guess, I bet the design drawing simply listed the weld size as (1/4) with no joint detail. The detailer than decided it was actually a flare bevel groove along the side and fillet welds along the toe and heel. By rights, the detailers should have listed the radius of the HSS followed by the required weld size. Kind of like this: 3/8 (1/4), but as I pointed out, this joint detail is not in conformance with AWS D1.1 which may or may not be applicable in your case. I refer to D1.X welding codes because they are the only ones to address the maximum size of the flare bevel and flare V-grooves. ASME, NAVSEA, API, and other welding standards simply do not address the issue. As a result, AWS D1.1 provides a reasonable rational for sizing such welds.
Best regards - Al
The detailer said it was a partial penetration joint. I guess we will see what happens. Thanks again for all your input.
i think that all flare bevel grooves in box tubing have to have a backing plate. im not sure exactly what clause it is mention in , but i have come across it. but in this case after i looked at the drawing it is half inch thick. so it would be pjp. i would make it at least 3/8 deep and open up bevel to get down to the bottom.
You might want to recheck the dimensions of the HSS. It appears to me that the HSS is 2 1/2 inches by 2 1/2 inches by 1/4 inch wall.
I thought the wall was 1/2 inch until I took a second look at the sketch to determine the corner radius of the HSS.
Best regards - Al
you are right on that. my bad. that would make it a cjp. so , would that not require a backing plate to weld this joint?
Not if they qualify the WPS without backing. Since it is a tubular connection, they get ensnared in the old T, Y, and K trick.
Best regards - Al
Powered by mwForum 2.29.2 © 1999-2013 Markus Wichitill

