Not logged inAmerican Welding Society Forum
Forum AWS Website Help Search Login
Up Topic American Welding Society Services / AWS Learning & Education / Practice and Economy
- - By Lawrence (*****) Date 09-13-2012 13:10
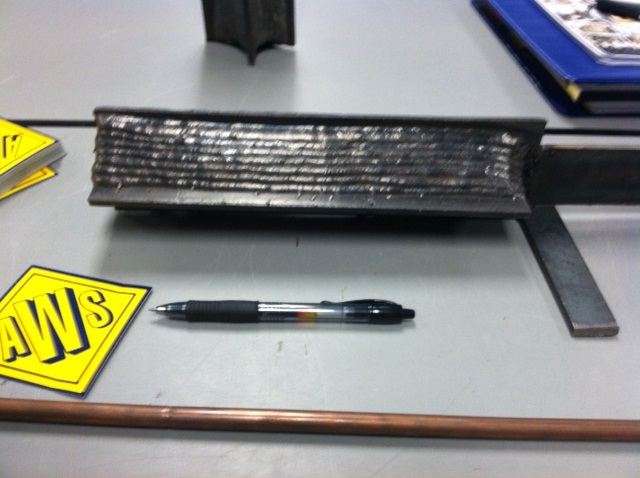
The image is what we call a "Boat Anchor"

Either 1/4"  or 3/8   plate  cut  with 2each 1 1/2" and 1 ea 3" pieces  10" long.

We use it for SMAW, GMAW and FCAW stringer and weave practice in all positions.

You can put quite a few stringers into one of these things before it is full.. Lot's of reps for beginners.

I just had a brainstorm the other day.... 

When the boat anchor is full, we air-arc a quarter section, prep it and refill it!

The lads love Air-arc and It is going to save me a pretty significant coin, while increasing the learning by adding CAC-A to multiple exercises.

Feelin Good!
Parent - By Superflux (****) Date 09-13-2012 14:21
Excellent training approach with the addition of CAC. I would consider having them excavate a 1/2 deep from the middle to simulate a slag inclusion repair for some real world experience.
Now that I think about it, they probably will find something down in there...
Parent - By jwright650 (*****) Date 09-13-2012 14:25
That should be a good exercise in Carbon arc gouging....I've done something similar with failed 1" weld test plate coupons...UT'd and found indications, had the student go back in and fix it. Multiple times if necessary. You should see the look on their faces when they fail, and then I show them an Air-Arc lead :confused: ....LOL..it's good practice.
Parent - By welderbrent (*****) Date 09-13-2012 14:38
Excellent battle plan Lawerence.

Real world application as well as lessons in economics and wise stewardship of available materials.  Use them till they can't be used no more.  (Improper language, I know, it just flowed).

Thanks for including the AWS stickers too.  We know who you promote. :lol:

Have a Great Day,  Brent
Parent - - By Blaster (***) Date 09-13-2012 19:39
We do a few similar fillet weld assignments for our new students too.

For groove weld training, the best thing we ever did was set up an area where students can work on 20+ foot sections of square tube, pipe, or beam.

By welding these shapes end to end and then cutting out the weld, then prepping them back up to do over again, our wastage was cut dramatically compared to using coupons.
Parent - - By Oneatatime (**) Date 09-19-2012 20:43
Can i see a picture of this?
Parent - - By Blaster (***) Date 09-19-2012 23:17
Starts at minute 2:15 in this Youtube link:  http://www.youtube.com/watch?v=No9i-OFtNZU

Continues a few minutes in to this Youtube link:  http://www.youtube.com/watch?v=xiLLgu9cWR4

Those videos were taken a few years ago.  Most of the students at that time were in their first year and were doing mostly structural connections.  Some quarters most of that area is filled up with pipe...  just depends on how the various course enrollment shakes out each quarter.
Parent - - By Oneatatime (**) Date 09-20-2012 00:07
That is nothing but impressive, i only wish we had that kind of time, 5 hours a day 5 days a week, oh how i would love to be able to work with that.
Parent - By Blaster (***) Date 09-22-2012 17:50
Thanks.  Yes, having a fair bit of contact time is a real treat.
Parent - - By aevald (*****) Date 09-13-2012 22:09
Hello Lawrence, excellent challenge and use of materials for your students! When I was attending welding classes a few eons ago my instructors told of various programs and of their approaches to welding instruction.

One of them would have students make up a "cross", in a way somewhat similar to your example, yet expanded just a bit. On one side they would apply flat beads, on another side horizontal, another side yet vertical beads, and finally on the last side overhead beads. Result would be essentially a "block" of steel that was approximately 9" to 10" long and probably 4" to 5" square. They did not however, arc it out and do additionally filling, I believe the carbon arc requirement gives your process a lot of extra added value.

Looks great Lawrence, hope your new year has started out well. Best regards, Allan
Parent - - By 803056 (*****) Date 09-14-2012 03:25
Excellent idea provided you have the power supply that will handle the current.

Al
Parent - - By Lawrence (*****) Date 09-14-2012 15:16
I have a couple of old Transformer Miller Demension 450  CC/CV pigs that I keep around just for CAC-A and hand held Sub-arc...  This will push 1/4 inch carbons very nicely... My Gas powered Miller Trailblazer 302 will barely push these carbons but does ok with one size smaller.....  ( I should have listened to Cactus and got a Vantage)  It would have been worth it to deal with the Diesel.

I'm trying to get P&H do donate an old used up 600A  power supply so I can get bigger Carbons going and run 3/32 FCAW at production rates!!!!!!!!   More more more!
Parent - By 357max (***) Date 09-24-2012 02:53
Teach the students how to parallel the outputs of two or more constant current machines and the ability to use larger diameter carbons.
Parent - - By pipewelder_1999 (****) Date 09-14-2012 13:03
I use a similar setup. Call it the "Simulated Vee Groove".

Get to throw in a little geometry explaining how to make it 60 degrees included angle without measuring anything.

If the student has been able to complete visually acceptable single and multipass fillet welds, I will cut and etch these prior to letting tbem start on actual vee grooves.

The Arc Gouging is a great idea but the Mobile Welding Lab just doesn't move enough air inside for my old lungs
Parent - - By Oneatatime (**) Date 09-19-2012 16:23
I use 3/8" beveled coupons, they are about 1/2" wide by 7" long, if you bevel them on a band saw 6 or 8 at a time, you can make tons of these mini test plates, just line them up one next to the other with the 1/4" root opening on a plate and weld away, it saves so much time and truly produces continuous practice, and saves my materials. Without drawing a picture, they look like this /_\_/_\_/_\_/_\_
Once they can do the root fill and cap we move on.
Attachment: IMAG0295.jpg (22k)
Parent - - By Lawrence (*****) Date 09-19-2012 17:36
Ok..... I'm having trouble with the mental picture of  "if you bevel them on a band saw 6 or 8 at a time"

When you have time... Could you have somebody snap a pick of how you chuck this up  on the bandsaw and post it on this thread?

Sounds good though.

Thanks
Parent - - By welderbrent (*****) Date 09-19-2012 18:45
Lawrence,

Not sure if I followed or not but let me try.  When I am cutting pieces for welder's certs I put 3 or 4 pieces of 3/8 X 8 flat bar into my saw on edge so that it is cutting down through the 3/8 dimension not across the 8" dimension (times however many pieces I am cutting at a time).  With my saw set for the proper angle I end up with a bevel on both sides of the piece and get 3 or 4 with every stroke of the saw.  And I can walk away and do something else for awhile because it takes longer to process 3-4 instead of just one at a time.

For my application I can only use one bevel.  But when people are using them for practise I make them use both sides.  With 3 pieces, instead of 4, you can do 2 welds.  Then, you can run them back through the saw and cut them in between the previous cuts and use them again. 

Anyway, he is cutting more than one piece at a time in the say by 'stacking' the parts.

Did that help or did I just confuse you more?

Have a Great Day,  Brent
Parent - - By Oneatatime (**) Date 09-19-2012 20:15
I apologize i didnt explain it very well, but yes i stack the flat bar vertically 6 to 8 at a time, then i cut the bevel, then i flip the flat bar and move it forward 1/2 to 3/4" and cut narrow test plates, them we fit them on a plate ( the plate is the back up bar ) this conserves test plates and time, test plate is unobtainium basically and i dont want to see it wasted or the students time.  I will try to take a picture tommorow as today is my day off.
Parent - - By 803056 (*****) Date 09-24-2012 14:15
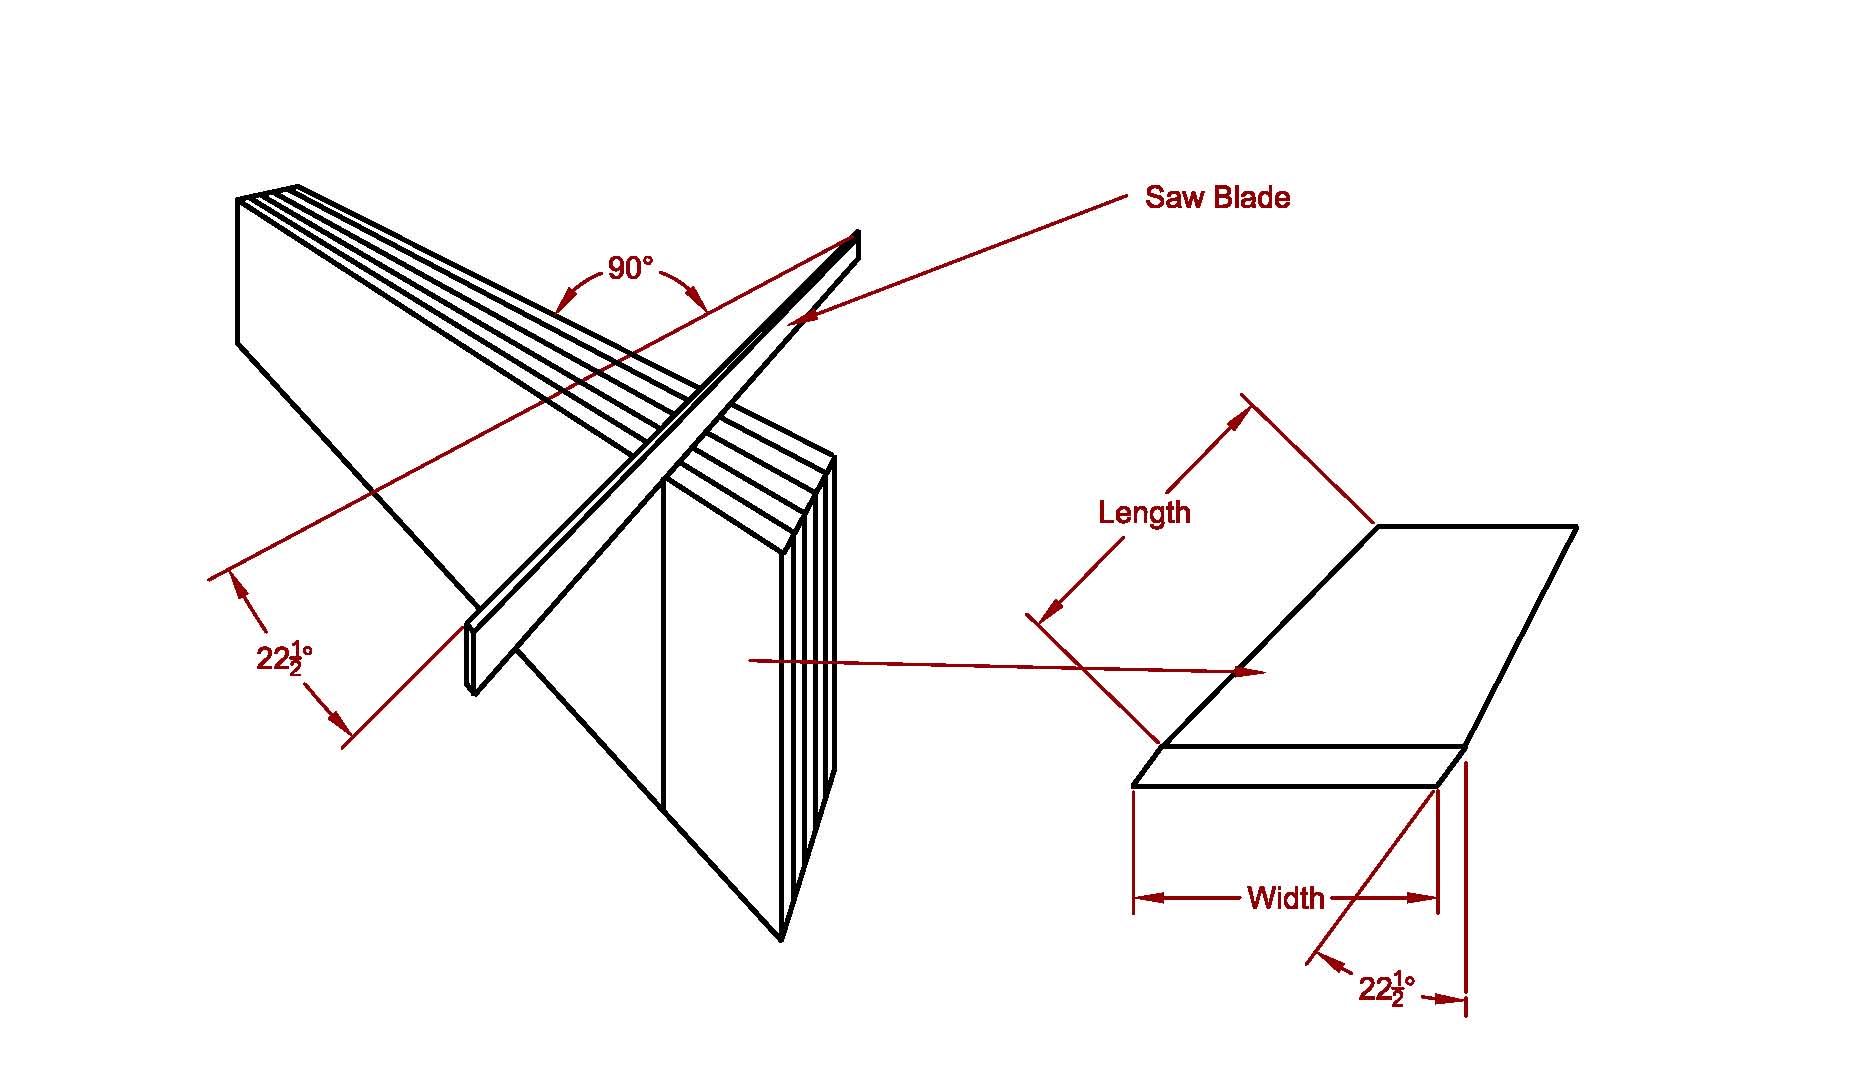
I think this is what they are trying to describe. I do the same thing, but I do not flip anything. I just set the saw blade at 22 1/2 degrees, and slide the stack forward to make a cut at the proper width.  I usually stack four to six bars so I am not clogging the gullet of the saw blade with chips.

Stacking also produces a straighter saw cut, i.e., a truer root edge when cut as shown.

Best regards - Al
Parent - - By Lawrence (*****) Date 09-24-2012 17:17
Thank you for drawing me a picture Al.

Sometimes that's just what I need   :)
Parent - - By 803056 (*****) Date 09-24-2012 18:00
We aim to please.

Al
Parent - - By Oneatatime (**) Date 09-25-2012 05:25
Heres how i do it.
Parent - - By Oneatatime (**) Date 09-25-2012 05:27
Okay now after 30 minutes of trying i got a picture posted, i saw the materials the same as everyone else, but i flip the pieces to bevel both directions, i line 8 - 10 of these up on a plate for the students and they can weld the groove multiple times without having to spend time preparing materials.
Parent - - By aevald (*****) Date 09-25-2012 05:59
Hello Oneatatime, certainly see how your method saves on material and allows for a lot of accurate practice for groove welds. The photos that I included are of actual preparation for WABO testing coupons. These are coupons used for state certification tests in the state of Washington. I've been testing for a lot of years and have a pretty good handle on how to set-up our saw to produce very accurate groove angles and save a lot of time on trying to make thermal cut coupons work or the need for "machined" grooves, ie. milled angles. Looks good, your students should appreciate your efforts. Best regards, Allan
Parent - By Oneatatime (**) Date 09-25-2012 06:20
The people i work with are mostly entry level less than 200 hours of hood time total, no need to give them 7x3 test plates rite off the bat. lol Like i said, mostly this is to get use to the process on the grooves and move along, we are limited in our class time, anything i can do to speed it up and save materials, i am always looking for new ways to streamline things.
Parent - - By aevald (*****) Date 09-25-2012 05:18
Hello Lawrence, I was having trouble figuring out where I had these photos. Finally found them, a little late in getting this included but I believe these pics will explain how "sawing" works for preparation for groove welds without a lot of precise machining. Best regards, Allan
Parent - - By Lawrence (*****) Date 09-25-2012 10:49
Roger that Allan

Thats about half a budget of steel there eh?

Nice
Parent - By aevald (*****) Date 09-25-2012 13:14
Hello Lawrence, when I do plates I typically do 40' at a time. It get's more costly every time it seems. It sticks in my mind that the last time it was between 6 to 700 hundred for those 2 bars. Best regard, Allan
Parent - By jwright650 (*****) Date 09-25-2012 15:34
stacking to get 22.5° bevels on each side. I'm doing something similiar here but using the optional test coupon(Fig 4.30) @ 45° which is closer to mimicking what we do in production. I usually make up the coupons a dozen at a time, not nearly the amount of testing that you guys do.
- - By 803056 (*****) Date 09-25-2012 11:53 Edited 09-25-2012 11:57
I hope you welding instructors spend some time teaching the students how to make a decent fillet weld.

I just tested a couple of freshly minted welders from a local welding school. They were "work/study" students in their last quarter of welding class. All they had to do is deposit a single pass fillet in the horizontal position. They didn't know where to start. They said all they practice for is the groove plate test. Both had qualification papers indicating they passed the 1 inch plate tests in both the vertical and overhead positions. Neither could pass the fillet break test until I spent some time with them and retested them a couple of weeks later after they had time to practice at school.

They said their instructor wanted to know why they were taking the fillet break test. They already passed the grooved plate test, so why take the fillet test? The answer is easy, because they didn't know how to make a decent fillet weld and fillet welds account for 90% of the welding done at that facility.

You have heard me say it before and I'll say it again, every welder on my projects is required to take a single pass fillet break test when they show up on the job. If they pass, they stay, if they fail, they go. Not too many get to stay on the job. The reject rate is on the order of 80% or higher for SMAW and definitely higher for GMAW and FCAW with electrode diameters less than 1/16 inch.

Best regards - Al
Parent - - By aevald (*****) Date 09-25-2012 13:23
Hi Al, I do know a bit of what you are talking about with your assessment of the folks that you tested there. A lot of the time students get it into their head that they expect to be "taught to the test" instead of being taught basics that they can apply to the various situations that they come upon. There is sometimes a fine line between understanding basic principles or simply applying a learned response. So you end up going into a tirade to explain and justify why you would like them to practice and master the nuances instead of just the specifics of a process. Thanks for the information and assessment from the business end of welding and your perspective. Best regards, Allan
Parent - By 803056 (*****) Date 09-25-2012 14:34 Edited 09-25-2012 14:40
That's what I like to hear.

I find that a welder that is tested on the fillet break test first rarely fails the groove test, but those welders that have only passed the grooved test rarely pass the fillet break test on the first go around.

I had one pipe welder that proudly showed me six different qualification records for different pipe diameters, base metals, processes, etc., but it took him three days of practice to pass the single pass fillet break test. He was insulted that I required him to take the fillet break test and he made a comment that it was a waste of his time. "I should be in and out in less than an hour!"

30 plus hours later he said he never had a test kick his ass so thoroughly. "You make it look so easy!" was his last comment to me.

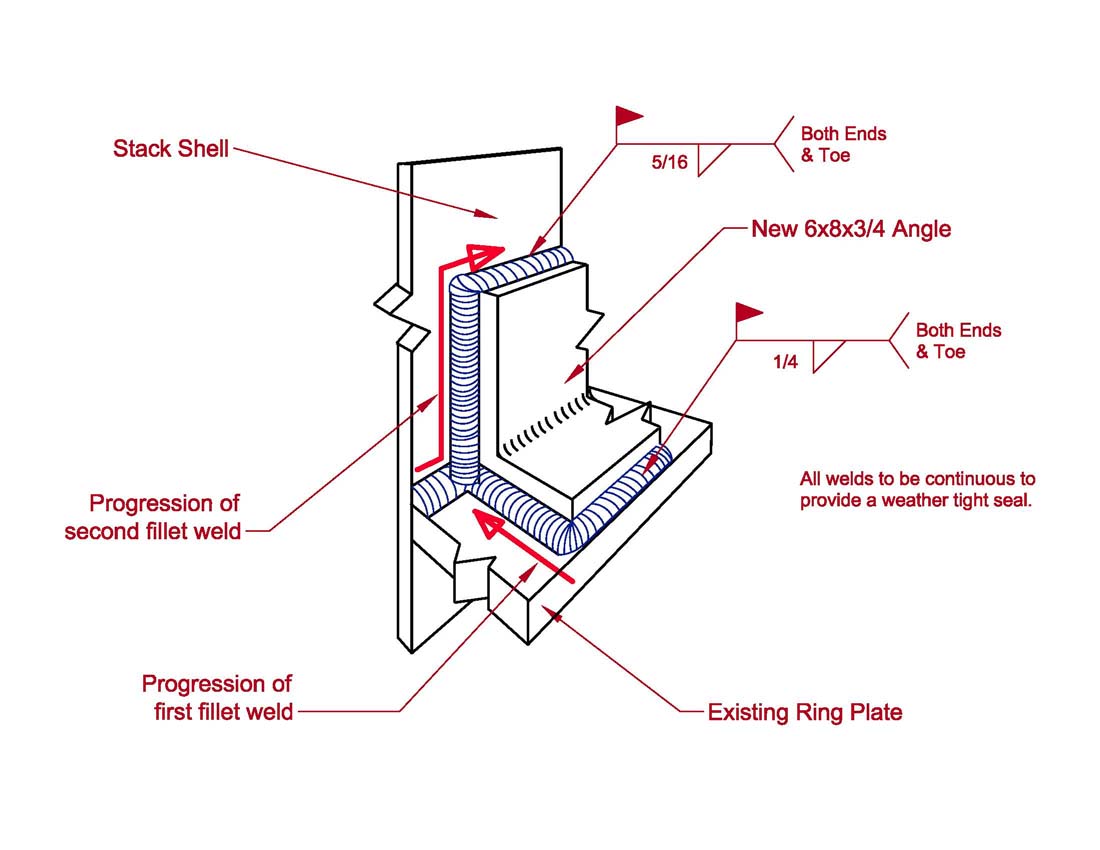
The Engineer on the project commented that the welder did a very nice job of welding and knew exactly what to do when he got to the site. My thoughts were, he better know what to do. I developed a very specific WPS for the project that indicated the placement and sequence to be used for the welds. I went over all of the requirements before I tested him and had him follow the WPS for his test. It worked. There were no welds rejected or that required rework by the project's inspector.

The attached sketch shows the level of detail I included on that project. There were about 60 angles that had to be welded in the field. The WPS permitted the contractor to use either SMAW or FCAW. The contractor elected to use the SMAW with E7018-H4R electrode option provided by the WPS.

Best regards - Al
Parent - - By Blaster (***) Date 09-25-2012 20:56 Edited 09-25-2012 21:23
Hi Allan

I can relate to that.  We do about 1,100 hours in the shop before they get to try their first V-groove on 1" plate, during their 6th quarter in the program.  Actual testing is in their 7th quarter.  I take a bit of pride in that.  It does a lot to focus our enrollment on those who are serious about learning to weld.

This is the assignment list for our 6th quarter course.  Unlike the first 5 quarters, this particular quarter is more focused on preparing the students for testing.  Several of the assginments are based on job tests given by local outfits.  BTW it is a 16 credit course:

1.  T-joint, 2F, 5/16” single pass, E71T-1.  3/8” plate.  Stop and restart in center.  Break test.

2.  3” Angle to ¼” plate, 6F, ¼” single pass, 1/8” 7018.  Ask for placement and restriction.

3.  3” Sch 40 to ¼” plate, 6F, ¼” single pass, 1/8” 7018.  Ask for placement and restriction.

4.  3” Square tube to plate, 5F, ¼” single pass, 1/8” 7018.  Ask for placement and restriction.

5.  8” Sch 80 to 3/8” plate, 2F, 1/2” multiple pass, 1/16” E71T-1.  Ask for placement and restriction.

6.  3” Square tube to ¼” plate, 5F, ¼” single pass, E71T-1.  Ask for placement and restriction.

7.  2” Sch 40 5G, stainless, GTAW, Argon purge

8.  8” sch 80, 2G, E71T-8 with backing

9.   Square tube splice with backing, 5G, E71T-8 CV.  8” x 8” tube outside, fit with crane.  Hand cut  for 45 degree bevel groove, ¼” root, 3/8 x 1 backing bar.  No weaving.  Cut out weld ring, quarter, remove backing bars for root inspection– don’t go below base metal surface, conduct burn test.

10.  WABO practice test, 3G and 4G, 1/8” and 5/32” E7018

11.  Butt joint, 3G, open root, E71T-1.  3/8” plate.

12.  T-joint, 3G, open root, 1/16” E71T-1.  3/8” plate.

13.  WABO practice test, 3G and 4G, FCAW

14.  3” Sch 40 6G, GTAW

15.  8” Sch 40 6G, 6010 root, 7018 out

Rod
Parent - By aevald (*****) Date 09-26-2012 00:29
Hello Rod, I believe "Rigorous" aptly sums up that particular curriculum. We don't have any 16 credit single class offerings. 10 is the maximum in our neck of the woods. However, if a student feels particularly energetic, there are a couple of quarters where they could take a 27 credit welding load made up of 4 different welding classes. Best regards, Allan
Parent - - By Blaster (***) Date 09-25-2012 14:17
Hi Al

What size single pass fillet welds do you require with each process, and with what electrode and diameter?

Thanks

Rod
Parent - - By 803056 (*****) Date 09-25-2012 14:42
If the welder is being tested to AWS D1.1 for unlimited fillet size, I require a single pass fillet weld with 5/16 inch legs regardless of the process or the size of the electrode.

I figure if I can do it any half-assed welder should be able to do it. After all, I'm just an inspector. If it is required on the job, the welder should be able to do it on the test.

Best regards - Al
Parent - - By Blaster (***) Date 09-25-2012 21:03
Thanks Al

Very true. 

I still have a burr for the structural steel test being a V-groove instead of the much more dificult bevel-groove that is found all over structural projects.

I have never understood companies testing welders on their job sites for welds that are easier (substantially so in some cases) than their production work.

Rod
Parent - - By 803056 (*****) Date 09-25-2012 21:44
The test required by the seismic supplement might be more to your liking.

The employer always has the option of administering tests with a higher degree of difficulty once the basic test requirements of AWS D1.1 have been met. I find it is cost effective to test the welders using joint details and conditions that replicate job conditions. It is not cost effective (very expensive) to discovered the welder can pass a simple test under laboratory (ATF) conditions, but cannot perform on the job.

The tests required by AWS or ASME are simple tests that require the welder to demonstrate he/she has the basic skills necessary to deposit a sound weld. They provide little assurance the welder can actually perform on the production floor or on the job-site. The welder qualification tests required by welding standards are like the driver's test one would take when applying for a driver's license. Just because the applicant demonstrated they knew how to stop at a stop sign, they could park a car, and they did not run over a pedestrian does not mean the driver is qualified to drive a formula car.

In the business world it is not always enough to simply meet the minimum requirements of the welding standard. The prudent contractor implements procedures deemed necessary to ensure the work produced meets the requirements of the drawings, project specification, the code, and the customer’s expectations in a timely manner. While some contractors ignore the latter two items, they do so at risk of not being invited to the next party.

Besst regards - Al
Parent - - By Blaster (***) Date 09-25-2012 22:05 Edited 09-25-2012 22:21
I like that test alot.  We do that as one of our fabrication course assingments.  I take the drawing for the test set up, make some changes, add and tighten some tolerances, add some welding symbols, and use it as an opportunity to get the students trained up on running an optical style burn table to cut parts to a spec.  Then of course the student gets to weld it out, back gouge, back weld, cut it apart with the air arc, and prepare and process the 4 samples.

Rod
Parent - - By 803056 (*****) Date 09-26-2012 03:41
Not a bad approach. Welding through the access hole can be a challenge.

Al
Parent - By jwright650 (*****) Date 09-26-2012 11:36
The most common problem that I've found while inspecting welds that have been welded through an access (rat)hole is the gun angle when trying to "push" the puddle through the middle past the web. It just doesn't work 100% of the time, a few get away with pushing the puddle to the other side and still get tied in well enough to pass UT...but "few" is the operative word here. The welder needs to resist the urge and stop his stringer before the gun gets into a severe push angle.
Parent - - By TAC (*) Date 09-26-2012 13:59 Edited 09-26-2012 21:28
Al,

How are you executing the bend-break test on the 1/2" plate?  I think the fillet test is commonly avoided because it is seen as a PITA!
Parent - - By aevald (*****) Date 09-26-2012 14:56
Hello TAC, not to answer for Al, but commonly if we are doing something like that we will outfit the grinder with a cut-off wheel and cut through the face nearly to the root of the weld and then "fold" it over. Much easier and allows for the same end purpose, although some might argue that it doesn't "stretch" the weld in the same manner. Best regards, Allan
Parent - - By TAC (*) Date 09-26-2012 21:33
Allan,

That is a nifty idea.  I can see the argument, especially when D1.1 states "in such a way that the root of the weld is in tension."  Would cutting the weld in that way not be more of a nick-break test?

Thanks for your input, Sir.
Parent - By aevald (*****) Date 09-26-2012 21:48
Hello again TAC, IMHO, by relieving the joint of it's throat thickness it would indeed reduce the amount of elongation/tension that would normally occur if the part were bent without the removal of some of the face material. You could argue that it would be similar to using a different bend radius when you were bending straps. However, if the main reason for fracturing the fillet was to check for penetration characteristics I don't believe it would be an issue. As you stated, if this were to go with the requirements of D1.1 then you would likely not use a method of relieving the weld joint. Thanks for the commentary, always good to hash out a lot of these types of things.
Parent - - By Superflux (****) Date 09-27-2012 12:50
"and cut through the face "

But Allan, that takes away all the fun. Especially when you hand the welder an 8 oz. ball peen...
Parent - - By aevald (*****) Date 09-27-2012 13:15
I know John, but I've been there for the flying metal pieces and the expletives and other associated circusry, is circusry a word? Anyhow that's my $.02 for the day. Best regards, Allan
Parent - - By Lawrence (*****) Date 09-27-2012 15:04
:::::::::  "circusry "

Farmcode glossary?

Next edition  :)
Parent - By aevald (*****) Date 09-27-2012 15:27
Sorry Lawrence, I have to get it out of my system somehow. But what the heck gotta expand that glossary don't we? Can't allow the farmcode to go unexpanded.

Hope your quarter is starting off well. Ours has been just a bit hectic, we are in the process of outfitting our shop with a lot of new equipment and all of the hoops, bells, and whistles are a bit draining. Yeah I know, complaining about a positive like that sounds rather dumb. Anyways, we've got a lot of students still and it's a bit of a juggling act trying to keep everything going along smoothly. Best regards, Allan
- By 803056 (*****) Date 09-27-2012 15:29 Edited 09-27-2012 16:16
I break the fillet weld in one of two different ways, first and most common, is simply breaking with repeated blows from an 8 or 10 pound sledge. The second method enploys a long "hickey bar".

The first method is to lay a piece of 1" thick plate on the floor to keep from damaging the floor. I use a lenght of 8" wide by 12" by 1" plate on the floor. The welded "T" sample is placed on the plate with the fillet on the top side. The hammer is swung downward so the root of the fillet is place into tension. After several blows the "good" weld will begin to break and it is a matter of two or three aditional blows to break the weld completely. If the weld has any incomplete fusion in the root it is very apparent on the first couple of hammer blows. The sound is a dull thud rather than a sharp ring. It gives the welder a clear impression of how weakened the the weld with a small amount of incomplete fusion is compared to a weld with fusion to the root and the importance of proper welding technique.

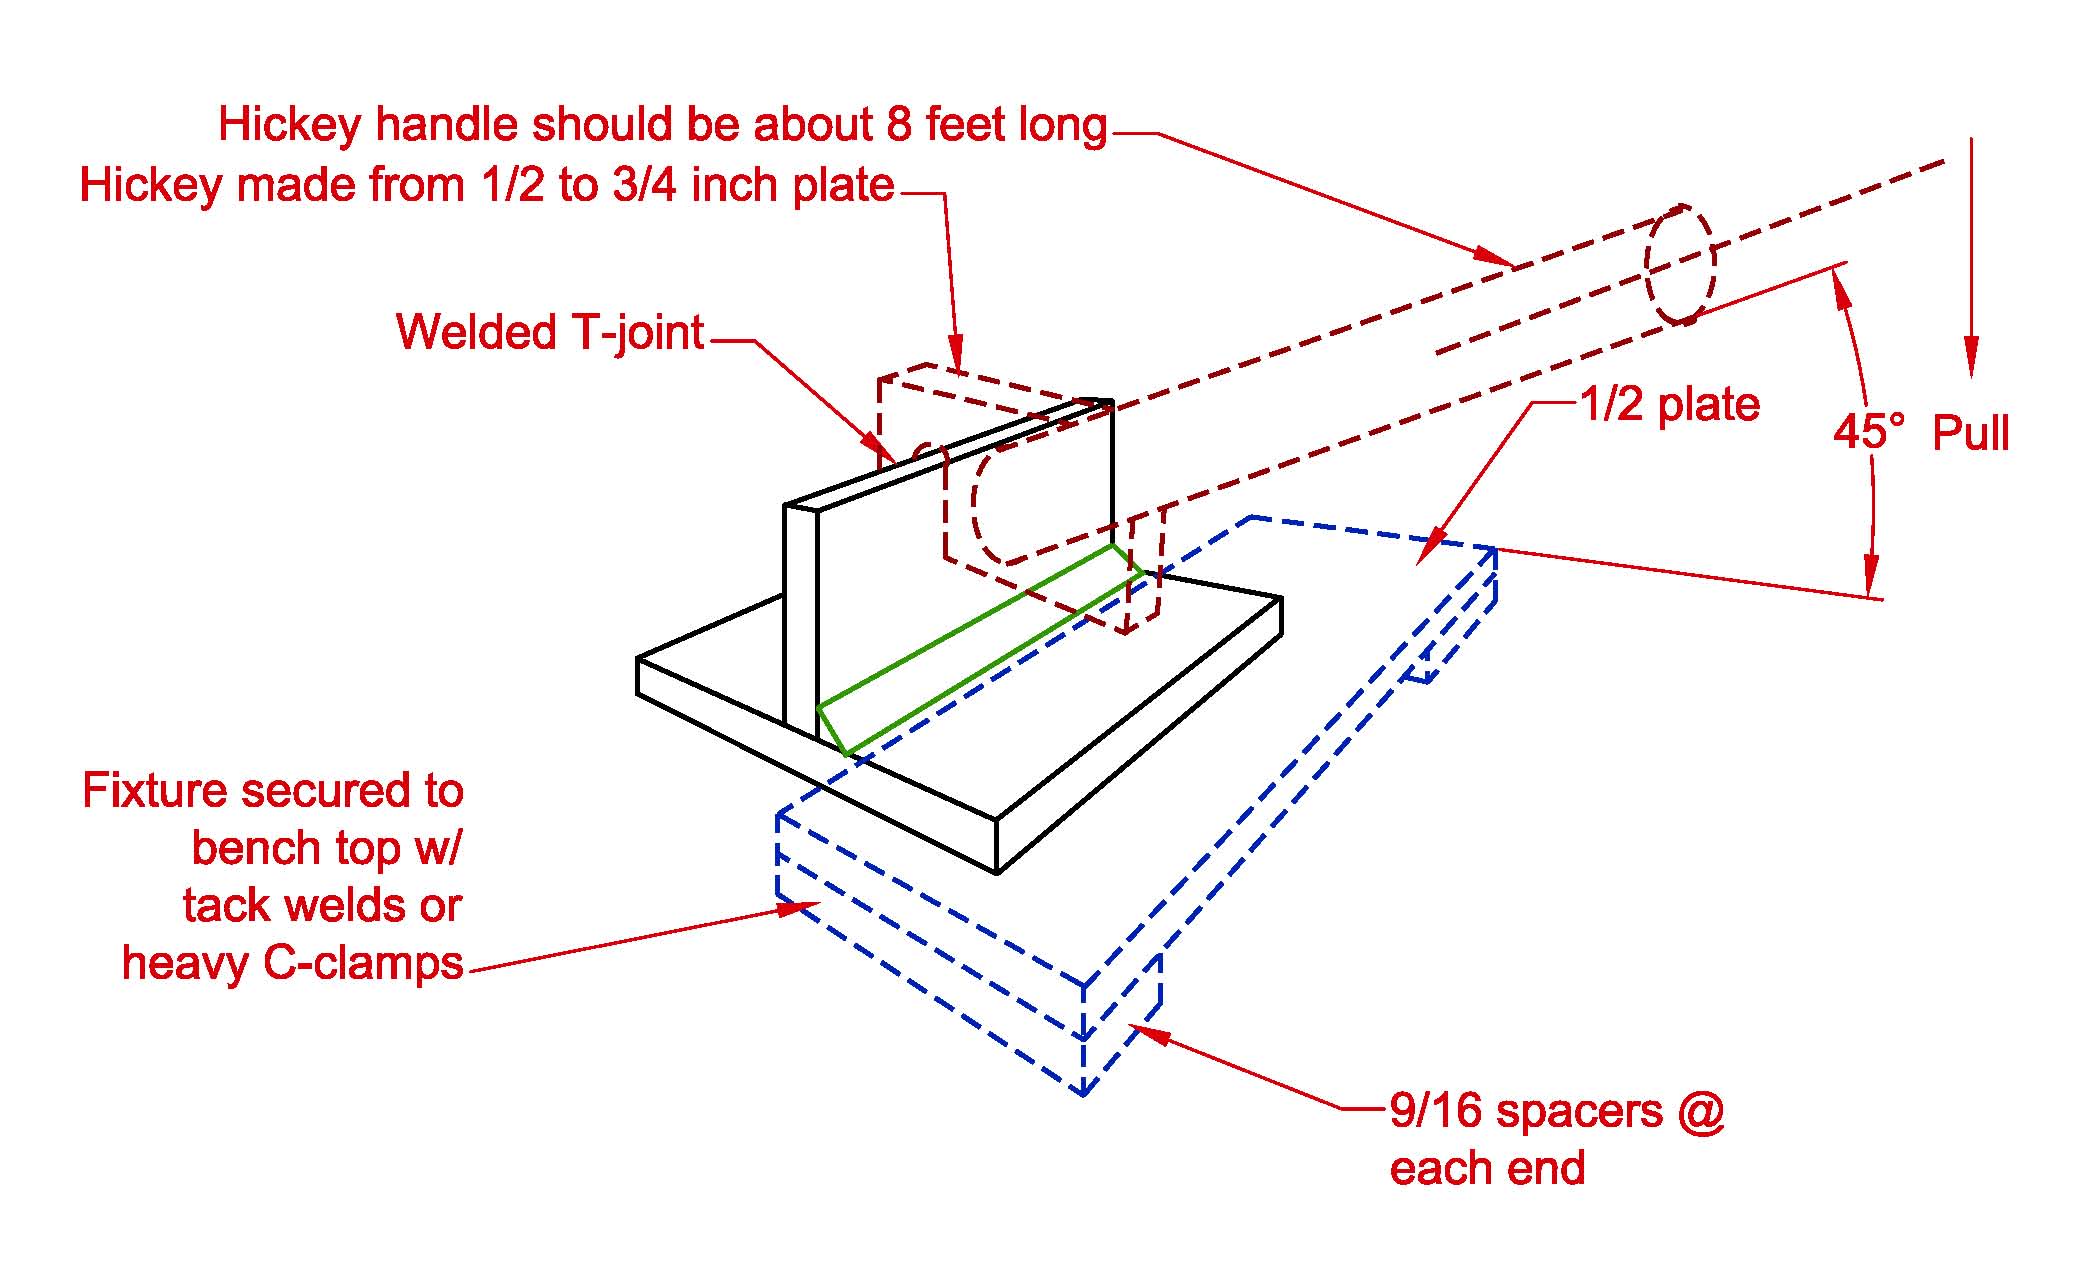
The second way is to clamp the welded sample to a study bench or column and bend the "T" over with a long bar. Again, it is important to secure the plate and to use a long bar or pipe hand to develop the force required to break the weld. Again, the difference between a weld with fusion to the root and a weld with incomplete fusion to the root is very apparent to the fellow pulling on the long handle.

I never reduce the weld throat. I like the welder to get a feel for the difference between an acceptable weld and one that isn't welded properly. In other words, I like the performance test to be a learning experience. That is why I usually test the welds with the welder present and he is an active participant.

If there are several welders to be tested, I usually hobble together a fixture like the one in the sketch. I recommend a hickey to break the sample. It is safer than 10 welders swinging a 10-pound sledge. Not all of the welders have a good eye. The fixture can be clamped or tack welded to a secure work bench. The hickey must be robust and the handle long enough to cause the weld to break. A sledge can be used instead of the bending hickey, but there is always a chance the welder will miss the "T", so stand back!

Best regards - Al
Up Topic American Welding Society Services / AWS Learning & Education / Practice and Economy

Powered by mwForum 2.29.2 © 1999-2013 Markus Wichitill