Not logged inAmerican Welding Society Forum
Forum AWS Website Help Search Login
Up Topic Welding Industry / Technical Discussions / Fluorescent dye check issues GTAW on 6061-T6 using ER4043
- - By Kix (****) Date 02-21-2014 00:00
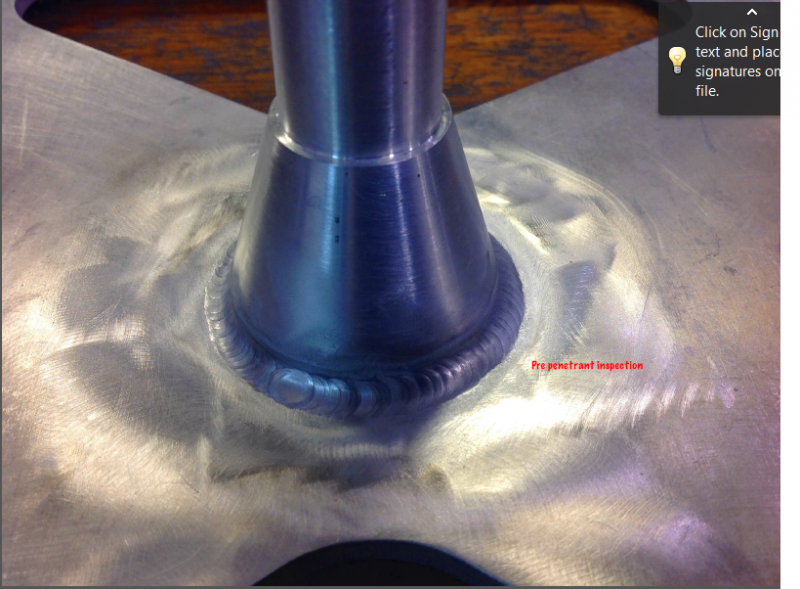
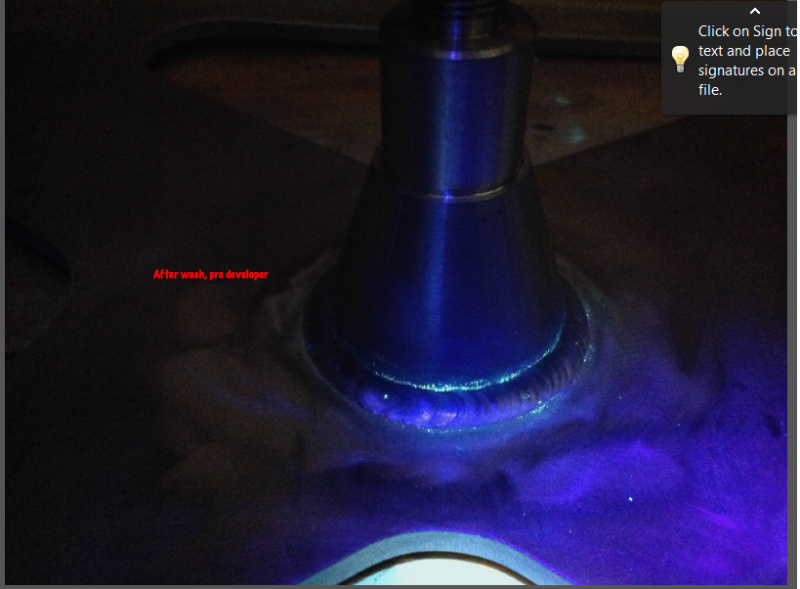
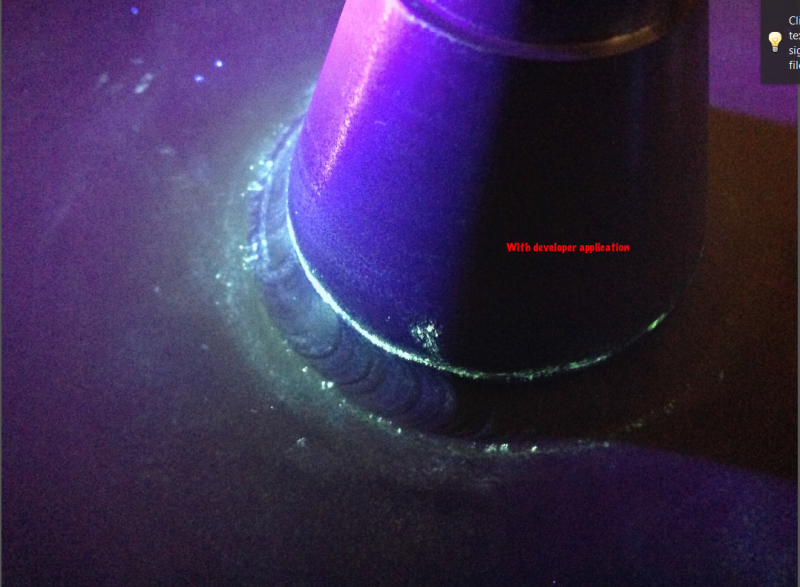
I just wanted to run this by everyone to see if anyone else has had this issue before.  I will give process details, but don't worry about code requirements just yet.  I'm just looking for why it's holding dye on the toes of the welds.  First thought comes to mind is that the arc etch is beating the toes up pretty bad and causing some micro pitting or something.  Please ask for more details if you need them.  I won't be able to check this again till tomorrow morn for more questions.  Thoughts on the cause of this please. (see below pics) Fluorescent

Material=6061-T6 .25" thick welded to a ground grommet.
Filler= ER4043
Fillet size=3/16"
Gas= 100% argon @30cfh
Cup size= #8 gas lense
Tungsten type=  1.5% Lanthanum,  .08 Yttrium, and .08 Zirconium
Tungsten size= 3/32
Straight polarity amps= 200
Reverse Polarity amps=150


Parent - By kcd616 (***) Date 02-21-2014 02:12
more heat
bead looks to high
I might be wrong:eek:
but doubt it
hope this helps
sincerely,
Kent
Parent - By Lawrence (*****) Date 02-21-2014 04:18
If you are using a post emulsified process you might look at maximum vs minimum dwell times or better tank agitation.
- - By 803056 (*****) Date 02-21-2014 02:20
My question is: Did you wire brush the weld and adjacent surfaces with a stiff wire brush?

I have found that doing so will often remove the "etched" region and eliminate the indications you are seeing. The region is usually affected by the cathode cleaning action of the AC. The roughened surfaces and shallow surface melt results in very small "cracks" in the recast material that is only a couple of thousandths inch in depth. The itty bitty itsee teeny weenie cracks retains the penetant and produces the indications.

Best regards - Al
Parent - - By Kix (****) Date 02-21-2014 12:13
Al,

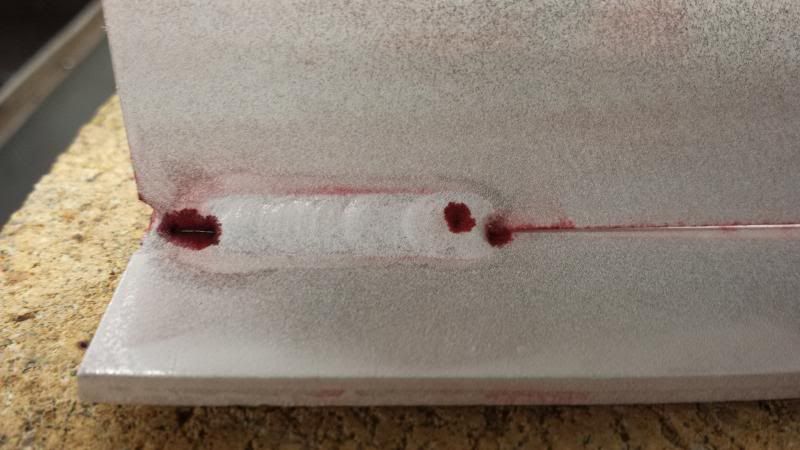
I am investigating this issue for a friend and that the cathode action issue is what came to mind.  So while teaching in class last night I tried to replicate the situation and the only way I could replicate it was to take a flapper disc to the material and ruff it up before welding.  I made 3 fillet welds, one with no cleaning, just welded over clean untouched 6061-T6 material.  This yielded good results.  I did another with stiff stainless steel hand brushing only.  This also yielded good results.  Last I welded on material that has been ground with a tiger paw disc.  This gave me the cathode action and pitting I was looking for.  See pictures below. You can see the red dye is acting similar to the fluorescent dye in the photo.  I will say that I also had to change up his settings a bit.  I went down to 75% on the balance.  I could hardly get it to weld on 99% balance.  The original picture you see up top does not look like anything I was getting with 99% balance.  I will discuss this with him today.


Parent - - By 803056 (*****) Date 02-21-2014 13:35
Make sure you wire brush the completed weld. It is usually sufficient to remove the surface roughness that retains the penetrant.

Nothing teaches better than a good demonstration. Good show.

Al
Parent - - By Kix (****) Date 02-21-2014 14:34
Do you think a good power brushing afterwards would yield the most consistent results or just a good hand brushing?  I believe this would require etching before penetrant is applied to remove and smears that might mask a defect. I don't believe that would be a cost issue because I've seen some of the welds are being manipulated mechanically anyway.  He did tell me that he has used mechanical scotch bright pads to go around the welds and still had rejection.  I could only believe those to be a different type of defect.  What I think is going on in the picture above is the cathode action hitting on the micro peaks of the abraded surface doing exactly what you described. In your opinion, do you agree with this assessment?
Parent - By 803056 (*****) Date 02-21-2014 14:52
I found hand brushing with a stiff stainless bristled brush to work. Power brushing may tend to burnish the aluminum.

Al
Parent - - By bozaktwo1 (***) Date 02-21-2014 19:14
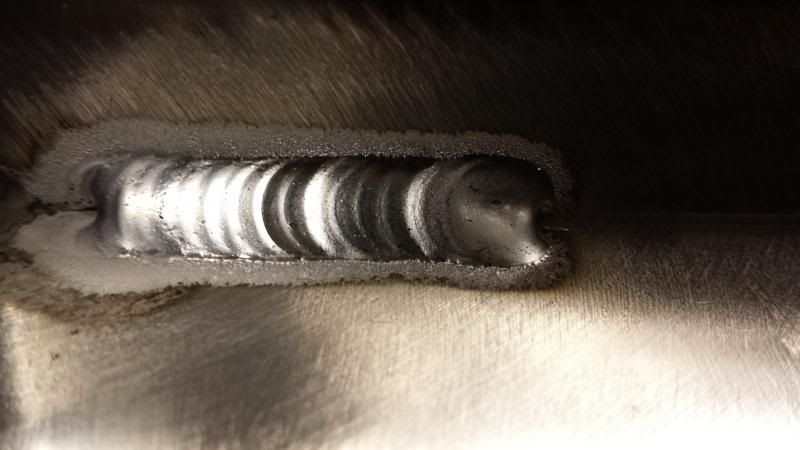
I get this frequently in 6061 welded with 4043.  If you examine the indication using a 10x, you'll see that the PMZ has a texture similar to a dry lake bed, retaining the penetrant and indicating as a long linear.  Al is dead on about hand brushing; a power brush may hide actual indications, very difficult to control.  The stainless steel toothbrush does a good job of taking off that layer of the PMZ.  As far as prevention goes, I found that a larger cup and gas lens usually minimizes the problem, but unless you weld in a gas tent this problem will happen from time to time.  I have a couple good pictures to post, see if I can find them real quick.
Parent - - By 803056 (*****) Date 02-21-2014 19:30
Nice photograph!!

Can I use it in my presentations?

Best regards -Al
Parent - - By bozaktwo1 (***) Date 02-21-2014 19:35
Certainly, sir.
Parent - By 803056 (*****) Date 02-21-2014 19:46
Thanks!

Al
Parent - - By Kix (****) Date 02-21-2014 19:48
Well played fine sir.  Amazing photo!  That will be my next test then.  To try a gas lens on the abraded surface to see if I can minimize it.  So you're thinking that those cracks are occurring because of lack of shielding in the PMZ or potentially from something else?
Parent - By bozaktwo1 (***) Date 02-21-2014 19:55
It's possible, but you may also want to look very carefully at your cleaning process.
Parent - By welderbrent (*****) Date 02-21-2014 22:46
Now where did Ross hide that 'LIKE' button anyway.  Oh well,  LIKE.

Have a Great Day,  Brent
Parent - By Mwccwi (***) Date 02-22-2014 02:08
I have had experience with similar cracks, at first I thought in was the anodizing process.
the attach photo is at greater magnification= the pits were discovered to be from the annodizer's pre-clean, after the pre-clean soak time was reduced the pits went away bot the tiny PMZ cracks remained until I read a earlier post fro Al that suggested the manual wire brushing post weld before sending out for anodizing.
Attachment: Fullpagephoto.pdf (539k)
Parent - By Lawrence (*****) Date 02-25-2014 13:15 Edited 02-25-2014 13:26
I'm annoyed by the relatively new paradigm that suggests that the best GTAW welds on aluminum are made with a minimum of EP set at the balence control.

SALES PEOPLE say that a small etched zone is desirable..   Exactly why?    If we are not annodizing pretty things, the reasons are few.

Mostly I suspect it is to sell inverters that "can" do it, and not much more.

My philosophy is to use as "much" DCEP as you can, and still continue to get the correct fillet size and not degrade your tungsten electrode tip prep.

The pic above (short fillet)  shows a surface that is a little rough.  That surface roughness is Hydrogen that was unable to escape as the weld froze...  Slow travel speed and poor etch are the two major causes here (assuming good surface prep)

So many folks are tempted to push balence control to the absolute ragged edge.... With higher and higher EN values because they think they are getting better penetration.... This is not the case...  You cant get penetration if you don't remove oxides! Furthermore, oxides are porus like a sponge and harbor even more hydrogen.  Take that balence control over 80% EN and do RT work and see how you like the reject rates.

95% of GTAW joining of Aluminum can be and is done most effectively with a balence control setting that is available from a Tranformer machine 68% EN max.

There is a place for the whistles and bells an inverter can produce...  High travel speeds, small fillets, thin base metal, etc.   But in my opinion the frequency control has a bigger positive impact on quality than the balence control in most cases.  

Thus endeth the rant  :)

.
- - By 803056 (*****) Date 02-22-2014 14:12
6061-T6 aluminum alloy is susceptible to cracking if the base metal isn't diluted sufficiently with a compatible filler metal such as 4346 or 5356. In other words, it cannot be welded autogenously.

Try welding bead down the length of some 6061 without adding filler metal. Then do a penetrant test. The indications will extend from one end of the weld to the other with transverse cracks extending from the longitudinal cracks. Almost like a spider web of cracks that are very fine and difficult to see without the penetrant or magnification.

Basically what is happening when you weld the 6061 using GTAW is similar to what I just described, but it is localized to either side of the weld bead made with filler metal. The difference is that the area affected is just to either side of the weld bead where the melt is very shallow and is not diluted with the compatible filler metal. The AC arc is not well focused, so the adjacent surfaces of the base metal is melted, but to a very shallow depth and subject to rapid cooling. The melted surface is not diluted with filler metal, so the shallow cracks result. In addition to the shallow melting, you have the cathodic cleaning action that roughens the surface of the metal. Both the roughed surface and the shallow cracks retain the dye penetrant can produce the indications observed adjacent to the weld toe.

Post weld cleaning comprising of a vigorous wire brushing is usually all that is needed to remove the surface roughness and shallow cracks. Hand brushing with a stiff bristled brush will do the trick, but power brushing can burnish the surface. If speed  a concern, you may do well to use a soft pad with fine grit. Scotchbrite probably isn't aggressive enough. Further I would not use grit composed of aluminum oxide which could interfere with subsequent rework.

Best regards - Al
Parent - By Lawrence (*****) Date 02-25-2014 12:45
Al,   These are very good posts.

Frank Armao maybe doesn't teach this well.
Parent - By Lawrence (*****) Date 02-25-2014 12:56
Al,

Given the behavior of 6061 base metal you describe.

Do you think GTAW inconsistant operator travel speed could increase the effect we see in the above picture?

Meaning... Slower travel speeds allow more "soak" time for heat, which in turn would make a wider zone that is "mushy" or experiences surface melting?

Could technique play a role in reducing this occurence?     Such as using larger diameter fillers to help cool the puddle, a higher GTAW current level but faster operator travel speed, or even a process change to GMAW that may produce more amperage at the arc, but moves more quickly from point A to point B that the heat affected area might be slimmer?
Parent - By bozaktwo1 (***) Date 02-25-2014 15:44
There's no end to what I learn about aluminum from you and Lawrence.  I'm well aware of the various results of inadequate cleaning/prep, and keeping the EN side of the balance under tight control, and so on....but speed of travel, now that's a new thought to me.  Aluminum dissipates heat so rapidly that any hydrogen present will be trapped, even in quantities so small that they wouldn't produce typical visible indications such as porosity and cracking. I usually have thought of hydrogen entrapment when discussing low alloy steels. Another tool in my bag in the fight for better cleaning procedures.
- By 803056 (*****) Date 02-25-2014 20:50
I am usually a fanatic about precleaning aluminum before welding. However, I have a couple of clients using Miller inverters with variable frequency. The amount of "halo" adjacent to the weld can be minimized as the frequency is increased. The arc is focused and produces great penetration. Cleaning? They shear the sheet, wash it with some isopropyl alcohol and start welding. The welds that I expect to be brittle are as ductile as, well, I don't know how to explain it. They bend like rubber with fail. The pass rate for welder qualification is on the order of 95%.

The shop foreman (both shops) sets the machines in the morning and the welder don't touch the controls. The results are beyond anything I've seen in any of my other shops that are using conventional Syncrowaves on aluminum.

Lawrence will not steer you wrong. He has the experience few can match.

Best regards - Al
Up Topic Welding Industry / Technical Discussions / Fluorescent dye check issues GTAW on 6061-T6 using ER4043

Powered by mwForum 2.29.2 © 1999-2013 Markus Wichitill