Not logged inAmerican Welding Society Forum
Forum AWS Website Help Search Login
Up Topic Welding Industry / Technical Discussions / Weld Penetration Profile
- - By Tyrone (***) Date 05-14-2014 10:59
Hey guys,
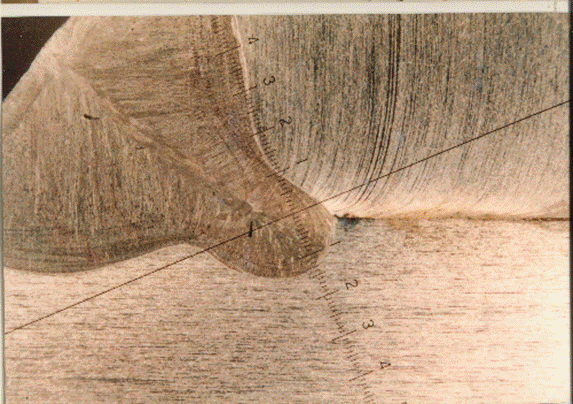
Welding ultrahigh strength steel.  Forget about the codes, process or parameters. 
What's your opinion on the finger like penetration?  Good? Bad? Indifferent?
Tyrone
Parent - - By OBEWAN (***) Date 05-14-2014 12:41
The grains appear somewhat "dendritic" (fingerlike) - I see a distinct line where they meet at the weld centerline.  You might be wise to use caution to avoid hot (solidification) cracking (due to impurities and weld shrinkage) if this process and material application is at risk for that problem.  Are those black linear indications inclusions?

I have seen similar macros with some mixed gas processes.

Other opinions?
Parent - By jwright650 (*****) Date 05-14-2014 13:30

>I see a distinct line where they meet at the weld centerline.

Is that from the puddle freezing too quickly?

Strange looking macro....I'm used to seeing a nugget with a more rounded appearance.
Parent - - By Tyrone (***) Date 05-15-2014 11:12
Obewan,
Got it covered.  Solidification cracking is alway on my mind (and a bazillion other things).
I'm questioning if you think the weld profile is acceptable or not.
Tyrone
Parent - By OBEWAN (***) Date 05-15-2014 11:53
Are you welding to any particular code?

Acceptable profiles in most codes only require the root of the fillet to be consumed - but use care here, because some codes require the measured distance from the deepest root penetration moving outward perpendicular to the midpoint of the fillet surface to meet certain distance requirements.

There would likely be more concern with the external surface profile, and yours is not concave or overly convex, so my opinion is that you have an acceptable profile.  If the black indications are inclusions they would need to be checked against the acceptable limit(s).

Sorry about the confusion - I was not trying to make trouble over the hot cracking "concern" - just making a side remark that I have seen hot-cracks together with fingerlike dendritic grains.

I agree with the others on the gas comments, and I have seen profiles similar to this that were made with the GMAW-Spray process.
Parent - - By Lawrence (*****) Date 05-14-2014 13:21 Edited 05-14-2014 14:00
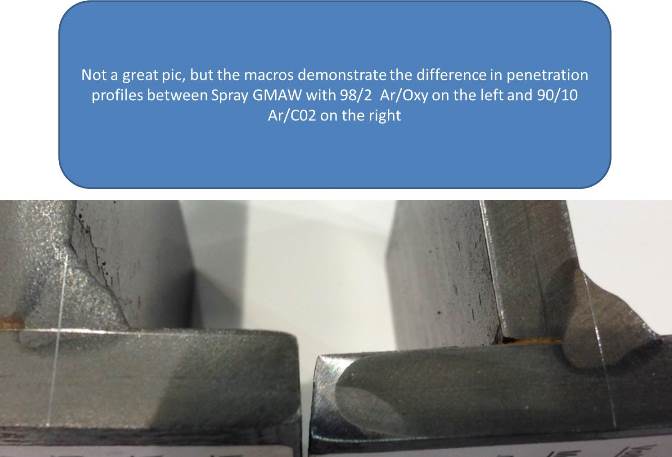
If this were GMAW (you did not say)  I would suspect you are using an argon oxygen shield gas mixture, which typically produces that type of penetration profile.

An argon Carbon dioxide gas mixture would produce a more rounded profile.

But for all I know you did that with an EB

Edit:
Parent - By Mwccwi (***) Date 05-14-2014 16:42
travel speed and push versus pull can influence bead shape also, especially with GMAW
Parent - - By Tyrone (***) Date 05-15-2014 11:05
Yes GMAW, but I didn't want to get into a discussion on "how" it was created.  I wanted to focus the discussion on the shape. 
 
Your response, and others, imply that the finger penetration is not desireable. Is there a reason why?  I'm trying to figure out if I should spend time and resources to prove it's beneficial or detrimental.
You mentioned EB...hmmmm, it has that pronounced finger and is acceptable.  (Same as LB, thinking out loud).  More food for thought....

Tyrone
Parent - By Lawrence (*****) Date 05-15-2014 15:32
There are width to depth ratios that need to obey sound engineering principles and I think are addressed in many commentaries.

I cant judge what is undesirable in your situation as it is above my paygrade.
Parent - - By Plasma56 (**) Date 05-15-2014 16:31 Edited 05-15-2014 16:58
I like the weld profile.
Thank you for posting the image. I found it an interesting image to ponder in my thinkings.
It has created a bit of interest in replies and seeming opened up a few questions.
If you happen to have any other related data please take the time to post. I'm sure from the responses you may be a bit challenged by the task but I would be quite interested to learn from your efforts.

Your not wasting your time thinking outside the norm. Welding technology has come a long way to disrupt the notion turning up the heat makes it better. The additional shielding gas cost could well be offset by reducing amps/volts,  increased deposition rates, narrowing of HAZ areas. Testing is however the proof, that takes time and money.

But I like the way your thinking.
Parent - - By Tyrone (***) Date 05-16-2014 11:17
Thanks Plasma56.  Out of the box, that' me....

Obewan/Lawrence,
No code on this project (R&D money).  On the side, you've both given me an avenue to analyze for solidification cracking.  I had not considered correlating depth to width ratio for the cause of solidification cracking.  I've set this up as a Design of Experiments, so should be simple to run the numbers. 

Lawrence,
I cant judge what is undesirable in your situation as it is above my paygrade.   Hahaha, I'll raise the 2 cents for your opinion to a shiny nickel.

My current thought is that if the penetration profile is the norm for GMAW-S, and acceptable, then there really isn't an issue.

Tyrone
Parent - By jwright650 (*****) Date 05-16-2014 11:23
What Lawrence mentioned about the width to depth ratio is something that D1.1 covers and needs to be considered when working to that code.
Parent - - By OBEWAN (***) Date 05-16-2014 12:42
Tyrone:

Regarding solidification cracks and your proposed DOE:

I personally would not pursue this extra work unless the information can be obtained with no "extra" work.  However, if you already plan to run a DOE to study other factors of concern, then by all means, include a look at cracks - if they come up.  However, there may be no cracks!

Otherwise, you might find it more cost effective to just implement best practices across the board.  I would certainly look at the depth to width ratios that have already been established by codes like D1.1 and maybe D17.1 - but if you have no contractual code obligation to control the D/W ratio(s), then it becomes an engineering "judgment call" when you qualify your procedure.  You might want to consider the cost of running your DOE(s) vs. simply repairing cracks - if and when they occur - assuming the occurrence is infrequent.  :;

Just my $.02 worth - FWIW.

But, I do love experiments!
Parent - By ssbn727 (*****) Date 05-16-2014 16:17
Hi Tyrone,

Depth to width is important as is consistency throughout the entire length of the weld also... :eek::surprised: If your macros show consistency in shape and D to W throughout the entire length of the weld and is repeatable with set power source parameters weld after weld with machine after machine then you should be relatively okay... :eek::roll::neutral:
But, if this hasn't been recorded as such then you should reconsider and instead follow best established practices instead... :roll::smile::grin::lol::twisted::wink::cool:
Just my 2 scheckles worth.:twisted::lol::yell::lol::yell::lol::wink::cool:

Respectfully,
Henry
Parent - - By Tyrone (***) Date 05-20-2014 12:19
Obewan,
I quickly re-analyzed the DOE with depth to width ratio as an input factor.  The R2 value was extremely low.
Therefore, couldn't statistically correlate d/w ratio with solidification cracking.
Tyrone
Parent - By js55 (*****) Date 05-20-2014 12:23
I think we are overthinking this. The points are valid and warrant consideration but overall the profile is fine.
In fact, there is consideration right now in ASME for a stepped groove configuration in some applications that will force the HAZ cracking path into UBM and thereby contribute to crack arrest.
Up Topic Welding Industry / Technical Discussions / Weld Penetration Profile

Powered by mwForum 2.29.2 © 1999-2013 Markus Wichitill