Not logged inAmerican Welding Society Forum
Forum AWS Website Help Search Login
Up Topic Welding Industry / Inspection & Qualification / As-welded inspection of fillet welds with galvanizing finish
- - By hburg rocket (*) Date 11-06-2015 18:41
Existing fillet welds with galv finish:  From an as-welded viewpoint, does galvanizing ever so slightly increase or decrease the "apparent" size of the weld?  Is this answer dependent upon whether or not the weld is concave or convex?  Or, using the typical fillet guage, is the difference "negligible."

In other words, for an as-installed weld, if the spec requires 1/4" fillet [with HDG finish], would you expect the weld [with the galv] to be slightly larger, or slightly smaller than 1/4", or not easily detected using the common fillet guage?
Parent - - By aevald (*****) Date 11-06-2015 18:58
Hello hburg rocket, galvanizing "does" add a slight size increase to a weld and additionally if the part is dipped in a manner where the galvanizing can "pool" it can be a considerable increase and also change the apparent profile of the weld. As to judging weld size: it will be completely dependent upon a number of variables of which you would need to assess and judge based on your view.

Was this something that was missed in the initial fabrication phases of the manufacture of these parts? Somebody trying to cover their backside? I am sure that others will have a much more technically correct and code based reply. Good luck and regards, Allan
Parent - - By Lawrence (*****) Date 11-06-2015 19:09
I dunno

Typical G90 is .76 Mils typically... If you can measure that with a fillet gage, you are a pretty special inspector.
Parent - - By ctacker (****) Date 11-07-2015 01:55 Edited 11-07-2015 01:59
I got a WABO card that says I'm a special inspector, but maybe i am not pretty enough to measure zinc with a fillet gauge! :grin:
My question would be "why are you inspecting welds AFTER galvanizing?', and are you accepting welds that have been coated?
Parent - By Lawrence (*****) Date 11-07-2015 17:21
Thank you for saying that...

It's coated!

Now maybe the manufacturer did their 100% visual prior to coating, and this is a matter of a customer seeing welds they think are small afterword.
Parent - - By welderbrent (*****) Date 11-06-2015 19:00 Edited 11-06-2015 19:03
It should be slightly to even significantly larger.  Gal coatings can get very thick at times depending upon many variables and the project specifications.  You could pretty easily expect to see results between 5/16-3/8" fillets instead of 1/4".

I don't know how anyone would ever justify an UNDERSIZED weld was a result of galvanizing.  Ludicrous comes to mind.  Grasping at straws as well.  Ignorance or just plain deceitfulness is probably very appropriate. 

For the most part the D1.1 code would indicate measuring of welds prior to any coatings application.  The inspector needs clear view of the weld in order to verify it is acceptable.  Look at Section 5 towards the end, don't have it with me at the moment.

EDIT: re-read your query.  So, the specs call out the weld as 1/4" AFTER application of Galvanizing?  Still, with the many application processes of galvanized coatings the weld would always be larger after the process.  It's only a question of how much.  So, the welders should not really attempt to undersize the weld very much from the after galv dimension.  I would try to get them very close to 1/4" so that there was no question that they would be at least 1/4" after galv.  If your welders are saying that it shrunk after galv then they are pulling a fast one.  And the profile of the weld will not matter.  Paint, powder coat, anodizing, galvanizing, will all ADD to the size of the part including the welds.  Only a matter of HOW MUCH.

He Is In Control, Have a Great Day,  Brent
Parent - - By Lawrence (*****) Date 11-06-2015 19:10
Brent.... You see galvanizing add a full 1/8" to fillet leg length?

"You could pretty easily expect to see results between 5/16-3/8" fillets instead of 1/4"."


I'm incredulous.
Parent - By hburg rocket (*) Date 11-06-2015 20:02
The typical 3/4" galv bolt has difficulty fitting in the typical 13/16" bolt hole, so I suspect the "typical" galv thickness is certainly less than 1/32" [1/16" / 2].  That being assumed, it sounds like one cannot hardly tell the difference in a typical G90 galv fillet weld size vs. non-galv weld with a gauge, disregarding unusual circumstances.

p.s.  The welds should be checked prior to galvanizing.  Tho' it may be possible, I have never seen a spec that requires a weld to be sized after galvanizing.

p.p.s.  The shop QC was practically non-existant, and tho' the welds are "very pretty", they are almost all 'borderline' and many are undersized!
Parent - - By welderbrent (*****) Date 11-06-2015 22:38
You guys must be kidding.  Hot dip can easily be thicker than the 'required' and it will also depend on how the part was dipped and let stand after removal from the dip.  90° corners that may be in a trough position can get pretty thick.

YES, I have seen galv thick enough to add over 1/16" to the size.  And not just a one time thing.

Glad you get incredulous so easily Lawrence.  So you are unwilling or unable to believe my statement.  Sorry to hear that Lawrence.

Brent
Parent - - By Lawrence (*****) Date 11-07-2015 17:29
You have way more experience with this thing than I do...

I'm incredulous because I've never even considered adapting a weld measurement because of a coating....

It's correct or it's not as far as size goes..

Could it pool up and take up space at the toe of a weld?   I suppose it could and does... But there is no possible way this could be objectively worked into a weld sizing inspection policy.  So again incredulous.

I was in the wrong if my words suggested I don't trust what you see...  I do trust you, and have learned something here from you.  So thanks for that Brent and please forgive the rudeness.
Parent - By In Tension (**) Date 11-07-2015 18:38
Yes.  Brent, with your experience you're the go-to guy to be giving advice on this one and I defer to your judgement.  Definitely not disagreeing with you.  All of our galvanized parts are coated to only a few mils but I can see large structural shapes behaving much differently than the components I've been inspecting lately.  My input was based on theory and not practical experience.
With 1/16" of build-up on the weld I wouldn't even attempt to size them.
Parent - - By welderbrent (*****) Date 11-07-2015 19:12 Edited 11-07-2015 19:17
I agree completely that the weld sizing should not even be considered AFTER galvanizing.  Why would it even be in the specs? 

Again, it all depends upon how parts are hanging, dipped, cured, and then if the weld is concave or convex, etc.  Even using Allan's diagrams it would not be inconceivable to have a concave fillet weld with puddled galv enlarging the dimensions so that the throat was able to be measured much larger since the gauge sits back from the corner being measured.  Galv settles into the low area while being removed from the tank. 

What I found hard to believe is that HDG is only .79mil thick.  Less than .00080 in thickness?  Really? (honest question, not rhetorical nor sarcastic)  If my simple math is correct, 1 mil is .001 or 1 thousandth of an inch as I recall.  So .79 mil is just over 3/4 of 1 mil or .001 which means in decimal equivalents it should be about .00079.  That seems awfully thin to me for what I normally see for Hot Dip Galv. 

1/64"= about 15 mil = .015625. 

Anodizing or paint I could see, but galvanizing by Hot Dip?  Is there really supposed to be a decimal in front of the 79?

Now remember, most of my experience with HDG is with channels, angles, flat bar, beams, weldments with differing angles, pipe/tube, etc.  Maybe they aren't that careful about the thickness on these as on other applications; bolts/nuts, machined parts, etc. 

But, bottom line is, when should the weld sizing have taken place.  NOT after the galvanizing seems to be the common consensus and the code application per clauses already cited. 

Lawrence, I don't consider you rude.  Even when we disagree.  Your sentence structure and word choice caught me off guard.  I was challenged once when I used 'incredulous' as to if I knew what I had just said.  While there can be variations of most of our words it still came down to 'unwilling or unable to believe something'.  I still use it at times when a better word or at least a change in the sentence/paragraph structure would be most advantageous. 

Still your respected friend, Brent

edit: dyslexic moment; .76 not .79
Parent - By aevald (*****) Date 11-07-2015 23:05
Hello Brent and others, I have been around galvanizing on a number of fronts and for a number of years. When I was located in the Portland, Ore. area I believe that there were 3 major galvanizers that the locals used for their parts/structures/etc. There are so many variables that can add to or subtract from the "coating" that results from the dipping process.

Vat temperatures, how parts are positioned and whether they are shifted during the dipping process and when as related to their removal. How clean the parts were and how they were cleaned prior to dipping and more. How the parts are removed and where and how they are oriented upon removal for "cool down". Just about everyone of these galvanizers would exhibit somewhat different results when you viewed the various parts.

I don't know for sure if In Tension may have been referring to zinc plating when he made comments about the thicknesses of deposited by galvanizing, I do believe that even though these two processes accomplish roughly the same purpose they are definitely different in how they are applied. Personally I have been around the hot-dip galvanizing quite a bit and have never been directly exposed to the zinc plating process that is often used on many fasteners. But, the zinc plated fasteners generally do have a very "thin" coating when compared to the more industrial zinc coatings that result from the hot-dip processes used on them.

Bottom line here: any inspection of the "welding" should have occurred prior to coating, then if there is a provision for knowing the coating thicknesses(as there sometimes are) the appropriate equipment should have been employed after coating for verification.

Great thread folks and very informational, you all got my grey-matter to percolating. Best regards, Allan
Parent - By dick (**) Date 11-07-2015 00:03
Rocket,
First I think the apparent weld size would appear to be slightly larger with coating. Don't see where concave or convex would have much effect.   I do believe the typical weld gauge would not give very accurate measurements due to pooling (thickness of coating at the toe of the weld) keeping gauge farther from actual weld. To me, 2-6"ers would get me a better measurement of actual weld with coating. But have not dealt with galvanizing only zinc, chrome, and paint coatings (elcometer).
Just my thinking, open for suggestions also.
Dick
- - By In Tension (**) Date 11-06-2015 20:31
Kinda with Lawrence on this one.  A quick look at ASTM A123 shows that HDG grades are measured in thousandths and microns... negligible in terms of weld size.  I don't remember having ever put a fillet gauge on an HDG weldment but if I did I would probably feel comfortable accepting or rejecting the size in the as-HDG condition.  Remember that as the apparent weld size grows, so does the reference surface off of which your fillet gauge is measuring.  So the measurements are relative to one another.
I would also feel comfortable refusing to measure them in the HDG-condition if it were obviously affecting weld size. I see where Brent is coming from because I've seen some pretty botched galvanizing operations.  So, doing this in practice is much different than in theory.  Therefore the answer must be... it depends!
Parent - By aevald (*****) Date 11-06-2015 23:09
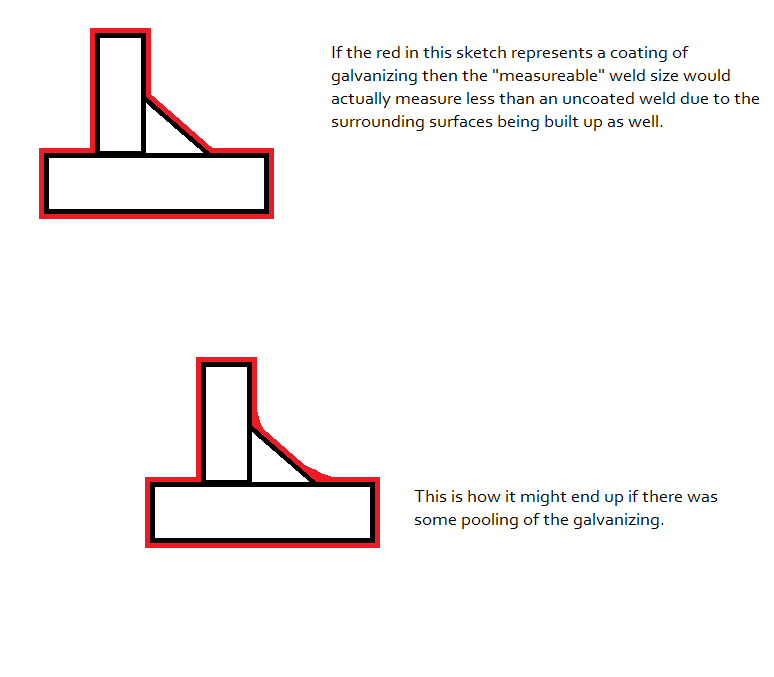
Hello In Tension, got to reading and thinking about what you said about adjacent surfaces and taking this to minute detail, etc., you are certainly correct the weld size would "measure less" because of the consideration of all of the adjoining surfaces. Put together a little "sketch" that visually applies, at least from my perspective. Thanks, Allan
- - By CWI555 (*****) Date 11-18-2015 15:51
Sizing has been well covered here. However I don't see (will re-read after this post) mention of LOF and other potential flaws. Something like that could easily be covered up.
Parent - - By thirdeye (***) Date 11-27-2015 16:45
I was thinking the same thing, especially surface porosity which is filled and not detected.
Parent - - By 803056 (*****) Date 11-28-2015 18:51
If you can't see it, it ain't there. It is akin to a layer or two of high viscosity paint. Both HDG and HVP should be applied before the pesky inspector shows up. :eek:

Al
Parent - By thirdeye (***) Date 11-28-2015 19:03
Heheeheeee, so true.  

I learned the hard way once that aggressive sandblasting can expose cluster porosity that was immediately below the surface, and not seen during the initial inspection by the welder, a foreman or myself.  When possible I prefer to do another visual following blasting, but I make the following notation in the 'condition' section of the report: "as-welded, VT before sandblasting".  If the shop performs a dry MT using contrast paint before I do my visual I note that too, but many times the light dusting of contrast paint will highlight both undercut and surface pores.
Up Topic Welding Industry / Inspection & Qualification / As-welded inspection of fillet welds with galvanizing finish

Powered by mwForum 2.29.2 © 1999-2013 Markus Wichitill