Not logged inAmerican Welding Society Forum
Forum AWS Website Help Search Login
Up Topic Welding Industry / Technical Discussions / Lamination - Welded Base Plate
- - By Distilled (**) Date 02-23-2024 22:07
I've spent several hours perusing forum posts and other documents on this topic, mostly dated posts, and I think I know the answer to this question already, but I thought I'd resurrect the topic and post anyway and see if anyone has anything new.

I'm familiar with ASTM A435 and it's evaluation technique and acceptance criteria and I've read D1.1:2020's sections regarding mill induced discontinuities as well as the related commentary, but it is pretty specific to those visible in cut surfaces.  I also understand the concern particularly with lamination type discontinuities which have a plane that is perpendicular to tension, such as in a t-joint.  Specifically in my case we're dealing with base plate to pipe or tube connections; CJP welds using static loading design criteria.

So, the question is, has anyone seen or been involved with the development of accept/reject criteria where this condition exists at this type of connection?  Is it even feasible to consider that some indication of a lamination is not detrimental in this type of joint and tension? 

Thus far I've argued that there should be zero tolerance for lamination or de-lamination as it were, and my Engineering Team agrees and any plates having indications found during straight beam UT inspections near or at the weld root out to the center line of a bolt hole pattern are quickly rejected.  We're not necessarily sizing the area of the indication or attempting to apply some level of reflected signal amplitude to determine the severity - zero tolerance - period. 

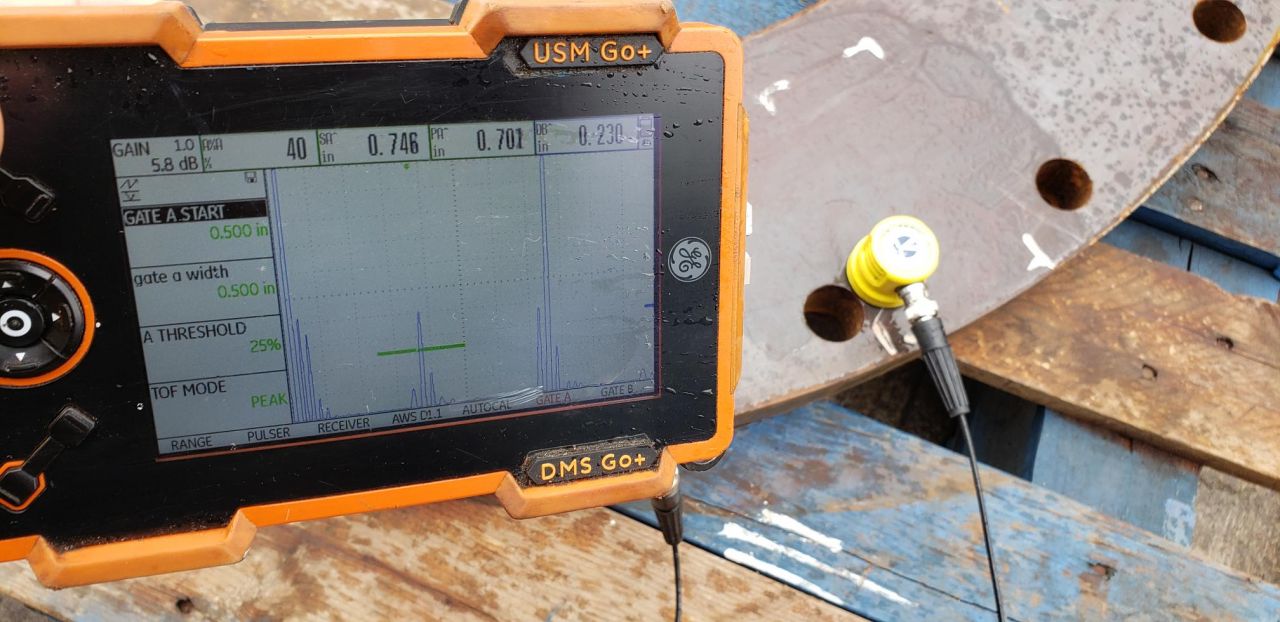
On one hand I completely get it... on the other hand I'm not sure if we're being fair to our vendor or the mill. :)  I've included a photo; 1-1/2" plate, indications consistent at approximately .730" to .760", but primarily we see several spots very very close to .750".  There is a pretty consistent reflector throughout the plate, but in places I can peak at 30% to even 50% screen height with my back reflector at 100%.  To me that is excessive, but should there be SOME tolerance for smaller indications??

I'd love to hear some feedback and fresh opinions on the topic.  Thanks in advance.

Shoot - - can't figure out how to insert a photo.

Cheers.
Parent - By Jovi Zhu (**) Date 02-26-2024 07:56 Edited 02-28-2024 03:00
Hi Distilled,
I appreciate your thoughts especially the thinking of whether the judgement is fair to the vendor.

"Zero Tolerance" from buyer is sometimes a cover of strict quality control with a core of "not capable or willing to bear any risk". From the seller's side the mill is not capable either to calculate and consider the service condition to convince and guarantee the serviceability of the plate to serve the customer.

Most commercially available structure steel plates are rolled and the inner imperfection will become planar lamination of different degree, however for the most cases this is not harmful since the service load are usually parallel to the lamination. (or I can even say it is even benifitial for some cases as the lamination increases the "surfaces" within the thickness to make the plate "stronger" same as why a wiresteel is stronger than a rod of the same size.)

ASTM A20 also gives some acceptance critera for "edge imperfection" but after further rolling or welding if laminar tear is detected, no one from the buyer's side wants to say it is acceptable.

This is a grey area where buyers are not paying for a perfect defect free melting process while sellers are still supplying commercial quality level plates.

Just some thoughts.
Parent - By jwright650 (*****) Date 02-26-2024 12:26
When we purchased plate at my previous employer, we specified the tolerances for laminations in our purchase order. If the mill wouldn't agree with the purchase order, they wouldn't supply the plate. I suppose in your case, you need to figure out what exactly is tolerable or not and then that gives your UT inspector(s) some guidance when mapping out laminations. I really think your case is an engineering question. Find out what they can live with.
Parent - - By Distilled (**) Date 02-27-2024 19:28
Thanks for the replies!
Parent - By TimGary (****) Date 02-29-2024 12:55
Sometimes it helps to look at issues from a business sense.

First, 0 tolerance for laminated plate in cyclic connections, period.
Raw, uncut plate lamination scan inspections of materials to be used in cyclic connections make sense as an investment in scrap reduction. Meaning, if a lam scan is part of the receiving process, rejectable plates can be returned to the vendor without charge, as long as the material has not been cut or damaged by the receiver.
When a plate does make it through to being cut before a lamination is detected, 0 tolerance means scrap the plate or at least laminated sections of the plate, so that material investment is lost.
When it comes to 100% undoubted static connections, reality is that lamination is not really a problem, even though most weld codes will call for rejection. Any code restriction can be over ridden by the Responsible Technical Authority, most often the Design Engineer over the project. This carries a lot of risk for the signers of the necessary documentation, and may also require approval from the Customer's and/or End User's Engineer, so it's not often done.
However, it does make business sense to use already purchased materials somewhere, rather than scrap, if it can be properly controlled. One way is to use it for temporary construction aids that shall not be included in salable product. Another way is to approve it's use for guaranteed static connections. Also, it can be used for weld training purposes.
I guess the point is 0 tolerance for cyclic connections shouldn't have to mean 100% scrap of laminated materials.

Tim
Up Topic Welding Industry / Technical Discussions / Lamination - Welded Base Plate

Powered by mwForum 2.29.2 © 1999-2013 Markus Wichitill