Not logged inAmerican Welding Society Forum
Forum AWS Website Help Search Login
Up Topic Welding Industry / Inspection & Qualification / MT Following Heat Treat
- - By bozaktwo1 (***) Date 08-28-2009 01:08
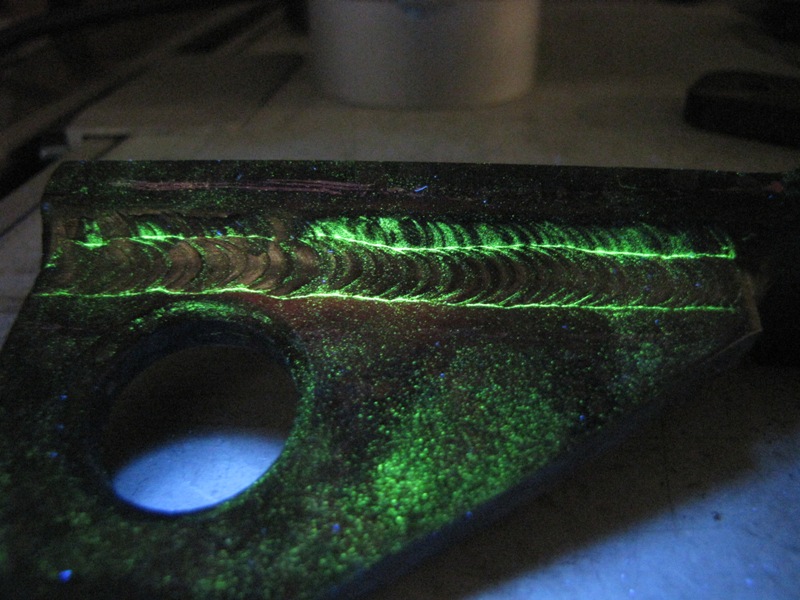
Let's say I have a piece with 1/4" multi-pass fillets about 3" long, AISI 4130, went through heat treat.  Now let's say that the piece has to pass MT with a flourescent process.  The tech is getting indications the full length of the weld on both the upper and lower toes.  I get the piece back and it hadn't been cleaned - I mean it hadn't been so much as wire-brushed. 

My question: Is it likely that by not cleaning the ash/scale from the parts following heat treat that this is a false indication?
Parent - By Mikeqc1 (****) Date 08-28-2009 01:28
It is possible that its a false indication, if the weld area and reasonable amount HAZ were not cleaned Id Question the whole inspection and want it rechecked By different tech, or id do PT on it myself its quick and inexpensive.
Basicly its gotta be clean.
Parent - - By Arctic 510 (**) Date 08-28-2009 02:17
I would question why the tech performed MT on a piece that was as dirty as this sounds...it should be wire wheeled or wire brushed at a minimum.
Parent - - By Jim Hughes (***) Date 08-28-2009 03:19
I would make him pull his procedure out and review it with you. There will be a cleaning part to that procedure and by what your describing he/she did not follow it.

Jim
Parent - - By Bill M (***) Date 08-28-2009 16:04
Lets play devils advocate for fun:

You said:
(Let's say I have a piece with 1/4" multi-pass fillets about 3" long, AISI 4130..)  = So you made the part

(...went through heat treat.)   =   so you sent it out for heat treat

(...the piece has to pass MT with a flourescent process.)  =  From heat treat you sent it to a testing lab since:

(I get the piece back and it hadn't been cleaned)  =  The testing lab sends it back to you with "reject" marked all over it and didn't clean it.

(The tech is getting indications the full length of the weld on both the upper and lower toes)  =  the technician inspected the part "as it was submitted" to him and reports finding linear indications on the toe of the welds.

(My question: Is it likely that by not cleaning the ash/scale from the parts following heat treat that this is a false indication?)  = quite possibly, but I think you already knew this.

My Question:  Is the lab expected to clean the part?  Was heat treat expected to clean the part?  Did the PO to the testing lab specify cleaning?  Did the lab quote cleaning of the part? 

Yes, the lab probably should have called you to advise you of the condition the part as was submitted and advise you the requirement for cleaning, maybe quote the cleaning work as an extra, or return it to you for proper cleaning.
Parent - - By bozaktwo1 (***) Date 08-28-2009 17:20 Edited 08-28-2009 17:39
The lab is following a proprietary procedure which specifies that all welds are cleaned prior to performing testing.  My take on it is that by specifying the MT spec, I am also specifying the cleaning.  Does that make sense?

Here:

This is one of the pieces.  I wanted to get an idea from folks who have tested these things, make sure I was on terra firma with the theory.  I don't want to get on my welder's case.  As it stands, I cleaned them and sent them to a different vendor to make sure.

The reason they go straight from HT to NDI is to save time.  These vendors are out of the area, but they are close together.
Parent - By bozaktwo1 (***) Date 08-28-2009 19:05
Theory validated! :)

All pieces passed by the second house.

Thanks all for your inputs.
Parent - - By CWI555 (*****) Date 08-29-2009 02:59
Now thats a crappy MT. However, you need to be careful here. Sending parts straight out of the HT and trying to get the NDI/NDT/NDE company to do your cleaning for you by forcing them to do so via their procedural/code requirements is asking for trouble. It should be pre-cleaned prior to sending for NDI. Don't be surprised if that piece was deliberately not cleaned to send that message. If I were their level III/owner I'd have simply added the required extra cleaning time to the bill.
Parent - - By jarcher (**) Date 08-29-2009 19:05
I'm not sure I understand your position on being careful. The NDE contractor has a published spec for MT. They took the client's money to accomplish MT by that spec. If the piece was deliberately not cleaned, it was willful abrogation of the contract established by the PO and their acceptance of the PO. If they were merely negligent in not cleaning it, they still did not deliver what they agreed to provide: MT inspection according to their procedure, and charged for it anyway. Either way they defrauded their client. If the NDE contractor was unwilling to clean, that should have been stated up front or they should have refused the job. If they willfully proceeded to do something that violated their own specification in order to "send a message," that was a clear violation of ethics as well as the contractual arrangement. If they negligently omitted cleaning, that was simply sloppy and again a violation of contract. Consider also the potential loss the client might have suffered if bozaktwo1 had not questioned the validity of the report - not only might his company have had to pay for a nonconforming inspection, but all the parts (perfectly good) might have ended up as scrap. I can't say I would be too careful in my dealing with a vendor if I was placed in a similar position.
Parent - - By CWI555 (*****) Date 08-30-2009 00:24
"If they willfully proceeded to do something that violated their own specification in order to "send a message," that was a clear violation of ethics as well as the contractual arrangement"

Firstly, we do not know what the contractual arrangement was. It could be that the peice was to be cleaned or not. It could be a lot of things. As for ethics, If they send a peice back reporting it is good, when they had performed an exam that was subpar, then yes, you have an ethical violation. If they have a contractual agreement that they should be cleaned first, and that cleaning was no good, then reporting the exam as failing, they have not released a subpar piece, and therefore I see no ethics violation. Crappy way to do business, but no outright ethics as they are not buying something off that should not be bought off.

I say careful because of the lack of details, we did not see all the details, nor do we have a complete history. I would not say something definitive without such details. It is a mistake to assume one way or another, and therefore my generalities.
Parent - - By jarcher (**) Date 08-30-2009 03:45
They agreed to inspect according to their procedure. That is implied in accepting their client's PO to perform the inspection, whether explicitly stated or not. If they tendered a report at all, whatever the conclusion, they strongly implied they had followed the procedure agreed upon. The procedure was agreed upon when bozaktwo1's company gave them a PO requesting inspection to whatever standard was named, since procedures necessarily name the criteria to inspect to, i.e. ASME, AWS, MilSpec, etc. Procedures also usually require adherence to industry accepted standards - ASTM E709 in the case of MT. E709 does have some things to say about cleanliness of material to be inspected I believe.

We do not understand what the contractual arrangement was in detail, no. But at the minimum it had to include the client's offer to pay for inspection and contractors acceptance of that offer. Strongly implied is the contractor's expertise in performing said inspections, otherwise why not contract with Joe's Bar and Grill to perform the inspection? Such expertise would usually be presumed to understand the procedure they themselves generated and to abide by it in execution of a contractual relationship, which is why the report was unethical, assuming they willfully violated their own procedure. Any report pretending to be based upon a procedure that was not followed is a fraud when the procedure was willfully not followed.   If it was done though sloppiness and lack of attention to detail, its not so clear that there was an intent to defraud, but it is clear that the NDE contractor did not render a report based upon their published procedure, IOW a substandard product accompanied by the claim (Yes, by forwarding a report that such and such was inspected to whatever standards, they are claiming it was. I would bet there is such language on their report. I don't accept reports, personally, that don't lay out standards for method and acceptance and I don't know anybody in the Oil and Gas Industry that would.) that it was correctly done. From the information we do have the report is palpably false. Therefore upon notification of the fact, the contractor should refund whatever fee they charged at a minimum to remain ethically correct in this matter.

Obviously, based on the above, I can not agree with the view that there is not enough information to draw an actionable conclusion. If they were unwilling to clean the parts, they should have returned them or negotiated a fee for cleaning. To inspect them, violating their own procedure, and submit the results as properly done inspection, that just doesn't wash. You're welcome to your view of course, but as a guy that spends my company's money on outside NDE, a vendor that performed the same way for me would be off the vendor list.
Parent - By bozaktwo1 (***) Date 08-30-2009 22:58
The procedure is a customer's proprietary specification which does specify cleaning prior to inspection.  My intent was not to question contractual obligations (they're quite clear to me), but rather to receive some insight as to whether the presence of a small film of ash/scale left from the HT process would entrap enough of the flourescent to show as indications.  I believe that I have my answer, now. 

Thank you, gents for participating.  Have a nice day! :)
Parent - By Jim Hughes (***) Date 08-31-2009 18:00
I have to go back to my original post. The original poster should have reviewed the NDE labs procedure. It would be very easy to prove they did not follow their procedure. I guess instead of assuming, I should ask.

Do you have their procedure? Did you review it? Is it obvious they did not follow the procedure that you reviewed? There is your case against them, if you answer yes to all these.

Jim
Parent - - By bozaktwo1 (***) Date 08-30-2009 02:36
The cleaning method is called as a part of the MT spec.
Parent - - By 803056 (*****) Date 08-31-2009 05:13
There's cleaning and there's cleaning. Most laboratories that perform NDT are not set up to provide grinding or grit blasting as part of their "cleaning" operations. I would be inclined to expect the lab to be capable of cleaning oily residue, dirt, etc, but not heavy mill scale or scaling from PWHT.

Before hoisting the first lab on the pike and blessing the second lab, you should consider all the factors involved.

I will grant you that if the surface conditions of the part was not conducive to proper testing, the first lab should have informed you of the fact. Then you could have made the decision to properly prepare the part for testing yourself or let the lab hire a vendor to preclean the part before they performed the testing. Then again, they may have done so in the past and your company has failed to follow up on their recommendations.

However, looking at the photo you included, I didn't see evidence of scaling that would lead me to suspect the indications are false unless I utilized a different NDT method, perhaps fluorescent penetrant testing, to validate the MT results or prove the indications were false due to weld geometery. Even the apparent shape of the weld beads doesn't lead me to suspect weld geometry as being the culprit. I would consider sectioning one of the rejected parts and performing a microscopic examination to check for toe cracks or HAZ cracks. Considering the material (4130) is highly hardenable and subject to hydrogen induced cracking in the areas where the MT indications are located, I would strongly recomment using an alternate NDT method to determine exactly what is going on.

Just because the second lab reported the part as good doesn't mean the first lab was wrong. I've seen numerous cases where a NDT technician performed the test incorrectly and reported the part as being acceptable.

Best regards - Al
Parent - By kipman (***) Date 08-31-2009 12:50
I agree with Al.  These things are only 3" in length, so you are likely making many of them.  Take one or a few of them, do some NDT using other techniques or methods, and then section them.  You may even be able to use the pieces as workmanship samples (that show proper fusion at the root of the joint, for example).
Mankenberg
Parent - - By bozaktwo1 (***) Date 08-31-2009 17:09
Yeah, Al, thanks.  I'm working with the guys at the 1st lab to figure it out now.  The theory about the ash/scale from the HT process was formed after talking with several people who are in that loop.  I'm not interested in hanging anyone from the yardarm as I am in getting these parts through process and to my anxious customer.  BTW, cleaning called out is as simple as wire brush and solvent rinse.  I am assured by the tech at lab #1 that this was performed, but I can't see evidence of it.  When I wire brushed the parts, the welds came out nice and shiny, as opposed to dull grey as-received from the 1st lab. 
Parent - By wall2112 (*) Date 09-01-2009 00:11
in my oppinion, the part should have been recleaned to much background die. that could mask indications. and unless called out on the blueprint welds only the whole part has to be inspected. the part pictured is not cleaned good enough for that. it needs a real fine sand blast then alkiline cleaned before mag. that is only if the spec allows it. my question is, did anybody visual this part before heat treat. by the looks of it i don't think so.
Up Topic Welding Industry / Inspection & Qualification / MT Following Heat Treat

Powered by mwForum 2.29.2 © 1999-2013 Markus Wichitill