Not logged inAmerican Welding Society Forum
Forum AWS Website Help Search Login
Up Topic Welding Industry / Technical Discussions / New to TIG [and "self trained" in stick / MIG ]
- - By tiger2 Date 08-13-2014 15:09 Edited 08-13-2014 15:44
Hello,
  I am trying to learn to TIG weld aluminum. I've watched Mr TIG videos, and seen the Weldmonger's videos, which have been a great resource. Making it work has not come as easily as they suggest it might. I have a Lincoln precision TIG 225, set at 125 amps / auto balance / 3/32 4043 filler rod / 3/32 pure tungsten, as per the TIG sliderule's instructions. Results are "not so good." Can anyone suggest what I'm doing wrong based on the [hopefully] attached photos?
Photo is shown with starting point on the left. I should have flipped the picture before posting.
Attachment: croped2.jpg (677k)
Parent - By welderbrent (*****) Date 08-13-2014 15:29
BTW,

Forgot to welcome you to the forum in your other thread.

WELCOME TO THE AWS WELDING FORUM!!

Now, just for the record, you are running AC current with a stabilizer? 

Your pics have not shown up yet...still not got that figured out?

He Is In Control, Have a Great Day,  Brent
Parent - By Lawrence (*****) Date 08-13-2014 17:37
Contaminated tungsten and slow travel speed typically result in visuals like you have shown.

Remember that aluminum goes up the sides of the electrode when you "stick" it.  So when prepping the end you need to make sure the whole thing is clean to about 1/2 inch up.

It takes practice... But the faster you go, the less hydrogen you absorb, which causes that grainy appearance.
Parent - - By pipewelder_1999 (****) Date 08-15-2014 13:59
If your material is thin, try adjusting your AC balance to Max Cleaning (+) . This may minimize the overheating of the puddle. In addition, if you are welding on a small piece of material, remember that once it gets hot, it melts quickly. Cooling your pieces to the same temp before welding each practice bead will help maintain consistent conditions for each bead until you begin to get "an eye" for what is happening in the puddle. The lack of ripples indicate the puddle is staying molten long and cooling down slowly. Try speeding up.

If your base metal is thinner or near the thickness of the filler metal things can be a little more difficult. Try the same settings on a thicker piece.

Gerald
Parent - - By jwright650 (*****) Date 08-15-2014 15:10
"The lack of ripples indicate the puddle is staying molten long and cooling down slowly. Try speeding up. - by Gerald"

That was my thought when I saw the pic the other day...but I was viewing on the small screen on my phone so I waited until I saw it on the screen here in the office before commenting.
When the puddle is laying down that flat, travel a bit quicker and dip a bit faster, or just lay the rod in the joint and move on with the torch.....also keep your torch over the puddle a bit longer when you stop and extinguish the arc . The puddle needs that post flow of gas to keep it shielded until the puddle cools off.
Keep practicing and keep after it, you're getting there. :cool:
Parent - - By Lawrence (*****) Date 08-15-2014 15:14
Another nit-pick

NEVER lay down the filler wire and weld over it with GTAW of aluminum.

The "lay wire" technique is not suitable for aluminum for the following reason.

The oxide coating on the bottom radius of the filler wire will not be removed by the cleaning action of the AC GTAW arc if it is laid down on the base metal.  This will cause lack of fusion, and oxide inclusions that are visible in RT examinations.

GTAW of aluminum MUST use a dipping technique.
Parent - By jwright650 (*****) Date 08-18-2014 15:27
thanks Lar
Parent - - By Lawrence (*****) Date 08-15-2014 15:10 Edited 08-15-2014 15:15
Maybe nitpicky... But I disagree with addition of DCEP balance to reduce heat.

DCEP bias balance may place more energy at the electrode, but it also creates a wider arc cone and wider weld puddle which takes more metal to fill and typically slower travel speeds.

The key to reducing heat input for aluminum in GTAW and GMAW is to increase travel speed and cool the puddle with filler.

DCEP balance bias with GTAW should be kept to the minimum (within wps limits) that will etch/clean the oxide on the base metal. The only exception to this is in cases where a wide puddle is required for surfacing or build-up welds and heat input is of a lesser concern.
Parent - By pipewelder_1999 (****) Date 08-15-2014 16:10
You may be right. I do think it will reduce the amount of penetration and I agree there is a point where "too little heat is too much heat". I have welded a few thin pieces with Argon and DCRP and the penetration was definitely limited.
- - By 803056 (*****) Date 08-13-2014 17:01
Did you use acetone or isopropyl alcohol to "degrease" the aluminum?
Did you clean the aluminum with a clean stainless steel brush to remove surface oxides before welding?
Did you "wipe" the filler metal with stainless steel wool to remove surface oxides? It is also helpful to wipe the rod with a clean solvent soaked wipe before using them.
Did you wear clean gloves that are not oil tanned as most "work" gloves are?

Best regards - Al
Parent - - By tiger2 Date 08-13-2014 17:32 Edited 08-13-2014 17:37
Thanks for the welcome, guys. Welds were done on AC, new gloves, acetoned and brushed Aluminum [6061] ?Don't know about a "stabilizer" but not using pulse, a bit of post-flow. Don't know if this was done before I saw a suggestion to wipe down the filler rod, but came out of a fresh box. My screen shows [attachment] and I have to click on it to see the picture [in way close up detail! may need to zoom out] Hopefully it is there now. I posted a second photo with this post, also
Attachment: croped3.jpg (615k)
Parent - - By Blaster (***) Date 08-13-2014 19:09
Looks to me like you burned through and are contaminating from the backside.

Did you burn through?
Parent - By pipewelder_1999 (****) Date 08-15-2014 13:54
That was my 1st thought.
Parent - By welderbrent (*****) Date 08-13-2014 22:40
Yes, the photos are there/here now. 

I'll let the more experienced GTAW people handle the rest.  Good advice so far.

He Is In Control, Have a Great Day,  Brent
Parent - - By Blaster (***) Date 08-14-2014 00:16 Edited 08-14-2014 00:20
You should be using straight argon, about 20 CFH, about 1/4" electrode sticking out past the cup.  A good general purpose cup size would be approximately 7/16" on the inside diameter.  Travel fast enough to not burn through.  Hot fast and thin is a good rule for TIG welding.... really a good rule for most welding.

If you are going to use pure tungsten, 1/8 is a good all around choice.  It can be tapered down on the end for low current use if need be.

Any chance the leads are hooked up backwards, throwing off the AC balance?
Parent - - By welderbrent (*****) Date 08-14-2014 02:10
Thought I had noticed a gas previously but now I don't see where either he or other posters have mentioned that Blaster.  Good catch and a possibility. 

He Is In Control, Have a Great Day,  Brent
Parent - - By tiger2 Date 08-14-2014 16:49
Gas is 100% Argon. I don't think I burned through [not visible to me, anyway] The machine is brand new, and my friend has burned a few decent looking lines with it, so I'm betting it is me, not the equipment. I imagine my stick out is closer to 1/2 inch, and the slide rule called for gas at 15, not 20. I can try again with more flow.
Parent - By Milton Gravitt (***) Date 08-14-2014 17:30
I don't want to sound like a smart butt, but it will take a lot of practice to get your timing and everything down to do GTAW and aluminum is not to easy to learn. The thing about aluminum is that it needs to be clean and cleaned again to make sure.

                              M.G.
Parent - - By Blaster (***) Date 08-14-2014 19:09
My hunch is then that the combination of the electrode stick out and the typically long arc length beginners normally use is resulting in inadequate gas shielding.  Less electrode extension and an arc length in the 1/16" - 1/8" range may do the trick.
Parent - By tiger2 Date 08-19-2014 16:40
Thanks for all the advise, everyone. I actually get to make it to the shop today and try to put that advise to use. Updates soon, I hope.
Parent - By ssbn727 (*****) Date 08-15-2014 08:53 Edited 08-16-2014 05:05
"WELDCOME TO THE WORLD'S GREATEST WELDING & WELDING RELATED FORUM of the AMERICAN WELDING SOCIETY":cool::wink: tiger2!

If you're welding with a conventional power source, DO NOT USE PURE (GREEN) TUNGSTEN!!!! Use Zirconiated instead of "the green goblin." Use a Zirconiated tungsten instead...
Zirconiated (ZrO2-0.15% to 0.40% Brown)Is excellent for AC welding due to favorable retention of balled end, high resistance to contamination, and good arc starting... Preferred when tungsten contamination of weld is intolerable...

If you're welding with an inverter type power source you CAN use a 2% thoriated tungsten ground down to a pointed electrode with the head of the needle point ground flat or "Truncated" if you only have a choice between red or green and don't have the extra funds to use rare earth's instead... The leading experts would prefer a 2% Ceriated, 1.5 percent lanthanated or 1 percent lanthanated... That's because ceriated and lanthanated hold up better for AC applications than 2 percent thoriated, and are radiation free, unlike thoriated... The most common electrode used in DC applications remains thoriated... However, because of concerns about radiation, most experts strongly recommend ceriated and lanthanated electrodes for both AC and DC welding because of their superior performance and the fact that they are radiation free... Tests have demonstrated that the ceriated and lanthanated electrodes are equal to thoriated electrodes in terms of their welding properties and even surpass them in some respects.... Both the ceriated and lanthanated electrodes are DC- and AC-weldable and can be used universally for almost every welding task  And here's why:

http://www.thefabricator.com/article/aluminumwelding/choosing-tungsten-electrode-type-size-for-aluminum-gtaw

Here's another good one also:

http://www.lincolnelectric.com/en-us/support/welding-solutions/pages/aluminum-faqs-detail.aspx

http://www.lincolnelectric.com/en-us/support/welding-how-to/Pages/aluminum-category.aspx

http://www.millerwelds.com/resources/articles/TIG-GTAW-Tungsten-Selection/

As far as your weld photo is concerned, it requires me to ask you some questions prior to giving my own opinion... So the first one will be:

1.) Are you using pure Argon? And if you are, then what is your gas flow rate set at on your gas regulator?  And 2.) What is your electrode to work distance? 3.) What is your approximate torch to work travel and work angle? When you're feeding the filler metal to form the weld bead, are you keeping the filler metal within the gas plume around the torch's gas cup, and not contaminating the tungsten electrode as you feed in the filler and, are you dipping the end of the filler metal @ the leading edge of the "puddle" or are you just steady feeding the filler @ the same leading edge of the weld pool (puddle)?

Side Note* I hope you know that the machine (Lincoln Precision 225) you're welding with has a less than 40% duty cycle @ 125 amps and only a 10% duty cycle @ maximum output amperage/current. Also. the design is of the conventional power sources of the past being a transformer rectifier type as opposed to an inverter type power source...

When one is working and welding Aluminium, remember that in preparation for welding the Aluminium base/parent metal must be cleaned, the tools being used must be dedicated for use on Aluminium only, and mild steel tools can contaminate the aluminium surface so stainless steel tools are recommended... Cleanliness is the key word when welding Aluminium so wear gloves that cannot transfer any organic or inorganic residue on to the surface or on the filler metal... Use the proper grinding discs designed and dedicated for Aluminium only and stainless steel wire wheels only... The Three C's... Clean, Clean, Clean!!!:lol::cool:

Finally, once you established the puddle, start stacking them (the dime shaped puddles - hence the non-standard term of laying your bead to look as if you 're seeing a stack of dimes laid out flat on the joint) as you move but, don't stay in one spot for too long to overheat the metal
so run with it!

This 1st link is probably the best out all of the links I will post in this response with respect to showing you 10 different problems associated with Aluminium TIG welding, or better known as GTAW (Gas Tungsten Arc Welding) and the photo's will surely help you narrow down the possible cause of your Aluminium welding problems...

http://www.millerwelds.com/resources/articles/common-TIG-GTAW-welding-problems-visual-guide-graphic/

Here's a good troubleshooting chart:

http://www.millerwelds.com/resources/tech_tips/TIG_tips/troubleshooting.html

Here are some other links covering Aluminium TIG welding:

http://www.lincolnelectric.com/en-us/support/welding-how-to/Pages/aluminum-category.aspx

http://www.lincolnelectric.com/en-us/support/welding-how-to/Pages/tig-welding-aluminum-detail.aspx

http://www.weldingtipsandtricks.com/aluminum-welding-training.html

http://www.thefabricator.com/article/aluminumwelding/welding-aluminum-piping

http://shopmetaltech.com/welding/identifying-and-solving-tungsten-electrode-and-arc-issues.html

Here's another good link or two:

http://www.alcotec.com/us/en/education/knowledge/

http://www.alcotec.com/us/en/education/knowledge/techknowledge/

Here's the aluminium welding question and answer link:

http://www.alcotec.com/us/en/education/knowledge/qa/index.cfm

And finally, this one is a generalized TIG welding link that can be helpful in other applications also:

http://www.gowelding.org/TIG_Welding.html

Once you got your technique down, post some more photo's to show us your progress and then we'll give you an honest critique to improve your welds even more if they require any... And if you're ready, try welding those Aluminium cans together like Lawrence recommended and post your results afterwards okay?
Go for it!:surprised::grin::lol::wink::cool:

There's probably something I probably left out so if I did, I'm sure someone else will chime in and add more suggestions... Practice, practice, practice, and when you get tired take a short break but then go back and practice some more! Good luck and once again, "WELDCOME!"

Respectfully,
Henry
Parent - - By Lawrence (*****) Date 08-15-2014 16:54 Edited 08-15-2014 16:57
Good pic

I'm sticking with my original advice.

Too much heat (Degrees F) put into the work.

Welding near an edge is a problem with Aluminum... Because of it's high thermal conductivity the metal will drink and drink the energy from the arc and it will spread fast... Way faster than steel... The lower melting point means that metallurgical changes are happening at lower temps also.

When the puddle is molten it absorbs Hydrogen (it is literally soluble)  when the arc terminates the Hydrogen tries to run out of the weld while the puddle is cooling (Migration)... Slow travel speeds allow the entire workpiece to get VERY hot and pretty soon there is no place for the heat to conduct away so the puddle gets bigger  as you go (you have certainly seen this)...  The roughness at the crown of the weld (bumpiness) is actually little hydrogen bubbles that almost made it to the surface.   It is NOT important to have a shiny surface, but it is important to avoid the bumpy surface.

A practiced operator will reduce heat on the foot pedal as they go, but even this will not work if the workpiece is soaked fully with heat.

Increased travel speeds and *HEAT SINKS* are part of an aluminum welders tool box.... Little pieces of copper plate, brass plate or even steel will help take up some of that heat (energy) on those aluminum welds...  Even clamping your practice piece to the work bench makes a very big difference.

1.  Practice moving faster
2.  Stay away from edges when possible
3.  Use foot pedal to reduce energy (heat) to the puddle as you progress.
4.  Use the largest filler wire you can to help cool the puddle
5.  Use heat sinks whenever you can.

Others have said enough about surface prep.

A.  AC frequency and type of tungsten electrode have Zero bearing on what your pictures are showing us here.  As Henry noted Pure Tungsten = Bad
B.  Cerium and Lanthanum can be used for steel or aluminum without issues.
C.  Zirconium can be used for aluminum only and works very well
D.  Thorium can be used for Steel and Aluminum ONLY if the electrode is not overheated during AC operations.
E.  Auto balance is ok for beginners... Keep AC balance BELOW 65% EN when training
F.  Max Penetration Balance on a Transformer machine (Synchrowave or Precision Tig) is 68% EN (a 10 setting on the dial)
G. Setting an inverter beyond 68% EN without taking other countermeasures almost always leads to rejects.
F.  I don't think I know.. I know I know these facts.
Parent - - By Lawrence (*****) Date 08-15-2014 17:15 Edited 08-15-2014 17:19
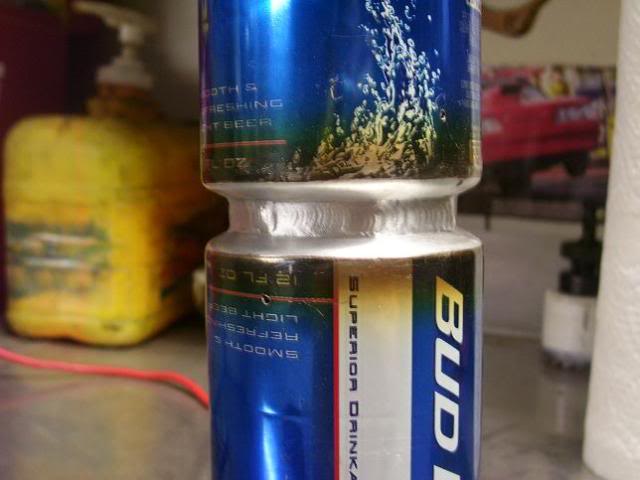
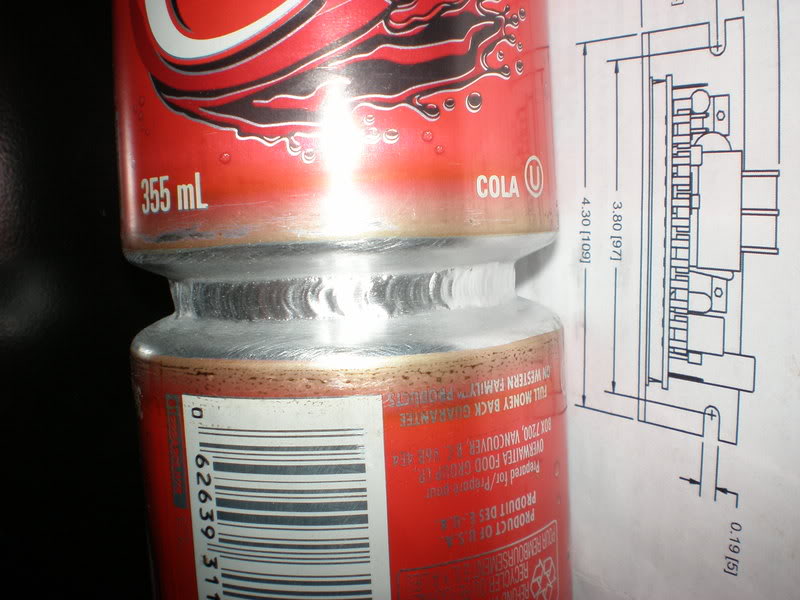
Last but not least.

Get a 1/16" tungsten electrode and collet set-up

Take two aluminum same size cans and punch a small hole in the bottom hemisphere of one can.

Place the bottoms together, laying the cans on their sides and secure them so there is no gap. 

Tack them at the top and then turn 1/4 turn and complete 4 tacks..

Weld out the groove between the two cans...

This takes a little practice but when you are finished you will have a very complete understanding about aluminum GTAW basics and will have spent zero on sheet metal.  I've used this exercise to train hundreds of people.

As you progress, try different balance settings to see how it effects the width of the welding arc,

Observe how the filler metal (also 1/16") cools the weld puddle.

Observe how the base metal (can) overheats if you stay too long in one place

Observe the difference in arc shape with a balled tungsten and a sharp tungsten

Observe the difference in arc shape with a clean tungsten and a contaminated tungsten

Observe the difference between a wire brushed can and a can without wire brush prep.

Observe the difference when the cans are fit-up well and when there is even a slight gap

Observe how the puddle changes and the heat moves depending on torch angles.
Parent - - By ssbn727 (*****) Date 08-17-2014 06:39
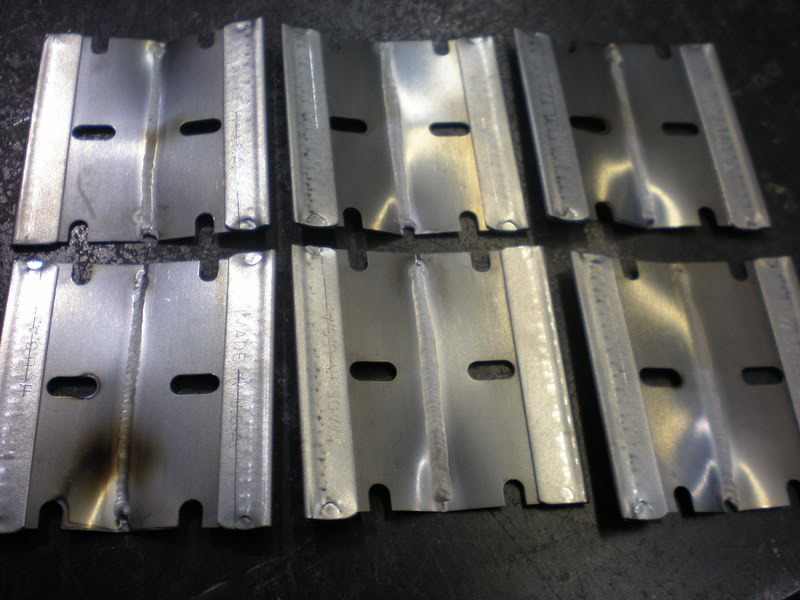
In case you're wondering what Lawrence is talking about regarding the welding together of 2 aluminium cans together, here's a video that should clarify the exercise...

http://www.youtube.com/watch?v=lJksVs2QT5Q

Attached are some pics showing hoe the weld should look like and a photo of stainless steel (Anyone know what grade of SS?) razor blades fused together with GTAW (TIG).
Enjoy and good luck!

Respectfully,
Henry
Parent - By kcd616 (***) Date 08-19-2014 20:00
Henry,
reminds of the old days
weld a 12 pack of beer cans together in 3 hours
beers started full and had to be empty, and you had to drink them:eek::evil::twisted::cool:
last 2 were fun:twisted::evil:
the better test was do it with o/a
that was a fuc*er:eek::evil::twisted::cool:
sincerly,
Kent
PS: to the OP start with o/a on aluminum, might help
btw think 309 ss on the blades but a guess
Parent - By ssbn727 (*****) Date 08-18-2014 16:15
"I know - I know - It's off to work I go!!!:smile::grin::lol::roll::surprised::grin::yell::lol::yell::lol::yell::twisted::wink::cool:"

We know you know Lar:lol: So now we know!:twisted::wink::cool:

Respectfully,
Henry
- - By alstonwelding (*) Date 08-14-2014 19:17
Are you able to adjust you Hz any?  If so, you might try adjusting your Hz to about 120 Hz and adjust your balance to about 75% negative. This is all based on the base metal and filler wire  being cleaned. You might also wont to try using 2% ceriated tungsten (EWCe-2) prepped as you would for welding SS.
Parent - - By 357max (***) Date 08-19-2014 03:39
The precision tig is a transformer rectifier machine so the output frequency will be fixed at 60 hertz. Its AC balance control will provide a 65% time at negative on the AC sinewave (squarewave). It will not produce DCEP with AC. The sinewave has a positive and negative value due to the position of the sinewave's wave above or below the 0 line.
It would be a waste of tungsten to use a large diameter and grind it to a long taper and point. Sharpen the tungsten and truncate. Do not ball the tungsten.
Have a variety of diameters of tungsten, collets, collet bodies and recognize that tungsten is a very poor conductor of electricity. Large diameter tungsten for low amperages are difficult to start. Seek a tungsten diameter chart that has the amperage range for the type and diameter of tungsten to get good low amperage starts and stable arc.
Parent - By Plasma56 (**) Date 08-20-2014 01:46
357...I agree with almost everything you said. And the rest, I offer a mild correction.
AC produces both positive and negative valves so part cycle it's DCEP and part cycle DCEN. The squareing of the wave is the rise and duration of the current on the half cycle.
DCEP causes electrode over heating during that side of the cycle which is responsible for the balling effect or melting rounding of the tungsten depending on the tungsten alloy and amount of current applied through the tungsten. Arc rectification.  It also provides the ionic bonbardment cleaning effect.
The DCEN side of the cycle, provides the melting of material.
A cool experiment is try useing DC.
While I agree in best practice to match tungsten type and size to material, electrode angle and an understanding of electrode trunication is an often over looked ingredient in many case of the GTAW process. I also suggest that long tapering of the tungsten is akin to walking a plank. Thinner the plank the greater pressure to push an electron off of it. That greater pressure is valued as current to get things melting. Blunter the tungsten the less current required. Add in as you mentioned a transformer rectifer and arc length is a big issue with its volt/amp curve. Pictures reveal contamination that would suggest shielding gas coverage issues and arc length /electrode issues could be to bame?
I like the way your thinking. Please don't let my comments upset that.
Up Topic Welding Industry / Technical Discussions / New to TIG [and "self trained" in stick / MIG ]

Powered by mwForum 2.29.2 © 1999-2013 Markus Wichitill