Yup, I feel your pain.
If there is only one inspection criteria for the job, every weld gets inspected to that criteria.
If there is to be a separate criteria for critical and non critical welds, these need to be documented and stipulated in the contract.
Two points to consider with working to D1.1 -
- The weld inspection acceptance criteria is very lenient, as it describes a generous max amount of discontinuity that may be accepted. You can have separate critical and non-critical criteria and still be compliant if you have tightened restrictions for the critical welds.
- D1.1 is only good for materials down to 1/8" thick. Non critical sheet metal components below 1/8" can have their own acceptance criteria, either to a code or an internal spec.
Tim
I was at an MBMA meeting in Cleveland this summer and there was discussion on weld quality.
Dr. Duane Miller was in attendance and made some very powerful points to the group. His insights matched exactly with my experience in the trenches. It's good to discover you are not a lone voice crying out in the wilderness sometimes.
He made two basic but related points. (I'll paraphrase)
Some weld defects while rejectable in accordance with the specification criteria, may not be so severe that the performance of the joint is less than design minimums. For example: typical overdesign might mitigate a small internal defect, and the "Engineer" may from time to time accept a weldment as is, because of various restraints in the project. (but it's very rare that a PE will their seal a noncompliant weldment).
The other side of that coin is the cost of poor workmanship. Rework on weldments typically increases the cost of manufacturing by 5X EVEN WHEN THE REWORK IS DONE IN THE SHOP BEFORE SHIPPING Meaning: There is great efficiency, and profitability at stake when you consider first pass quality. Doing it right.. and right the first time,,,, matters more than most managers can possibly imagine. (This is the single most damaging fraction of a Man-hours per ton metric)
On top of that mountain of common sense, also understand that there is no provision in AWS D1.1, D1.3 or CSA W47/W59 for a Welder, Supervisor, Manager, or QA/QC team, to accept workmanship that is non-compliant. The same goes for accreditation frameworks such as AISC 360, IAS, IBC, or A660. I'll wager there is no quality manual for any accredited fabricator that gives that authority to anybody other than the "Principal Engineer."
Personal opinion: Fools demand that they should be able to "learn by their mistakes." Meaning they prefer the hard rod of discipline and correction from consequences of rejecting external advice. While those who prosper seek wisdom and are sensitive to avoid mistakes others have made. (I do so love King Solomon's book of Proverbs).
So yes Scott.... "Welding 101" It is very straightforward. Complication is born of compromise
The work needs to be done right. When the truck rolls out, the fabricator has guaranteed that the workmanship is 100% compliant, and that all mandatory inspections have occurred.
If a customer comes back with a Non-compliance ? They will knock on your door first eh? And all those people who are pressuring you to let is slide will be asking you: "How did you let this get out the door????"
It's not the QA/QC team's mission to "inspect quality into the work" That quote is used time and time again.... Leads and Managers need to know what is happening on their factory floor!
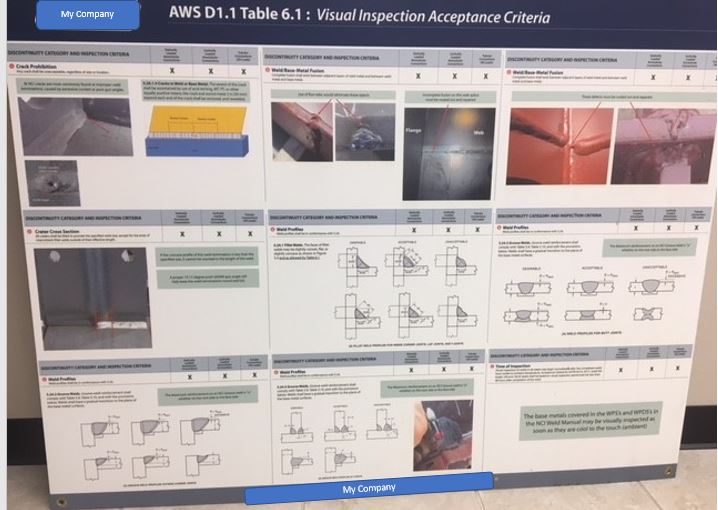
Something I've done so that everybody knows what flies and what does not, is to do very specific inspection training from the Plant manager on down and then made very large posters that provide Table 6.1 data along with pictures of good and bad welds to illustrate what it means... The posters also illustrate specific instances when our shop engineering standards and quality manual exceed the code.
Hope this encourages you and helps a little Scott.

Thank you Lawrence. I very much appreciate your response. I know the engineer could accept the non compliant work, but in the amount of time it takes to call and get an answer, we could have fixed it and got it off the shop floor. I have a very good excel spreadsheet with three letter codes, for example WUE is weld undercut excessive, for every non compliance I can think of. It has each shop employee on the list. At the end of each day I add rejected items. The sheet automatically add up the items for each employee, and it also adds up the total for each rejected discontinuity. It's a great tool to show upper management the problem areas, and it's also printed and posted in the shop for the guys to see each Monday. In addition to this weekly report, I have an accumulated report for the year. These reports are not intended to get anybody in trouble. They're a tool to initiate improvement by showing where the problems are.
