Not logged inAmerican Welding Society Forum
Good night all , please someone help me to clarify this situation .
In a building with metal structural elements A36 1-3/4 inches thick subject to cyclic loading, with simple preparation V . For SMAW welding process , my WPS under AWS D1.1 tells me that the maximum aperture should be 1/ 8 inch . By poor construction practices this is separated up to 1 inch.
At the prompting correction, the builder plans to recover part base material according to section 5.22.4.4 of AWS D1.1 code 2010.
This material recovery is to perform and not made binding as indicated in section 5.22.4.3 Is this correct ?
A qualified recovery WPS base material required?
What about the heat input into the material recovered ?
What about the heat affected zone in the material recovered ?
What about the mechanical properties of the material recovered ?
using E7018 filler metal electrodes .
Thank you very much for your feedback
regards
Rusbeli r
Good morning Rusbeli,
Now, you mention a SMAW process, I presume with a low hydrogen alloy (ah, there it is, good assumption, just read the post silly).
You also mention a V Groove preparation, I presume backing could be used? Why not use backing instead of backgouging and open it up some?
Thus, why did we come up with a 1/8" maximum root opening? Fig 3.4 B-U2a would indicate you could set this at a dimension up to 1/2". You are then allowed an 'As Fit-Up' Dimension of +1/4" (equaling a total of 3/4" root opening). Is there a reason to not have backing used? It would mean far less buttering up (is this what you meant by "recover") of the edges.
Now, if not with backing and using Figure 3.4 B-U2 with backgouging, then yes, 1/8", backgouge and weld.
(Just working through some things in my mind, have been at work for 12 hrs on swing and graveyard for the past two days, plus 2 hrs each way driving time, not sleeping well with daylight outside, head is spinning)
So, if backing is out, yes, build up without binding. Bring it into close contact per the allowable tolerances then let it cool back down to acceptable levels before making the 'binding' weld pass. According to the sections you posted the engineer should have already approved this and suggested the heat input limits. Those will take care of HAZ and mechanical properties. Work should be done slowly to keep interpass temps minimal. I would think part of the process for getting engineering approval would have included a 'Repair' WPS outlining what was to be done to 'correct' the problem.
One more question, A36? Most structural work I have been on of late has been A572-Grade 50 even for plate and other shapes. Especially when considering Cyclic applications (do we mean seismic? As in D1.8?).
Have a Great Day, Brent
Brent says:
One more question, A36? Most structural work I have been on of late has been A572-Grade 50 even for plate and other shapes. Especially when considering Cyclic applications (do we mean seismic? As in D1.8?).
Have a Great Day, Brent
I say:
At least a few short years ago, plate over 1 1/2" was unavailable in Gr 50, it was all A36. I combed the planet and 2" plate was only for sale as A36. May be different now, may not be.
Engineering was unaware at the time they spec'd the material, but adapted easily.
J
I know. A lot has changed in how items are designated in all shapes; plates, angles, wide flange. Research will show A992 was supposed to be a combination of the old A36 with that new designation of 572-50 so that instead of dual certs you only needed one. Now, on occasion you need triple certs.
A job we just recently finished had plate in A 572-50 up to 2". A709-50 up to 4".
According to the ASTM specs both are available in plate sizes up to 4".
A 709-50 is basically the same but the alloys are slightly different as it was developed mainly for bridge applications. You can also get angle iron in the 709 series and the engineer will approve it where 572-50 was specified but higher quality than A-36 is required.
Have a Great Day, Brent
Sure, it's available in ANY spec, if you have it rolled in train car loads (and I assume they do where you're working).
But buying in-stock plate over 1 1/2" is a whole nuther world. Try to buy smaller than mill rolled car loads of 2" plate with mtr's and they will make plain that you are buying A36, at least in my experience calling all around the country. That's just my experience but I don't contract with mills to buy freight trains at a time.
Maybe that's changed in the last year and current old stock is depleted so everthing is Gr 50 now, I wouldn't know that.
I'm just trying to add a small amount of reason to what the OP might be dealing with and answer the question you asked. He also might be working with material they have on hand.
Not everbody is working in a large scale structural shop, the guy might be in circumstances similar to or even quite a bit bigger than mine.
When you say "a job we just finished", is that a job done out of your personal shop or out of the shop you inspect in? Have you tried to personally buy heavy plate in Gr 50 lately?
Life is different when you order material that's available today to ship. Bechtel/CBI/Flour/on and on we can go, can get volume material in whatever spec they choose, I get what's in stock in the continental U.S.
Research is great, but I have to buy what's available from the service centers. Regardless of what the ASTM specs say is "available".
Thanks for the tutorial tho.
J
Ladies and Gentlemen,
I am called an engineer. What I would say give me a WPQR plate. In your situation I would say give me guidance and your PE stamp on such!
Sincerely
Len Andersen weld@speamil.org
914-536-7101 / 914-237-7689 (H) / 800-428-4801 USA
POB 1529 / NYC 10116-1529 ( $1160 per year Caller
Box GPO NYC / Most Secure Service At Largest Post
Office USA )
www.lenandersen.com
There are several issues to be considered when contemplating a repair. Let's review them:
Base metal - ASTM A36 steel - plain carbon steel, hot rolled, as rolled, no additional heat treatment, i.e., quench and tempered, thermal mechanically enhanced, etc.
Filler metal - E7018 low hydrogen, proper storage and handling essential to maintain low hydrogen deposits.
Groove type - Single V
Groove Angle - Not listed
Groove type - Not list
Backing - Not listed
Problem - excessive root opening, actual RO measures approximately 1 inch
We have a single groove in 1 1/4 inch thick base metal, but we do not have all the details such as whether backing is used, groove angle, etc. The code per clause 5.22.4.3 does allow the contractor to reduce the excessive root opening by 3/4 inch by depositing weld on the groove face (one or both). That will reduce the root opening to 1/4 inch. That should be fine whether backing is used (B-U2a) or if the groove is welded from one side (B-U2) and back gouged to ensure sound weld.
Unless the Engineer has imposed heat input restrictions or notch toughness requirements on the design, there is no need to consider these variables when contemplating the repair. It is a good idea to control interpass temperature to minimize the possibility of coarse grain in the HAZ, but considering the base metal hot rolled and air cooled, there is no reason to lose too much sleep over it. Simply restricting the welders to stringers beads or limiting the bead width will accomplish the desired results. Welding on 1 1/4 inch thick material should provide sufficient heat sink to limit the interpass temperature. Depending on the size of the weldment and the ambient temperature, I would be more concerned that the welders maintain sufficient temperature to prevent the temperature from falling below the minimum preheat temperature.
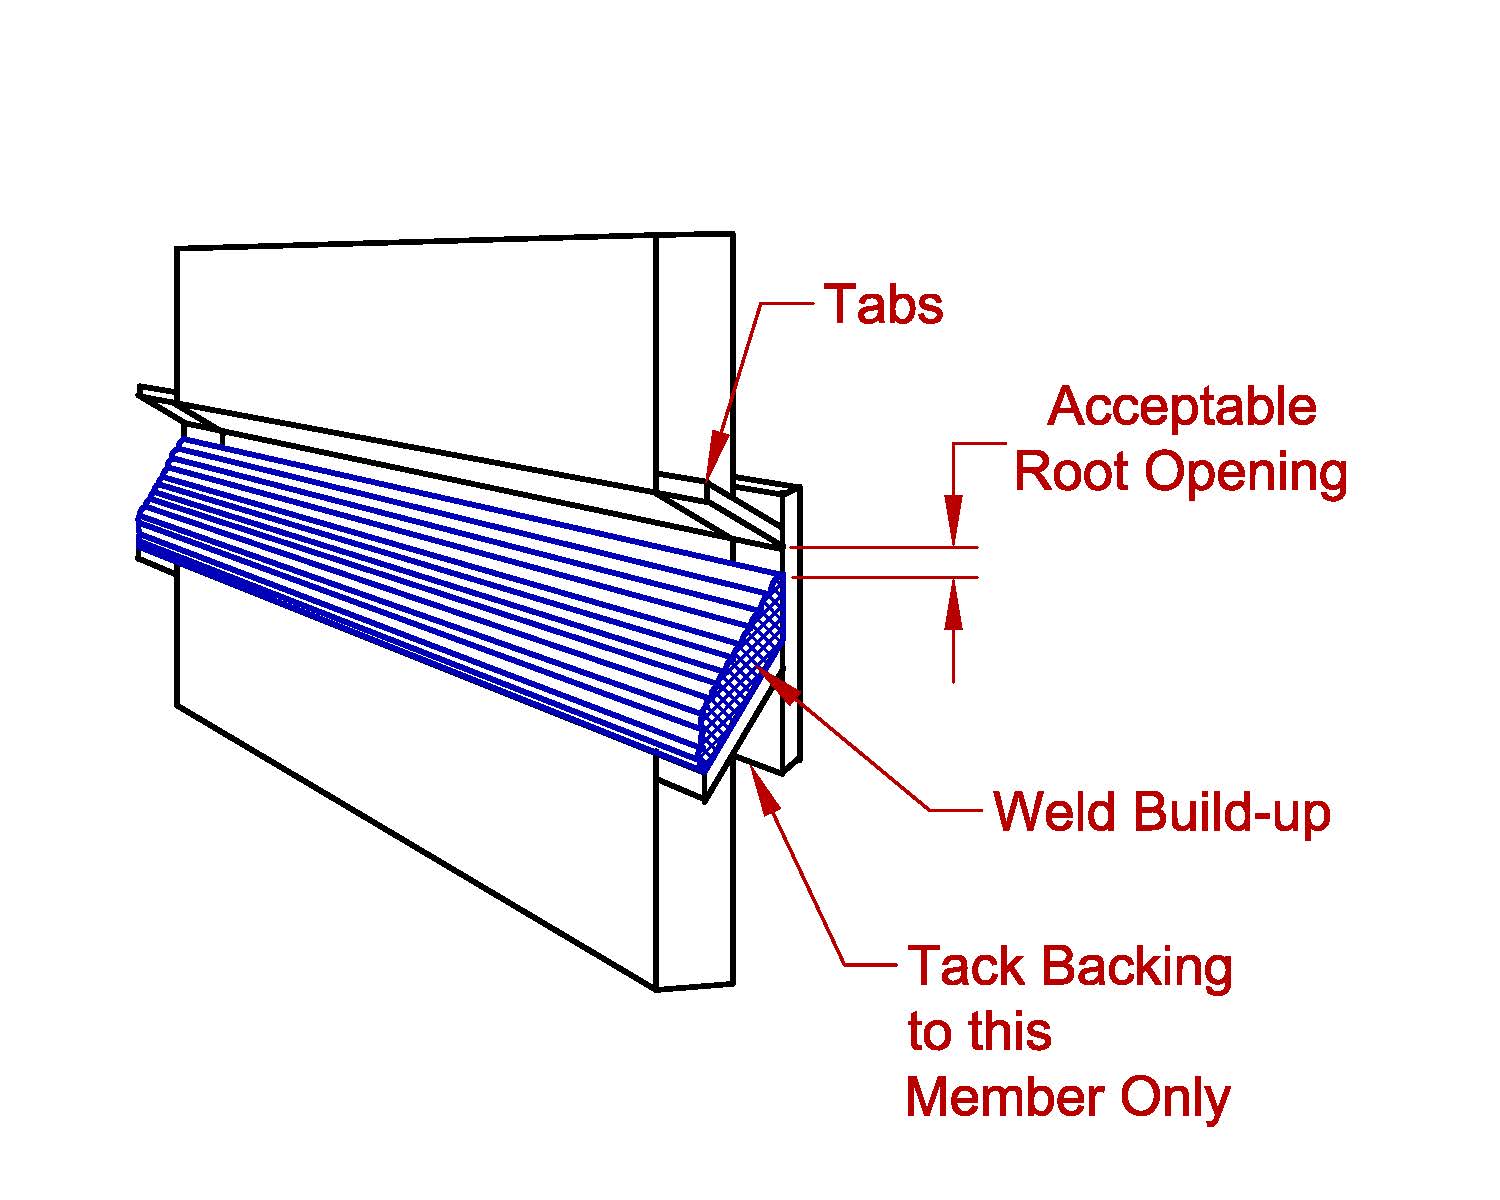
My recommendation is to deposit weld against the groove face of both members to reduce the root opening to a dimension that is acceptable. If that isn't possible due to limited access, then it will be necessary to deposit weld on the member that is most easily accessed.
Do not restrict movement until the root is closed to an acceptable dimension. That is, if backing is used, only tack weld it to the member that is being built up. When the groove face is built up to an acceptable dimension allow it to cool to the minimum preheat temperature before beginning the final weld. As the groove face is being welded, the temperature of the member increases and it expands toward the opposite member, thereby closing the root opening. Allowing the members to cool will allow the members to contract freely without restraint. It will reduce the tendency to crack when the final weld is made.
Do not attempt to weld the two members together unless there is sufficient time to weld at least 1/3 of the total thickness before the weld is allowed to cool to ambient temperature. This will minimize the possibility the final weld will crack when the partially welded members cool and contract at the end of the work shift.
Best regards - Al


The non-technical term for what Al is describing is called "buttering". Adding filler material to one or both sides of the joint until the proper root opening is achieved. As Al said, complete the geometry corrections and let it cool BEFORE allowing the joint to be welded out complete.
Brent had questioned whether it's a cyclic or a seismic application and I was also wondering how Rusbeli knew that it’s subject to cyclic loading. Until recently, I’d always had problems determining whether a joint had to meet cyclic criteria or not. No one in the company could verify whether it is or it isn’t cyclic, and they were not interested in submitting a RFI to the EOR to find out. Among other things, I tried to explain that one thing that needed to be considered was whether backing needs to be removed or not, because if a connection is a cyclically loaded nontubular connection with backing, and the backing is transverse to applied stress, it forms a point of stress concentration (stress riser) that may be a source of fatigue crack initiation, so, D1.1 requires the removal of backing when it is transverse to the direction of computed stress. Since no one has been able to answer my question as to whether a joint will be subjected to cyclic loading or not, my next question regarding whether any shop applied backing would end up being transverse to the direction of computed stress and needs to be removed, never gets asked. In the end, it had been better to be safe than sorry, so not knowing, we would go to the worse case scenario and typically resort to backgouging in the shop. I know that D1.1 requires the EOR to specify in the contract documents whether the structure is statically or cyclically loaded for nontubular applications, but in 36 years, I have never seen it mentioned anywhere in the specs. Either we've never been subjected to any fabrication that had to meet cyclic criteria, or it was required and not mentioned in the job specs. Has anyone else experienced the same problem? Recently, my complaints about the lack of this information has finally been addressed, and when it's not indicated in the job specs, it's now being submitted as an RFI prior to bidding on a project and is also included as a topic of discussion in the pre-detailing meetings.
"We have a single groove in 1 1/4 inch thick base metal"
The OP stated 1 3/4" I believe. But all else is far better explained than by me.
Have a Great Day, Brent
Yup, I misread the dimension on this little screen.
Al

 By 803056
  Date
Date 01-22-2014 20:55
Edited 01-23-2014 00:38
When in doubt, ask.
Not only doe it determine what VT criteria is invoked, it also affects whether or not the backing must be removed (as noted by Scott), but it may also require mandatory volumetric examination per clause 2.19 if the fatigue category is B or C. Again, a RFI would be needed to find out what applies.
Assuming the worst case (cyclic/fatigue) can be very expensive for the fabricator and it will adversely affect the bottom line on the corporate balance sheet.
A quick RFI is the best route to take. The Engineer may not realize the added cost of meeting the additional requirements imposed by the structural welding code.
The worst case would be if the fabricator assumed it was a static load and instead it turns out to be cyclic loading. Ouch!!
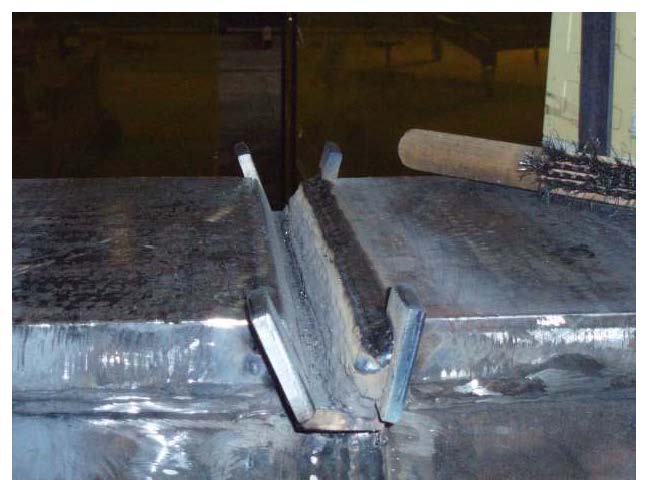
Attached is a photograph of a joint with an excessive root opening similar to the one being discussed.
I forgot I had this in my files. It shows the surfacing weld added to the groove face to reduce the root opening. Once corrected, the joint was welded and checked with UT. Static nontubular criteria was used as the acceptance criteria for UT. The tabs were trimmed flush with the edges of the box girder flange and ground flush.
The problem started with the initial UT examination. The weld failed UT due to indications in the root and throughout the weld. The repair was a clean as a whistle. It would have passed UT for cyclic loading, but it wasn't required.
The welder really butchered the job when he removed the weld with the carbon arc gouger. It was ugly! So I had him recut the groove with the track torch. By that point the root opening was larger than that permitted for a prequalified groove detail. Time to surface weld the groove face to reduce the root opening. The welder claimed he had never seen a fix like that before. One of the other welders who I have known for many years shouted, "That's because you haven't work with Al before."
I took that as a compliment.
Al
Al

Good morning to all,
First of all, I thank you for your quick response and valuable support for sharing your knowledge.
I could not write before because internet service is poor and hard work.
Something important reference to items that were subject to cyclic loading was not supported by the information that I drive like a conventional structure. Work was continued, in line with the recommendations as temperature control in the process and placement of plate and weld. All this with the awareness of the experiences presented here for you.
Thanks to all
Have a good day
Rusbeli r
Powered by mwForum 2.29.2 © 1999-2013 Markus Wichitill


