Not logged inAmerican Welding Society Forum
Forum AWS Website Help Search Login
Up Topic American Welding Society Services / Certifications / RT vs. Bend
1 2 Previous Next  
- - By MBlaha (***) Date 10-06-2014 17:54
A third party inspection party rejects a welder qualification test plate using RT.

The contractor testing the welders, does not like the results.

They send the plates to a different third party inspection company for bend testing.

The results from bending say the plates pass.

Is this acceptable?

Mike
Parent - - By WeldinFool (**) Date 10-06-2014 18:26
Oooh, this one's going to be good....eagerly awaiting responses from others before weighing in...
Parent - - By MBlaha (***) Date 10-06-2014 18:43 Edited 10-07-2014 00:58
I am the QC/QA manager for the customer. The first testing method was RT, not UT.

I have seen the RT results and there are 2 distinct lines showing lack of fusion in the root between the test coupons and the backing strip.

I removed part of the post. I should never put my personal thoughts in  Sorry
Parent - - By lo-hi (**) Date 10-06-2014 19:08
Isn't there a limit as to how much they can reduce the thickness of the coupon? That might be of concern if there is excessive grinding. Just throwing it out there for discussion.
Parent - By MBlaha (***) Date 10-06-2014 19:27 Edited 10-07-2014 00:59
Like I said, I have no proof. I am going to ask to see the coupons post bend.

once again, removing my thoughts    sorry
Parent - By Lawrence (*****) Date 10-06-2014 19:54
Good point. Glad you brought it up.

I've always wondered how different folks deal with test straps that were 'over-ground'.

The measurement of material thickness must be made *before* the bends, as the coupon will stretch/elongate over the bend radius and measurement afterward is useless.

CWB W47.1-09  Figure 15  is super clear on this point and gives a 1mm or 5% thickness reduction allowance.  (1mm = .039)

I don't believe D1.1 provides any "tolerance" in figure 4.12

Whoever is removing the reinforcement is key to this.  Welders get pretty toasty if their bend test is ruined by somebody who over-ground their test coupon.

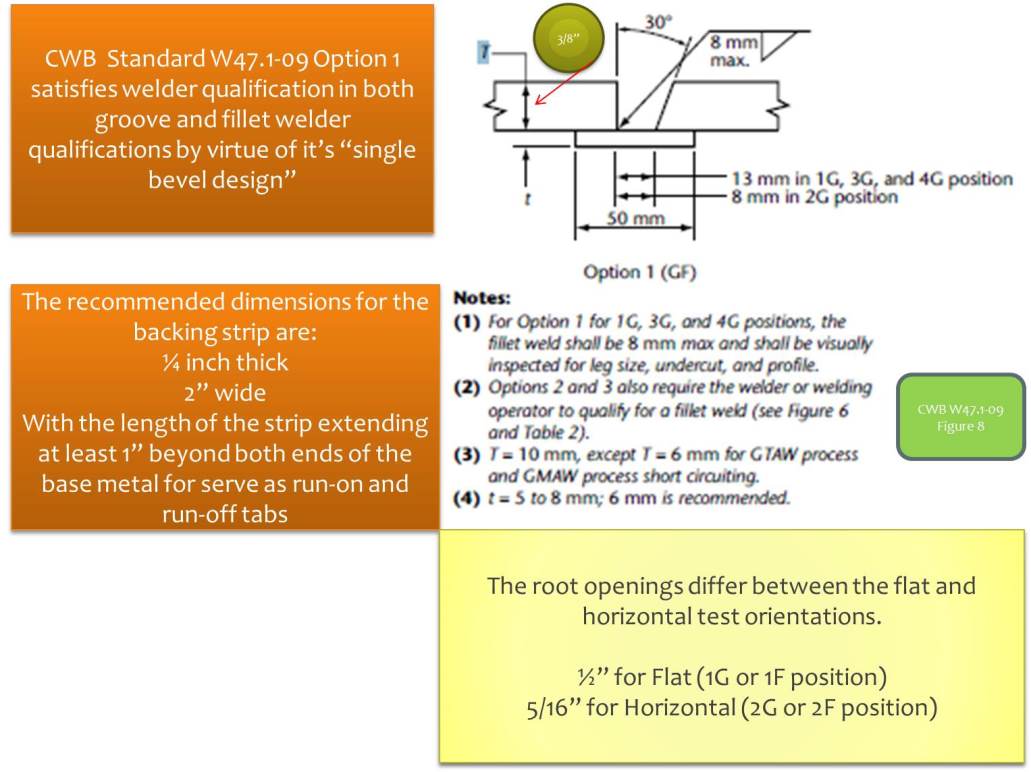
The Pic is of a slide I use to train our QC folks.

As to the original post/question.  If the thing failed RT.. In my book it's done.  Just like if it had failed visual.   Overlap and excessive reinforcement *could* be ground off and bends might pass... But I have a moral objection to the practice of this unless it's for educational purposes and a retest is mandatory.
Parent - - By SCOTTN (***) Date 10-06-2014 18:32
Just a couple thoughts.  Has the inspection party actually showed you what the grounds for rejection were, based on the UT results? Just because the contractor doesn’t like the results are not grounds for rejection.  Either the welds meet acceptance criteria or they don’t.   If the coupons pass the bend test, you may want to run it by the EOR.
Parent - By MBlaha (***) Date 10-06-2014 19:28
The contractor showed me a couple of the films after rejection.
Parent - By MBlaha (***) Date 10-07-2014 01:04
I did just that. Should have an answer tomorrow.
Parent - - By trapdoor (**) Date 10-06-2014 21:57
I'm sure the bend tests pass once you have verified that there are no rejectable flaws in the sample areas of the weld with RT.

My personal opinion is that a bend test is harder to pass than RT. With a bend test the proof is in the pudding. With RT it open to debate.

Ramon
Parent - By Milton Gravitt (***) Date 10-07-2014 00:08
Ramon the place I work send all our welding test out for testing and the first thing he does is to visual test and if it past that he will RT the plates if they past that test he will send the test plates that does the bend test if they past they are good to go. It looks like to me they would want the test plates RT first because it's not as expensive as the bend testing. That's the way I see it. I've known the people that does our testing  for a long time an trust them.

                                            M.G.
Parent - By Joey (***) Date 10-07-2014 02:21
That will be depends on agreement with Clients. The contractor will definetely submit only those test report with favourable results., they can do it if the welder certification is to be done in-house. If it's not acceptable to the current project, the contractor may produce the test results to other projects to save the time & cost of requalification. That's why some of project specification requires the welder performance test to be witnessed by owner inspector / or appointed TPI.

That is also the disadvantage when the role of TPI is mainly to provide the service of NDT or destructive testing. But if the TPI is in change of issuing the certification, then I don't think you can switch to another TPI without them witnessing the actual performance test. 

~Joey~
- - By 803056 (*****) Date 10-06-2014 19:40
The plates are either tested using RT or guided bend tests. If it fails RT, end of story, they do not go to guided bend testing after failing RT.

I would say the welders in question get to test again. This time both parties agree on the test method and stay with it.

Personally, I do not care for RT. I have had problems with RT in the past. The film interpreter accepted the test plate as "good enough." Upon closer examination I could see daylight between the backing bar and the plate. There was no fusion between the backing bar and the root bead. When I cut off the ends of the backing where it was tack welded to the test plates, the darn backing bar fell off!

Now that I look back, the plates never should have been RT'd, they were welded using GMAW-S. They should have been subjected to the guided bend test to begin with. I still have the plate kicking around in my "house of horrors" collection. 

Live and learn.

Al
Parent - By SCOTTN (***) Date 10-07-2014 11:12
I don't particularly care for RT either.  I have no experience in interpreting RT results, but I would think that it's more likely to misinterpret it's readings as opposed to misinterpreting the visual acceptance criteria of a bend test.  A visible discontinuity on a bend test coupon can be easily measured and evaluated determine the size of the discontinuity and I personally think that it would give a better indication as to whether the test coupon is acceptable or not.
Parent - - By js55 (*****) Date 10-07-2014 17:38
Al,
I would agree with you that it should be end of story. And as far as my policy is concerned it is. You pick one and stay with it.
However, I do not believe there is any language in the code (API/ASME/AWS) that says this. If it is there I do not remember it. Never had to essentially. And so from a Code standpoint I do not believe it must be rejected. And I doubt there is any interpretations on this issue other than the Code does not address it.
ASME does say however, again, if memory serves, that you cannot determine bend location with prior RT, but that does not seem to be what happened here. Or at least not what was reported as having happened.
I think it is bad practice, and unethical, but I am not convinced it is prohibited by Code.
Parent - - By js55 (*****) Date 10-07-2014 17:41
I also think the requirement for destructive testing for performance qualification is a bit anachronistic. Even for SC GMAW given the ability of UT.
Gonna have to wait for some grandpas to retire.
Parent - By js55 (*****) Date 10-07-2014 17:44
This issue creates an interesting conundrum. We seem to be arguing in general that destructive testing is better and yet at the same time that it cannot be a second tier test for performance qualification. Seems to me the logic of this is backwards.
Parent - By MBlaha (***) Date 10-07-2014 17:45
I did, but trying to get a sand mine going forced me back LOL.

I agree, I cannot and believe me, I have looked, but I cannot find anything in D1.1 or ASNT that prohibits it. You are correct js55. The film definitely showed lack of fusion. I asked to see the bend specimens, but they were discarded. HMMMM, next time, I will insist all test plates be destroyed after RT.

I agree on this also, it is unethical, but again, cannot find anything to stop it now.
Parent - By WeldinFool (**) Date 10-07-2014 18:39
I have found that when qualifying welders in our shop (to AWS D1.1), the guys learn so much more when using the guided bend method rather than RT. I will never get tired of seeing the look in a seasoned welder's eyes as he watches his GMAW-S root-bend specimen tear open, it is priceless. It is also an excellent opportunity to educate them on the importance of material preparation, following the WPS, and proper technique. I usually give them a re-test (unless their first attempt was really bad) after performing training and/or practice as directed in Clause 4.33.1.2, and have never regretted it. I like the fact that they have witnessed how easily a weld can fail if not performed properly.

Of course, many of you do not have that luxury and I understand that. We hire welders for long-term, permanent careers with our company, and this kind of training is a great investment for us.

As to the question posed by the OP, I also agree that a failed test is a failed test, and should not be subjected to different testing methods in the hopes that you will get different results.
- - By welderbrent (*****) Date 10-07-2014 18:20
I have always held the position that you needed to establish the welder performance qualifications upon the job requirements and needs.  It should also be coupled with the process and procedures in use.

Example: when using GMAW-S I always want bend testing. 

Why?  There are things that RT will find that bends will not and visa versa.  When using Short Circuit Transfer it is EASY to make a weld that will pass RT but will peel apart under a bend test. 

Now, if you don't have stresses involved under public safety issues then RT even of Short arc would suffice as you are probably only interested in sealing the joint for mild pressures of some kind.  Pipelines are sometimes under pressure, including extreme pressure in some cases, and other times under practically no pressure at all while the product is flowing.  Take a simple air line with pumps set at 150 lbs.  With all exit uses closed it is under 150 lbs pressure.  With air being used it is under lower pressure depending upon the rating of the compressor, tank, and volume of air being supplied to the one use.  Add more users and the pressure drops even more.  Pressure goes up and down depending on use.  Some lines hardly ever have pressure due to continual usage.  Some are more often under pressure because of the type of use and frequency of use.  Some would be fine with RT, others I would want to see bends on the welders. 

This thread gives me the impression that someone has confused the operation of PQR testing with WPR testing.  For those you want RT after VT and before bending and other parts of the testing to establish compliance to applicable requirements.  If not, then there is a bigger problem with someone just trying anything to 'get it done'. 

It does not surprise me that one passed and the other did not.  They are looking for different things and a simple surface exam of a sample of the material will not supply 100% viewing of the weld.  It could have gone the other way as well.  If the welder had the direction of roll wrong or depending upon material used and welder practices, say quenching, the sample broke in the HAZ but would pass RT because it was clear enough. 

The object of testing is to be determined by the EOR, Contractor, and any involved inspections prior to testing and acceptance/rejection of testing results.  And especially prior to work beginning on the job at hand. 

I see nothing in the D1.1 code establishing a procedure that excludes, or includes, multiple testing past the VT and one form of either RT/UT or bending.  The only purpose I see in performing both, for myself, would be opposite from what happened here in that I would have insisted on both passing.  One fails then the welder fails.  Doesn't matter which one, a fail is a fail.  It is not a matter of trying to make the welder pass at any cost.  It is a matter of getting the best that is available for the job to be done. 

He Is In Control, Have a Great Day,  Brent
Parent - - By welderbrent (*****) Date 10-07-2014 18:52
Going a little further, I scanned B2.1 Spec for WPS and WPQ and found nothing directly related but some interesting items regarding a recurring question on the forum that involves testing welders for specific applications beyond what is required to be D1.1 qualified.  Say testing for a specific joint or material grade.

Next I scanned B4.0 Standard Methods for Mechanical Testing of Welds and find nothing there regarding multiple testing.  However, there is definite reference to the sample being prepared for bend testing being 3/8" plus or minus 1/64".  Not much tolerance to grind away discontinuities or lack of fusion area into the backing bar prior to bending.  Make sure you have a good caliper and/or micrometer handy to make sure the preparing party does not go too far.  I believe there is a reference to that somewhere in D1.1 as well but couldn't find it while looking for it. 

I believe the main point will again be in the language/sentence structure and intent of the applicable code.  As the code says RT may be substituted for bending it does not say one can be used if the other fails just to give the welder the benefit of the doubt and hope he can at least pass one. 

This link is to an official interpretation that is not exactly of the question but is about the only thing found in the list of all interpretations posted:
http://www.aws.org/technical/interps/d1-84-014_4_.pdf

Now, after all that I must fuel the fire  :twisted:  ; SO, the code allows for a retest.  If a welder fails and the sample is long enough another set may be cut from the same test plate.  Or, another test plate can be welded and used.  So, since the RT did not destroy the first test plate...is it really a reach to say that the retest coupons may be cut from the same original test plate and retested but using a different test? 

HHMMM???  Had not considered that angle before as this had not come up in my jobs before.  What think ye?

He Is In Control, Have a Great Day,  Brent
Parent - - By Lawrence (*****) Date 10-07-2014 20:01 Edited 10-07-2014 20:15
The only latitude D1.1 provides for test strap thickness from what I can determine is the difference between the U.S. standard and the metric values provided in Fig. 4.12
3/8" = .3750
10 mm =.393
That's twenty thou almost... But in the wrong direction :)

Brent, where did you get this notion???  "If a welder fails and the sample is long enough another set may be cut from the same test plate."
(lets not hear a word about corner cracks sir)

D1.1 Figure 4.21 directs that the specimens be extracted one inch away from the centerline on each side.   If it's  a dimension given in the figure it ain't a suggestion :)     Same for limited thickness on Fig 4.31

It does not say take them where you want, or if the test fails, pick another spot and maybe that will work.

I'm itching to make an edit to Clause 4 of Farm Code
"For limited thickness always use the side-bend option so as you can cut at least a dozen samples."  Send to machine shop to saw coupons cause the gas ax takes too much kerf.
Parent - - By welderbrent (*****) Date 10-08-2014 06:13
Lawrence, you sir are no fun at all sometimes  :lol: :roll:

So, no, we won't go to the corner cracks.  But notice please I was fueling fire and playing devil's advocate. 

Now, since one of the wrong guys jumped in way too soon...

This is an opinion I have heard many times.  But it has several flaws: 1) if doing face and root bends you aren't going to have enough material, 2) the test plate was rejected because it failed, 3) D1.1 clearly states that two welds of each type and position that failed may be done.  That makes it clear that the failed welder now welds two new plates for each failing plate, and 4) as Lawrence states we are shown/told exactly where the sample coupon is to come from and once ONE has been removed it is totally impossible to remove another from the correct location.

I had an inspections company owner tell me to just cut more coupons out of the specimen.  Now, we had done side bends so only removed 3/8" splices and had enough material to do so.  BUT, that is not what the code says.  You fail your 3G, you weld 2 more to take it's place and now I bend 2 face and 2 roots to see if you can pass the 3G test.  You want to only do one?  Wait and prove additional training and/or practice (code says 'or' but and/or is proper as well).  If you want it immediately it is 2 for 1. 

Personally I use 8" plates with 10" backing bars.  That gives me plenty of clamping area in the saw and the code does say 7" minimum for the plates.  I can do more if I want.  Just not less.  8" has always worked well for me.  Doesn't make the welder do a lot of non-required welding but gives more space to get the coupons from.  Yes, Lawrence, you go to center then come out 1" then take your sample of what ever dimension for side or face and root bends.  (yep, no fun at all) 

In addition to already made comments about RT vs bends, notice in Clause 4.20.1.1 and 4.31.3 the phrase "in lieu of" is used.  It means, to take the place of, replace, or be in place of.  HHMM.  That kind of rules out doing both tests.  Especially after one has failed.  When RT is used in lieu of then it is the final authority.  If the film shows rejectable discontinuities then the specimen has failed and is rejected in total.  And no, you can't do a second test on the same plates and you certainly can't cut a second set of samples/coupons out of the same plates.  (Satisfied Lawrence?  :roll:

I tried but Lawrence just wouldn't let me get away with it. 

He Is In Control, Have a Great Day,  Brent
Parent - By Lawrence (*****) Date 10-08-2014 11:47
I'm just waiting for Al to enter and explain how we are somehow both wrong :)
Parent - - By welderbrent (*****) Date 11-18-2014 05:05 Edited 11-18-2014 06:23
I know this has been dormant for a while but I just came across some pertinent information regarding how much may be removed from the thickness of the weld test specimen.

While checking some other items out in D1.1 regarding preparation of the test specimen I notice a footnote (the notorious footnote we are constantly being admonished to look at) on Figure 4.12 regarding removal of reinforcement and backing. It says: "The weld reinforcement and backing, if any, shall be removed flush with the surface of the specimen (see 5.24.3.1 and 5.24.3.2)" (emphasis mine).  When you go to those sections they state "Welds required to be flush shall be finished so as to not reduce the thicknesses of the thinner base metal or weld metal by more than 1/32 in [1mm]."

A little more than what B2.1 allows and specifically applicable to D1.1. 

I had seen the 'removed flush' statement before but at least recently had not read the entire sentence and checked out 5.24. 

So the code interprets itself again and we now have a definition of 'flush'.  Not over 1/32" material removed from the thickness.  So, about 1/64th per side.

He Is In Control, Have a Great Day,  Brent
Parent - - By Lawrence (*****) Date 11-18-2014 12:22
Perfect!  

Good Sherlocking Brent :)

I feel vindicated in the way I perform testing :)

I really think this specific item is worthy of it's own thread.

How many of us (or test authorities in general) actually take the time to measure bend strap thickness *after* preparation and before bending ?

I know when welders must prep their own coupons they have a tendency to "massage" the root profile sometimes after the backing strap has been removed to make small indications go away.

I also know the look of consternation on their faces when they see the calipers brought out.  (even though I bring them out for every single test strap).   It's frustrating for everybody when they are told:  "We can bend them to see what happens, but you are going to weld another test assembly even if the bends are perfect."

Furthermore;  If for example one of the two bend specimens is ground too thin and rejected for that reason,  Does 4.33.1.1 apply?
4.33.1.1 Immediate Retest. An immediate retest may
be made consisting of two welds of each type and position
that the welder or welding operator failed. All retest
specimens shall meet all of the specified requirements.


What say you inspectors and test proctors?
Parent - - By aevald (*****) Date 11-18-2014 15:33
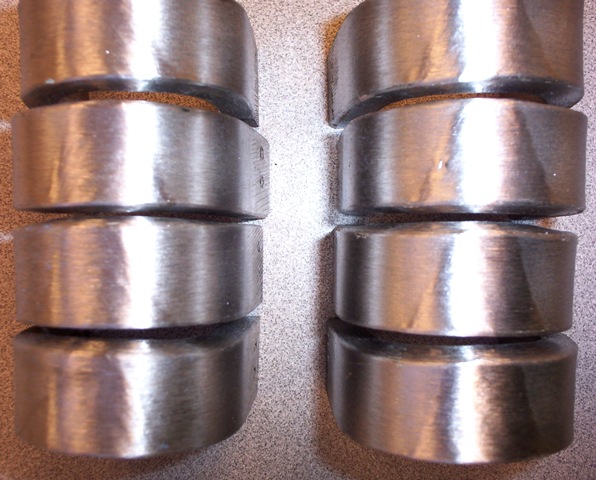
Hello Lawrence, that is one of the reasons why I do the specimen preparation on the testing that I do myself. It definitely avoids a lot of the "mistakes/liberties" that often happen/are taken by outside testers and even our own students. I have a pretty good system down now to allow for cutting to approximately 1/32" over the required thickness. I feel that this allows for the final finishing to be accomplished and to be at the 3/8" requirement that our WABO testing is requesting. As to the root, face, and side finishing, I use an Ellis belt grinder with a #36 grit belt to achieve the "flush" profiles. When I am done with the specimens they are pretty much shaped like a 3/8" X 1" length of flat bar with radius-ed edges on all 4 corners. We have a Fischer Industries bending machine that is specifically set-up to bend the specimens to the correct radi. We do not do AWS testing at our facility other than proxied tests done by others using our facility. I have included some photos to demonstrate the equipment and the process a bit better than just a verbal description. Great topic gentlemen and one that should be revisited often. Best regards, Allan
Parent - - By welderbrent (*****) Date 11-18-2014 17:14
Allan,

Is that an adjustable spacer I see in your saw for cutting parts that are short enough that the jaws of the clamp would not grip properly due to the pivot point?  Did you make it yourself?  Great idea.  I usually just take one of the 'Discard' ends and use to hold the other side of the pivot point. 

Lawrence,

I would say it depends upon who did the grinding.  If they ground it, it qualifies.  If I ground it, shame on me and they do get to do an immediate but without it counting as anything but the original.  I should have been more careful and as a non interested tester should have ignored the urge to chase out any discontinuities especially if it meant going beyond the flush condition.  And, I usually do all prep work, cutting, sanding, backing removal, etc.  1" and/or 3/8".  I do them.  Trying to explain what I want, what is required, to some welders who have a hard time with English is not worth the risk.  I charge enough for it and we (Darrell or I) do it.

He Is In Control, Have a Great Day, Brent
Parent - - By aevald (*****) Date 11-18-2014 17:22
Hello Brent, the "spacer" that you see in the picture is a re-purposed project from the machine shop. The students in the machine shop have to do internal and external thread projects, this is one of those projects that we are using to make sure that the plates remain secure while the cutting is taking place. As you said Brent, it keeps the part in proper contact with the fixed jaw in the saw vice. Best regards, Allan
Parent - By welderbrent (*****) Date 11-18-2014 18:07
Thought it was something like that as it appears to have different threads on each end?  Good idea though, often there aren't parts that are the same dimension to use as spacers when cutting a small part in the saw.

Brent
Parent - - By js55 (*****) Date 10-07-2014 21:30
brent,
Be careful when talking of "intent" of the Code. If it isn't EXPLICIT in the language it isn't there.
Parent - - By welderbrent (*****) Date 10-08-2014 05:37
But I believe we can understand the 'intent' of the code.

First, as you say, the explicit language of the code. But, there are many 'grey' areas to that or we would never need official interpretations.

Second, see what the committee has to say about the text of the code in the commentary.  It may not be 'CODE' but it is definitely there to guide and explain parts of the code.

Third, see what already published official interpretations have to say about the topic under review.  They are easy to find on the AWS Website.  Every one ever issued. 

Fourth, compare with A3.0 Definitions and Terms to make sure you are looking at things the same way as the committee.

Fifth, compare with other codes and specifications, such as B2.1 and B4.0 in this case. 

When you combine all of these you can USUALLY come away with a pretty sure sense of understanding the INTENT of the code.  Unless, you are defining intent differently than I. 

But I do understand your concern JS and you are correct, we all need to approach the code with care and not try to make it say what we want it to say.  Any student of scripture knows how easy and at the same time destructive that can be and is. 

He Is In Control, Have a Great Day,  Brent
Parent - - By js55 (*****) Date 10-08-2014 12:51
Brent,
I understand what you are trying to convey and I think we are closer than it may appear. But I have to disagree to an extent.
And even though all those references are of value, you do not reference other Codes to understand the intent of a specific Code. References exist in the code to determine requirements connected to the Code of which the Code does not specifically address.
When Code committees are developing language they are trying to be as specific, 'self contained' and precise as possible(I once heard a Section III committee member exclaim that the doesn't give a shyt what Section V says- and he was right). And though that statement is perhaps a bit strongly worded it does convey the self contained thinking of the Code committees. If you go beyond the language that is there you are going beyond the Code. There is no intent in the Code beyond what the language says. This is a mistake. Intent beyond the Code is to be covered by quality programs.
This is why so many interpretations simply say the Code does not address that issue. Too many people are thinking too much into what the Code is saying. They are trying to turn the Code into a cook book.
Bottom line if you are going beyond the Code to understand the intent of the Code you are not thinking Code.
Parent - By welderbrent (*****) Date 10-08-2014 18:09
I'll leave the discussion with your first sentence.  I agree.  I also agree with the rest but think those can be used to help us understand.  I'm not talking about changing from D1.1 to D1.6 to see what the D1.1 'intended'. 

The bottom line (to me) is that you are correct and great care must be involved in making sure each of us truly rightly interprets the applicable code for the use at hand and doesn't try to read our own 'intent' into it. 

He Is In Control, Have a Great Day,  Brent
Parent - - By MBlaha (***) Date 10-08-2014 12:59
One of the problems, is I am here for an outage and I was not brought in until the day the outage started as the QA/QC manager for the customer.

I was aware that the contractor was having problems with the Welder Qualification tests due to the large volume of work going on at this time. I was also aware that failure rate per RT was over 50%.

I was aware that the QC/QA for the contractor took 2 test plates to a different TPI, because we had discussed what was going on with the films, but was under the assumption, (my fault for not checking further at the time) to find out if the RT TPI was not doing proper interpretation of the films. When they found out that the plates, (3" X 8" X 3/8", 3G and 4G, with backing, and with 7018H4R) passed the bend test, they loaded up the balance of the coupons that had failed RT, took them to the 2nd TPI, and had them all bent. Results were that all but 2, I believe passed the bend test. (1 1/2", 1" from the ends per AWS D1.1).
When I questioned how the welding was going so fast with the lack of qualified welders, the QC manager for the contractor told me what they had did, and by now, we are half way though the outage, with 3/4 of the welding already complete.
I spent a couple days trying to find if it was acceptable or not, when I remembered the forum.

The work being performed is reinforcement of diagonal beams, welding 3/4" 588 grade 50 to the existing beams. The weld requirements are 4" on 12", 5/16" fillets and 12" returns on each end. . Having been away from welding for several years other than teaching for the local Technical college, not really being involved in the codes for a couple years, it took a day or so for the 4lb. to smack me in the head and say hey, wait a sec here.
Parent - - By welderbrent (*****) Date 10-08-2014 18:17
Michael,

As you can see, it is not a real easy clarification but I don't think it is that difficult either.  All wording must be carefully considered in the context it is intended. 

I personally don't think that was a proper solution for them to accomplish the work.  Not at least without having a meeting of the minds and getting some input from all parties and reaching a decision.

Now, I personally would prefer the bend tests over the RT.  But once the 'in lieu of' aspect had been accepted that was the criteria that needs to be adhered to until proper alternate specifications/procedures were accepted. 

Hope it all works out for you and the customer.

He Is In Control, Have a Great Day,  Brent
Parent - - By MBlaha (***) Date 10-08-2014 20:00 Edited 10-08-2014 20:08
I finally received an answer from our EOR See below. Thank you everyone. I knew I could count on the forum, even though I like Brent, took a Hiatus from it as well. Certain people just had gotten me to the point, that why bother.

Mike:

The contractor is both correct and incorrect.  They are correct in that they suspect that RT indications may be non-relevant, but they are incorrect in how they addressed the issue.  Let me explain:

Non-relevant indications are common in radiographic examination of groove welds with backing.  If the backing is not fit up very tight (<0.015" clearance) to the base metal, an undercut can occur at each side of the root pass, which looks like lack of penetration or lack of fusion on the radiographic film.  This indication is common enough that it has its own name, "railroad tracks."  It sounds like this condition was verified, when the contractor "cut several of the coupons."  I would like to see photos of the coupon cross section and copies of the rejected film, if they are available.

Although AWS D1.1, Table  4.11 specifies bend tests to qualify welders, and although Table 4.11, note b allows radiography in lieu of bend tests, it is inappropriate to nullify a rejected radiograph with a bend test.  AWS D1.1, Paragraph 6.17.3 indicates that the correct way to evaluate a possible non-relevant indication due to surface conditions would be to blend the surface and reinspect, because the surface condition "may cause objectionable weld discontinuities to be obscured in the radiograph."  In this case, the contractor should remove the backing ring and blend per AWS D1.1, Paragraph 6.17.3.2, without violating minimum wall, and perform a new radiographic examination.  If the indication is truly non-relevant, the new radiography will not show the previous indication.

With this said, I have some concerns from reading the questions below:
1.  AWS D1.1, Table 4.12 lists the omission of backing as an Essential Variable for welder qualifications.  This would mean that a welder qualified with a backing ring would not be qualified for CJP one sided welds without backing.
2.  If backing is going to be used in production, and the backed welds will be radiographically examined, this same issue will arise in the production welds.  The solution to this issue in production, will be to remove backing from production welds or perform ultrasonic examination.

Please feel free to call, if you have any further questions.

EOR's name omitted for obvious reasons LOL

A NCR will be generated. I just wish the EOR has used stronger language than (Inappropriate) so the above reply would have more bite. You are correct Brent, and if the contractor had discussed this with me, I may have gone along with it. Seeing how they just bypassed me, I feel I have to generate the NCR.
Parent - By welderbrent (*****) Date 10-08-2014 20:59
Agreed.  Great news and nice to hear the EOR got onto it in a reasonable time when brought to his attention.

He Is In Control, Have a Great Day,  Brent
Parent - By Joey (***) Date 10-09-2014 04:32
MB

Your EOR is very kind :smile:

To remove the backing plate prior to RT?:surprised: I don't believe that this is a normal practice.
The welder should know if the fit-up condition is not good before the start of test. Otherwise, this will become an alibi for whenever there is an RT fail.
If this practice is acceptable and I'm the EOR, I will request that the Inspector who conduct the test be present during removal of backing plate. Without the presence of Inspector, the root can be repaired to pass the RT. Not only undercut can occur if the backing is not fit properly, I've seen slag trapped between the gap when we cross section it during our betting game (when QC Inspectors don't agree with the type of radiograph defects :twisted:)

Contractor has to pay for inspector's time spent plus the labor cost of worker to remove the backing & there is no guarantee that RT will pass on 2nd attempt. I think it will be much economical to retest the welder using the new coupon and do the bend test:lol:.

~Joey~
- - By 803056 (*****) Date 10-09-2014 01:56 Edited 10-09-2014 02:07
Sooo very interesting.

The welders were tested using a standard plate test, with backing as required by D1.1. I omitted the Figure number for the 1 inch groove plate assembly because it changes depending on the code edition used. In any event, check the footnote. The 2006 edition calls for a 3 inch wide backing if the welds are evaluated using RT.

The bottom line is that a decision must be made before the test is administered. If bend tests are used, a narrow backing can be used. If RT is to be used, a 3 inch backing must be used.

If the test plates used narrow backing, i.e., less than 3 inches, RT cannot be performed per D1.1. Period, exclamation point.

How satisfying. I wished I smoked because if I did I would be lighting a cigar right now.

Lawrence; I'm going to have to owe you that lobster dinner. I'm on a job that is hot, hot, hot. I will be on site until December. I just cancelled my hotel, my flight to Atlanta, and my colonoscopy. I was so looking forward to the latter. I had to put two jobs on hold until this one is completed about the first week of December. I even told my wife I will be missing Thanksgiving this time around. What really ticks me though is that I'll miss Halloween. I had my Halloween suit all picked out. Since I'm playing the part of the invisible man, all I need is my birthday suit! Scotty should like that.

Since this isn't a "code" job, I'm using my test, which is modified as per Lawrence's suggestion. The test is a single bevel groove with a 3/4 inch root. The welders weld the square edge side of the joint first by depositing the fillet weld in the corner. That brings the "root opening" down to about 1/4 inch. Then the remainder of the groove is welded as if it is a V-groove. I get to check the welder's ability to deposit a sound fillet weld with fusion to the root and a V-groove using a single test assembly. Two birds with one stone. I like Lawrence's suggestion because it saves time, but still provides the information I want. This job involves the equivalent of about 480 linear feet of one inch thick CJP groove welds. All done using FCAW-G. All positions, with about 50% in the vertical position. We have a few weeks just to gear up and qualify welders. A bunch of welders.

Best regards - Al
Parent - By ssbn727 (*****) Date 10-09-2014 07:29 Edited 10-09-2014 09:03
480 linear feet? Hmmm, "Them's shipyard numbers" if it's gonna be done daily..." How many welders? How are you gonna map it out? Mostly vertical up? very interesting indeed...:grin::wink::cool: Reads like a fun job Al...:cool:

Btw, I think you earned a Montecristo Torpedo - Cuban of course! No! Not those Dominican clones being sold currently which don't come anywhere near the smoothness and flavor that that real Montecristo has... Although, the Dominican Opus X is a formidable contender (Because they're Cuban seed) also... There used to be and, please correct me if I'm off here but, over in your neck of the woods in Connecticut there were some excellent cigar tobacco grown and may still be growing correct? They use the Tobacco from Connecticut for wrappers (cover layer & Cuban seed also) for some of the best quality domestic and foreign brands but that's a whole different story and I want to avoid steering too far away from the intent of this thread

Mike, It's so good to see you posting again... This is another example of some people using the code and interpreting it for their own purpose - which is to interpret the code incorrectly so they could get the job done, and unfortunately it happens a lot until an alert inspector like yourself notices and says to themselves "Wait a minute! This doesn't look correct, so let's dig deeper."

And if you understand how Al called the mistake they made, it certainly makes sense and most definitely justifies an NCR at the very least... I'm wondering if the EOR understands what Al has pointed out, or if he's even aware of this FUBAR? I mean the initial qualification tests were done incorrectly if the backing strip used (narrow width) was indeed used for RT therefore, voiding all of the passed qualification results that passed also... If the code is to be followed to the letter of the law, and it is a legal document then a retest is required and all of those welds are to removed to start over again causing even more delays...

Unless the EOR officially accepts the original qualifications which is why IMHO, you should run what Al has pointed out by the EOR to CYA... Just make darn sure that every detail is written down, citing the code in detail also with the EOR's signature and stamp in on the acceptance letter to CYA.:eek::twisted::yell::lol::yell::lol::wink::cool: Once again, it's really good to see you posting again Mike!:grin::lol::wink::cool::cool::cool:

Respectfully,
Henry
Parent - - By MBlaha (***) Date 10-09-2014 11:49
Thanks again everyone. Henry, good to hear from you again.

Yes, they did use a 3" X 8" X 3/8" backing  bar. Basically, a test plate without the bevel.
Parent - By ssbn727 (*****) Date 10-09-2014 21:39
No wonder why the RT's came out the way they did... That is a total screw up on their part.:eek: What a waste of metal!

Respectfully,
Henry
Parent - - By Lawrence (*****) Date 10-09-2014 11:57
In case anybody is wondering what Al is discussing with a Fillet/Groove combination test; It's taken from CWB 47.1 Certification of Companies for Fusion Welding Steel.

Here is a slide from another QC training set that makes it more clear.
Parent - By welderbrent (*****) Date 10-09-2014 19:35
I like it Lawrence.  That is similar but modified from the one test in D1.1 for fillet welds.  I think it would make a great all around test.

He Is In Control, Have a Great Day,  Brent
- - By 803056 (*****) Date 10-09-2014 20:05
The difference is that I place the square edge toward the top and the bevel on the bottom. The welder has to deposit the fillet in the overhead position while the remainder of the "grooved" plate is welded in the horizontal. The vertical is welded the same way, the fillet deposited first and must pass visual before proceeding to weld the groove.

Best regards - Al
Parent - - By ssbn727 (*****) Date 10-09-2014 21:50
And adding a 12" restrictor plate makes it even more fun to weld in both overhead and vertical joints... I remember the EB Nuclear qualification structural test was laid out in the same manner as I just described with a single bevel groove which was HY-80 1" T with probably (Don't remember exactly) the same dimensions as shown in Larry's drawing, and no mirrors were allowed for that test.:eek::surprised::grin::lol::yell::twisted::yell::lol::yell::roll::wink::cool: Once one got used to it, the test wasn't that difficult.:roll::wink::grin::cool:

Respectfully,
Henry
Parent - - By 803056 (*****) Date 10-10-2014 00:37
Most welder qualification tests involve a certain amount of learning. Once the test has been passed and one has survived the learning curve, successive tests are easier.

Best regards - Al
Parent - - By Lawrence (*****) Date 10-10-2014 11:39
I also like that the CWB demands two separate restarts on the first two passes.

One restart on the fillet and the other restart on the root that fuses with the beveled edge.

This also makes it necessary to extract TWO ROOT BEND specimens located at each of the restarts and a THIRD face bend elsewhere.

So three coupons altogether.

I've seen guys who sail through the D1.1 inch thick test really struggle with this little 3/8" assembly until they stop and listen to a few pointers.

But the fact is...  If it takes special attention to make this test pass, this is how you need to view production weld quality also.  It should not be special attention... it should be every day craftsmanship.

It really hammers home the point that structural GMAW is not just a very simple thing... It takes attention to details to make it high quality.
Parent - - By 803056 (*****) Date 10-10-2014 20:48
I saw the CWB test many years ago and it made sense to me on the spot.

Al
Up Topic American Welding Society Services / Certifications / RT vs. Bend
1 2 Previous Next  

Powered by mwForum 2.29.2 © 1999-2013 Markus Wichitill