Not logged inAmerican Welding Society Forum
Forum AWS Website Help Search Login
Up Topic Welding Industry / Technical Discussions / Weld Progression
- - By Blaster (***) Date 11-20-2014 23:03 Edited 11-20-2014 23:05
I had an experienced guy in a training program tell me that he was welding with a vertical up weld progression and was using the back stepping technique.  His trainer insisted that he must stop immediately and start at the bottom and weld to the top as "welding downhill" was not permitted. 

Now my first reaction at hearing this was :eek:

But then I figured I would ask here to make sure I am not overlooking something.  I say backing stepping down the vertical joint has nothing to do with direction of weld progression.

AWS A3.0 Downhill = Welding with a downward progression
AWS A3.0 Uphill = Welding with an upward progression

What do you say?
Parent - - By welderbrent (*****) Date 11-20-2014 23:19
Blaster,

Let's explain this a little further to make sure of this description...

So, we have, hypothetically, a 24" vertical weld in 1/2"  butt joint groove weld (just to give us all some place to start even if this is not exactly what he had).  If one laid it out in 6" sections, mentally at least, and started 6" from the top and welded vertical up to the top, then went down 12" to allow for another 6" weld pass and started the weld and welded vertical up and tied in with the first 6" pass so now there is a 12" weld completed by welding 2 sections 6" long vertical up but going down further each time and coming back up to the previous weld (boy, I'm even confusing myself!!).  Continue this operation 2 more times until we have completed 4 sections of weld each one 6" long which were welded individually in the vertical up position but overall came from the top down.  CORRECT??  I hope! 

NO!! That does not constitute a vertical down progression weld.  Do you really want me to say what I really think.  Talk about over thinking...NO, UNDER THINKING the code and the applicable application of downward progression opposed to upward progression.  Can I have 5 minutes with that guy?  PLEASE! 

Now, all that emotion aside, there may be other reasons that the described weld procedure may not be preferred.  BUT, it is not because downhill is not permitted. 

He Is In Control, Have a Great Day,  Brent
Parent - - By Blaster (***) Date 11-20-2014 23:40
Your example is a correct description of the situation Brent.  Thanks!

I back step vertical progression welds all the time and have never had anyone question it.
Parent - By welderbrent (*****) Date 11-21-2014 00:32
Downhill, downward progression, vertical down, are all descriptive of a weld pass that begins at the top of a vertical joint and the welding progresses in a downward direction until the bottom is reached.

NOT, a series of vertical up welds that are backstepped from the top down. 

He Is In Control, Have a Great Day,  Brent
Parent - - By welderbrent (*****) Date 11-21-2014 00:44
Hey, this guy would be great on a field job.  NOW, I can start 12" up from the bottom of the joint, weld down to the bottom of the joint, then go up 24" and weld down another 12" tying in with the first weld pass and claim I was welding vertical up.  THIS IS GREAT!  Why didn't I think of that? 

OH, I did.

He Is In Control, Have a Great Day,  Brent
Parent - By welderbrent (*****) Date 11-21-2014 23:23
Please note:  the above was in sarcastic jest utilizing the reverse application of the OP's concern of a trainer's interpretation of vertical progression in order to fictitiously justify vertical down welding where it is not qualified, certified, nor approved by code or engineer because I would have been, according to that interpretation, welding in an upward progression.

Clear as mud?  Good!
Parent - - By S J (**) Date 11-21-2014 04:19 Edited 11-21-2014 04:29
What is the Navy definition of up?

"Up is a direction extending vertically outward from the center of the earth, perpendicular to the tangent of the surface of the earth, extending infinitely outward into space."

Caution is advised when attempting downward weld progressions with thicker material cross sections.  My advice would be to only allow such techniques after proper macro or X-Ray evaluations have confirmed full penetration and complete fusion occurs with any downhill welding process.

However, for some folks prone to nit-pic precise definitions, crack jokes, and or/avoid reality, the definition of downward might become confused - assuming the weld travel center line crosses through the mid-point at the earth's center.

The bottom line at the end of the day mostly likely would be determined by the material type and thickness.

Now this subject has me wondering about the proper geometric definition of upside down.  All I remember is catching my shirt and hair on fire during two or three lab projects - that were completed on plate and not pipe.  Fortunately, we do have the AWS position nomenclature specification, and this should suffice provided that R does not always mean "rotated" absent the proper positioning equipment.  Then we have the folks that perform some pipe welds rotated together with some not-rotated pipe welds.
Parent - - By ssbn727 (*****) Date 11-21-2014 09:28
AWS A3.0 clearly states:

1.) downhill, adv. Welding with a downward progression.

2.) backstep sequence. A longitudinal sequence in which weld passes are made in the direction opposite to the progress of welding. (See Figure23(A). Now I don't know if this definition has been revised but this is the definition from A3.0 2010...

3.) uphill, adv. Welding with an upward progression.

Plain and simple... And the key word in the definition for the backstep sequence is: "Longitudinal" and, the last time I checked in AWS A3.8 2010 is associated with this term below:

longitudinal sequence. The order in which the weld passes of a continuous weld are made with respect to its length. See also backstep sequence, block sequence, cascade sequence, continuous sequence, and random sequence. See Figure B.23(A) through (C).

So the AWS A3.0 2010 IMHO, doesn't acknowledge the backstep technique with a vertical progression which does pose more questions as to whether or not the technique is limited to using the technique in a longitudinal sequence only...:eek::confused::roll: More questions... :razz: Okay let's have some discussion about this technicality.:twisted::yell::lol::yell::grin::cool:

Respectfully,
Henry
Parent - By SCOTTN (***) Date 11-21-2014 13:39
As we all know, a "vertical up" weld starts at the bottom of the joint and progresses upwards, and a "vertical down" weld starts at the top of the joint and progresses downwards.

I personally see no issue with using the back step sequence that has been described.  Basically, the back steps have been made opposite of the weld progression.  As described, the back steps progress downward, but the weld progression within each back step progresses upwards. In my humble opinion, this is a joint that has been welded "vertical up", and I thought that Brent did an excellent job with his explanation. 

Also, I think that Henry brought up a good point with the A3.0 definition of longitudinal sequence.... the order in which the weld passes of a continuous weld are made with respect to its length.  With the back stepping sequence of the vertical weld, the meaning of "longitudinal sequence... "the order in which the weld passes of a continuous weld are made with respect to its length" has been met, but the welds are within a latitudinal sequence, not longitudinal. 

Henry made a very valid observation and pointed out that A3.0 doesn't acknowledge the back step technique with a vertical progression, and as we all know, longitudinal relates to east and west, whereas whereas latitudinal relates to north and south. 

For me, the bottom line is that while A3.0 only acknowledges the back step technique with a longitudinal sequence, I see nothing that prohibits using a back step technique with "vertical up" welds, as long as the vertical weld progression is upwards.
Parent - By WeldinFool (**) Date 11-21-2014 19:06
You are correct, sir.
- - By 803056 (*****) Date 11-21-2014 20:19
The A3.0 definition is adequate to define the welding sequence of a vertical joint using the back step technique.

The term longitudinal is relative to the longitudinal axis of the weld. This is similar to the term used to define a longitudinal crack.

I have used the sequence, i.e., back step, described for years when welding longitudinal and vertical seams to minimize distortion. the position of the groove weld or fillet weld has no bearing.

Best regards - Al
Parent - - By ssbn727 (*****) Date 11-21-2014 22:44 Edited 11-21-2014 22:46
I have too Al, but my point is that the definition has a term that is at the very least a term one can possibly be mislead into thinking that "longitudinal" means exclusively horizontal which we both know isn't true... Many joints inside and outside both the missile and reactor compartment in a nuke boomer sub are vertically welded using the backstepping technique and I personally welded quite a few vertical as well as horizontal joints using that technique... I bought up the term "longitudinal" being used as part of the definition which IMHO, should be replaced with a more appropriate term instead... Maybe this will be bought up at the next committee meeting or not, but at least a query should be made in order to seek clarification.:eek::roll::twisted::yell::lol::yell::grin::smile::wink::cool:

Respectfully,
Henry
Parent - - By 803056 (*****) Date 11-22-2014 00:42
Hello Henry;

I didn't have a problem with the definition. I though you did a good job of explaining the meaning of longitudinal.

Best regards - Al
Parent - By ssbn727 (*****) Date 11-22-2014 02:01
I hear you loud and clear buddy... I just wanted to point out that the term longitudinal being used in the manner described as part of the definition for backstepping technique doesn't make sense with the way it is written and from prior experience for which I'm glad that there are other folks besides myself who have performed this technique out in the real world... And know that the technique is not restricted to being deposited on horizontal joints only... The illustrations also allude to suggesting that the use of the term longitudinal is used to represent horizontal weld deposits and is limited to that position exclusively when that isn't the case... That's why I bought it up for discussion and I knew that you would chime in to let us know your thoughts on the topic.:grin::smile::cool:

Respectfully,
Henry
Parent - - By kcd616 (***) Date 11-22-2014 06:17
Al
back step, described for years when welding longitudinal and vertical seams to minimize distortion.
how I learned
might be wrong
just my thoughts
sincerely,
Kent
Parent - By ssbn727 (*****) Date 11-22-2014 07:32
Hey Kent,

How's it going over your neck of the woods?

Respectfully,
Henry
Parent - By 803056 (*****) Date 11-22-2014 14:32
Hello Kent;

I'm going to have to answer this in two separate responses. I have to pack so I can catch a train back to New England. However, I started and so here is the first half of the response.

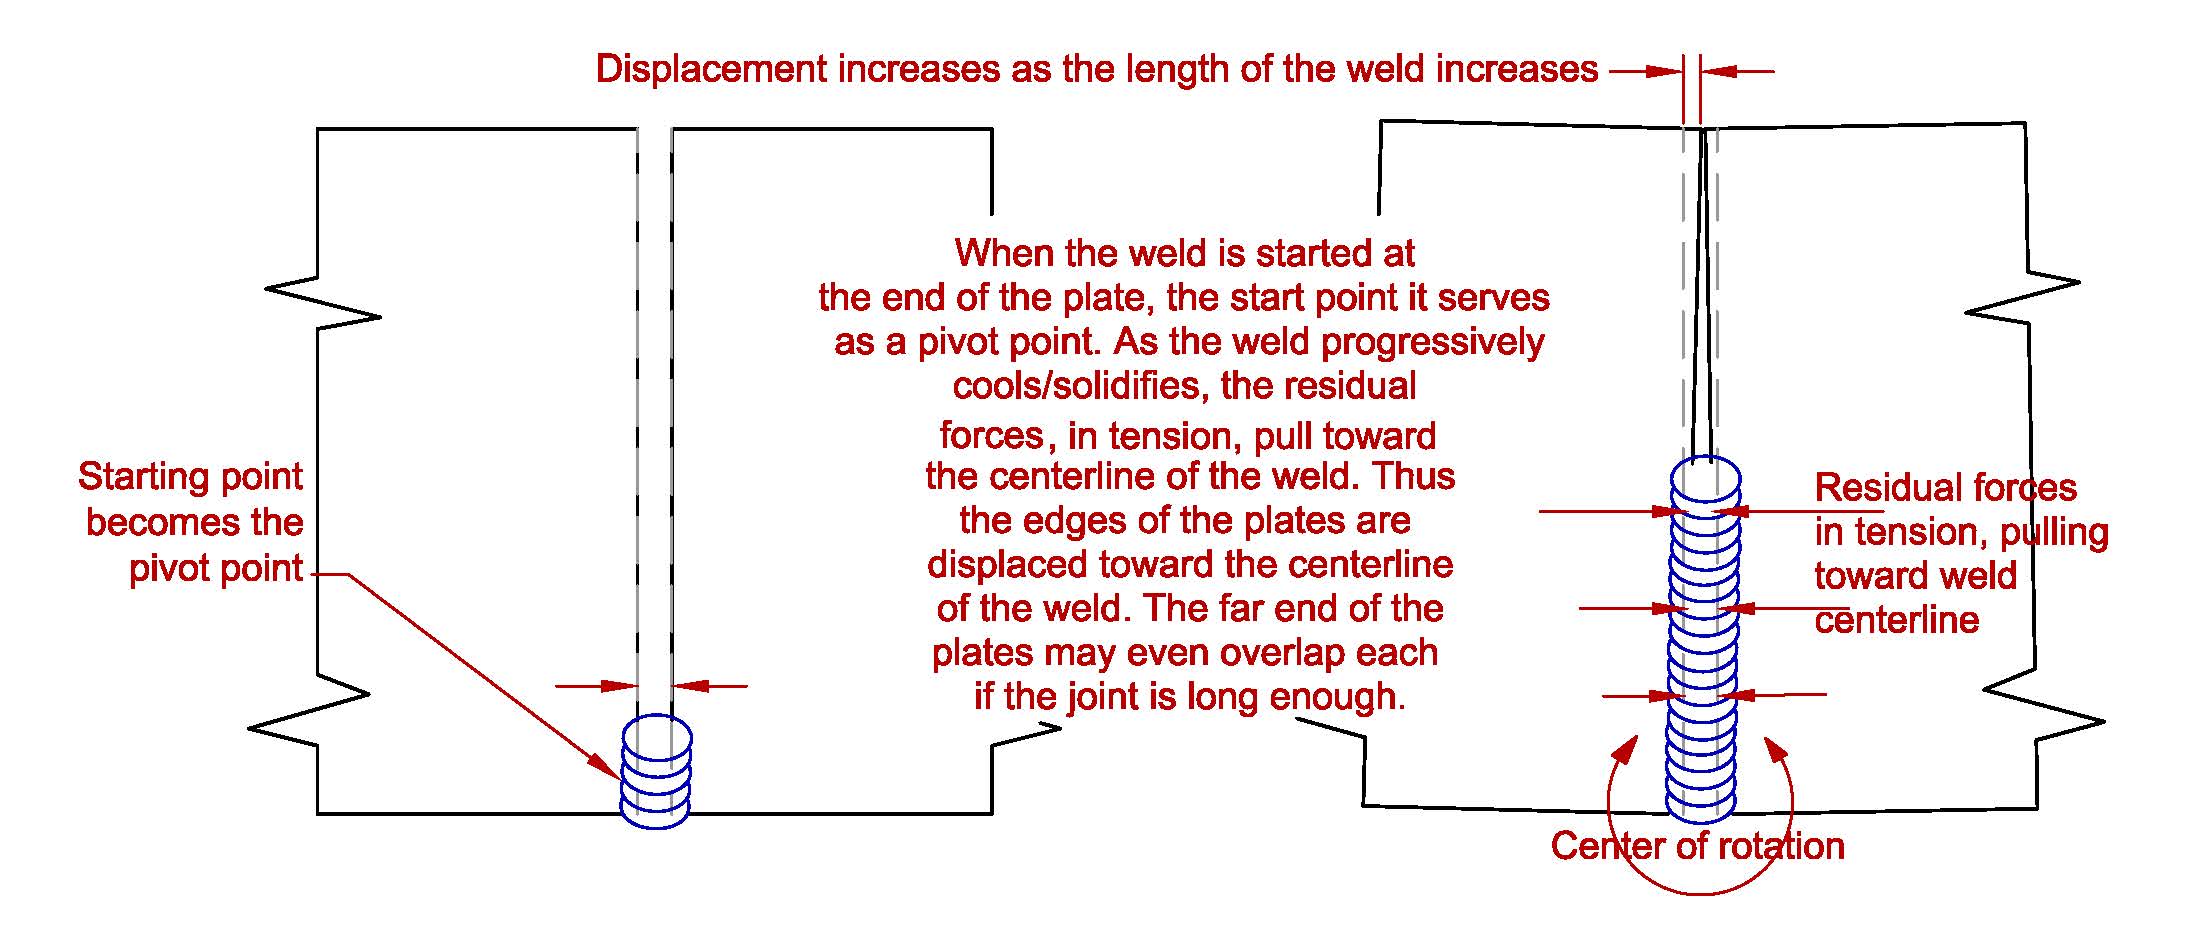
As indicated by the sketch, the location of the beginning of the weld serves as a pivot point of the plate displacement resulting from the residual stresses. I am ignoring the longitudinal stress, I am simply considering transverse residual stress since it is responsible for the displacement of concern.

As the weld progresses toward the far end of the joint, transverse residual stresses, acting like a spring in tension, pulls the edges of the plates toward the weld centerline. Again, simplifying the theory to make it easier to show, the stress caused by the weld cooling and contracting, the residual stress is on the same order of magnitude as the yield strength of the base metal and the weld. If this was A36, the R.S would be 36 000 pounds per square inch. If a higher strength low alloy steel was being weld, the RS would be equal to the YS of the base metal, 50 ksi, 70 ksi, etc. It all depends on the strength of the base metal being welded.

From the magnitude of the residual stress, you can see that it is nearly impossible to resist the forces of the residual stress without taking extreme measures, i.e., strong backs, etc. The longer the weld, the greater the problem of distortion.

My example is considering a groove weld consisting of a single pass weld. The distortion is at its worst while making the root bead. Once the root bead is in place, it offers resistance to the forces pulling the plates toward the weld centerline, but there is still residual forces at work and the effects are additive for every weld bead and weld layer deposited in the groove. The effects diminish because each weld layer offers more and more resistance to the tensile forces introduced by each new weld layer. To simplify; the root bead might result  in 1/8 inch displacement over the length of the joint, the second layer might result in 1/16 inch displacement, the third layer 1/32 inch, and so on.

We are ignoring the residual stresses in the longitudinal direction for this discussion, but as you know, the residual forces in the longitudinal direction cause the ends of the plates, at opposite ends of the groove weld to pull upward. The transverse residual stresses (which we are talking about) pull the side plate upward as well. The bottom line is that the sum effects of residual stresses are complex and affect the part geometry in all direction. Considering the transverse stress and longitudinal stresses makes it a little easier to understand.

The crazy part is that the base metal only needs to attain a delta "T" (temperature difference) of about 220 degrees to reach the yield point of the steel and induce permanent distortion. We use the principle whenever we use heat to camber a beam or to flame straighten a member that has excessive distortion. My point is that we do not have to heat the steel to a high temperature to see the results of the residual stresses when cambering or heat straightening. I usually use about 800 degrees F as the maximum temperature to ensure no metallurgical damage results from the operation.

I'll get back to this thread after lunch. It is time to pack and head out to the train station.

Best regards - Al
- - By 803056 (*****) Date 11-22-2014 18:51
Kent;

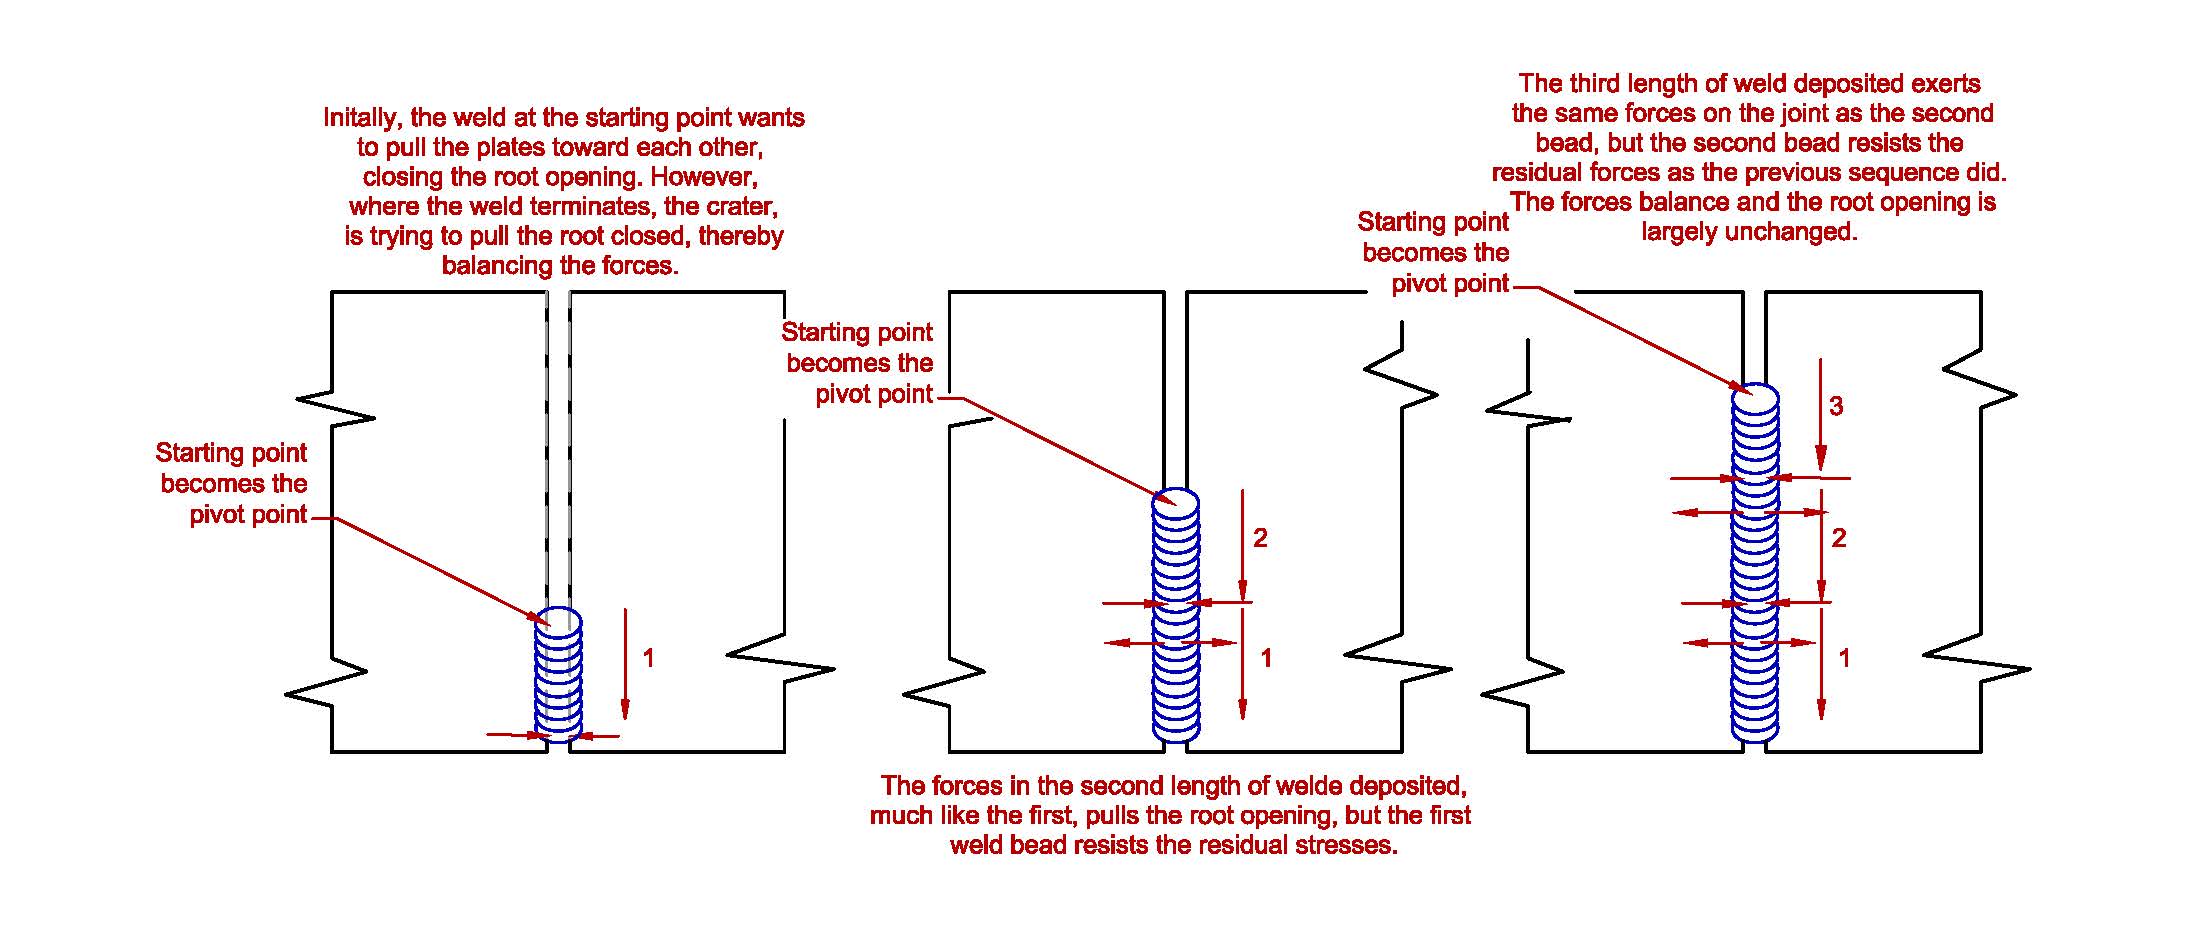
As promised; here is the next sketch depicting the back step technique. It is very effective at maintaining the require root opening and keeping the far end of the joint where it is suppose to be.

Forgive me if the sketch and my writing are short and to the point. This train car is bobbing, weaving, and bouncing like a bronco!

Anyway, when the first increment of weld is deposited, the starting point is the pivot point. As the weld cools and contracts, it pulls on the adjacent base  metal. The tendency is to open the root opening at the far end. However, the length of weld deposited is relatively short, so the effect is manageable. The next length of weld is deposited, the starting point is now the new pivot point. As the 2nd weld progresses toward the first weld bead it is cooling and contracting, but the residual forces are resisted by the 1st weld deposited, so the movement is nearly zero. The 3rd weld bead is initiated beyond the starting point of bead 2. The new point of initiation for bead 3 is now the new pivot point. It too results in residual forces that pull in on the root opening, but those forces are countered by both the 1st and 2nd beads deposited. This sequence is repeated several times until the far end of the joint is reached. The end results is that the far end of the joint, i.e., the root opening is nearly the same as it was when the joint was fitted together.

In this post, the issue was welding vertical downhill, but using the back step technique to control the joint distortion. To see how that works just rotate the sketch 180 degrees so that the weld is initiated near the top of the joint and progresses downward, but each weld increment is still welded vertical uphill.

Welds are not all that intelligent. Rarely do they realize whether they are being deposited using uphill or downhill progression. Down hill progression will reduce the heat input and can possibly result in fusion type discontinuities. However, discounting the fusion type defects, if the weld is sound, the mechanical properties (other than notch toughness) will meet the minimum specified by the welding standard.

Best regards - Al
Parent - - By waqasmalik (**) Date 10-12-2015 17:22
Thank you for very informative images 803056. Do you have images of this technique being applied to pipe welding to maintain a root gap?

Thank you again.
Parent - - By 803056 (*****) Date 10-12-2015 18:12 Edited 10-12-2015 18:42
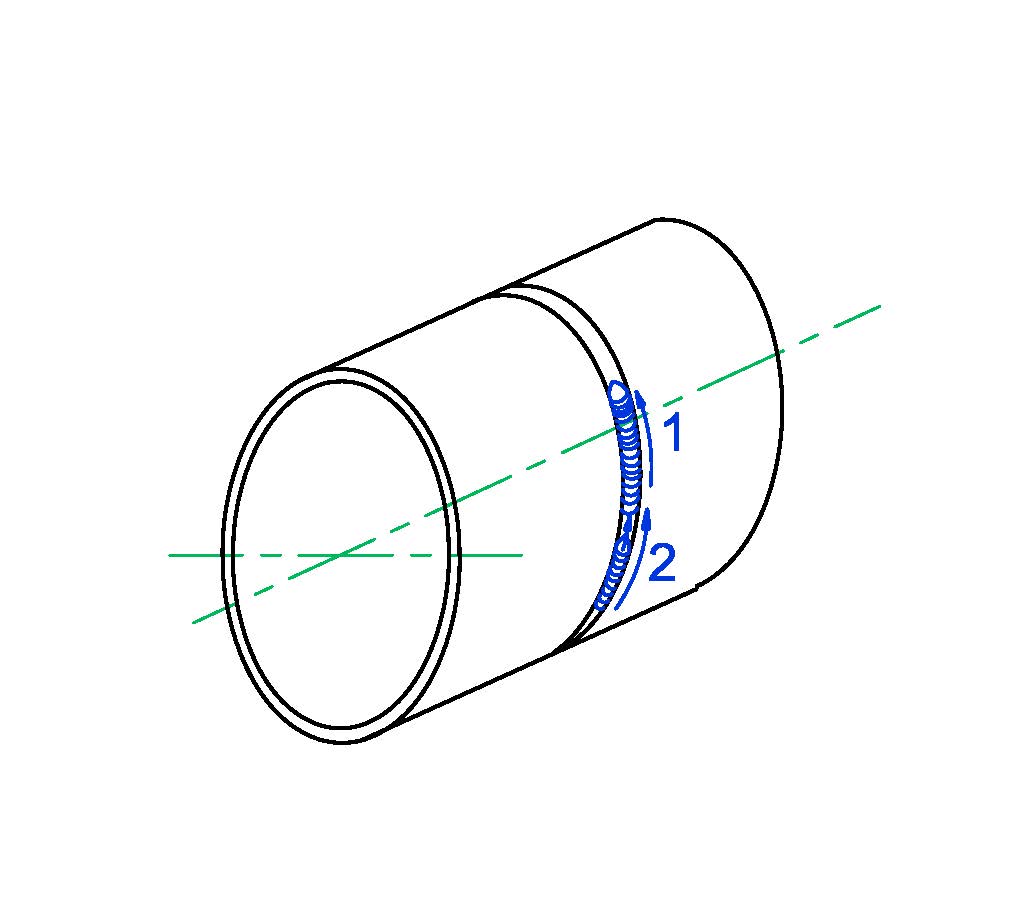
Just use the last sketch and imagine the joint is wrapped around a piece of pipe to form a circle. Make sure the tack welds are long enough to keep the root from closing. Grind the weld crater where you just terminated the initial weld. Move 3 inches or so and initiate the weld and progress toward the weld crater you just ground and feathered. Now grind and feather the beginning of the weld just made, leapfrog over it skipping 3 to 4 inches, start the weld and progress toward the weld you just ground. It would be good if you could space your tack welds so the weld can start on a tack weld that is ground and feathered.

You didn't mention the welding process you are using. I assumed GTAW, but if you are using SMAW, just increase the distance you move (leapfrog) by the length of weld you can deposit easily with one electrode.

You can start two welds, on opposite sides, to balance the residual stress that will make the pipe take on the shape of a banana. Each length of weld can progress around the pipe using the back step technique. The two welds will balance the residual stresses, the back step will reduce the tendency to close the root opening.

Al
Parent - - By waqasmalik (**) Date 10-13-2015 13:56
Tack welds are necessary prior to back step technique? Also will this technique work on aluminum large diameter pipe welding with manual GTAW especially if very low levels of porosity is required ( Grinding many times may introduce contaminant)?

Thank you
Parent - - By 803056 (*****) Date 10-13-2015 14:30
Tack weld are necessary and if grinding aluminum, do not use aluminum oxide wheels. Use a vixen cut carbide rotary file. Keep it wet with isopropyl alcohol. Wire brush with a stainless steel brush.

Al
Parent - By waqasmalik (**) Date 10-13-2015 17:43
Yes, Thank you sir.
Up Topic Welding Industry / Technical Discussions / Weld Progression

Powered by mwForum 2.29.2 © 1999-2013 Markus Wichitill